Layla’s Leash
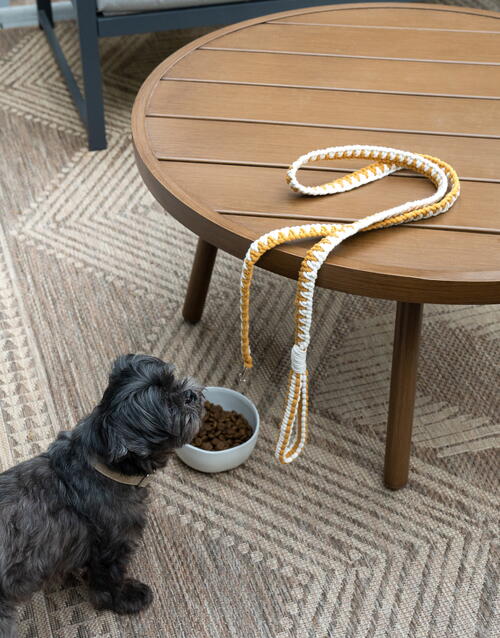
This project is for all of you dog lovers out there! This stylish dog leash features only a few simple knots and is designed to give your pup some extra flair while keeping them safe and secure on walks. If you’re looking for a project where you can comfortably sit while working, this may be a great one to tackle. I love making these leashes as gifts for friends, and what’s even more fun is customizing the colors to match their pup’s personal style.
Materials and Tools
- 48 feet (14.6 m) of 5mm braided cotton cord in off-white/natural color
- 44 feet (13.4 m) of 5mm braided cotton cord in color of your choice (I use Mustard Yellow in this tutorial)
- One swivel snap hook (approximately 2¾ inches [70 mm] long)
- Clipboard
- Measuring tape
- Scissors
Knots and Techniques
- Bundling Cord
- Reverse Lark’s Head Knot
- Square Knot
- Gathering Knot
Finished Size
- 5½ feet (1.7 m) long by 1 inch (2.5 cm) wide
Preparation
- Horizontal Setup
Cut List
- 1 piece, 44' (13.4-m) long, of 5mm braided cotton cord in Mustard Yellow (or color of your choice)
- 1 piece, 44' (13.4-m) long, of 5mm braided cotton cord in off-white/natural color
- 1 piece, 4' (122-cm) long, of 5mm braided cotton cord in off-white/natural color
Instructions
-
Attach the snap hook to a clip board. Take the 44-foot (13.4-m) piece of colored cord and use the Bundling Cord technique to bundle up one end until there is about 10 feet (3 m) of cord remaining. Then measure 8 feet (2.4 m) from the remaining end, and fold the cord in half at that point. Create a Reverse Lark’s Head Knot around your snap hook, ensuring that the bundled end is on the outside of your snap hook and the 8-foot (2.4-m) end is on the inside.
-
Repeat step 1 with the 44-foot (13.4-m) length of off-white cord. Make sure that when attaching to the snap hook, the shorter ends of both pieces of cord are in the center. These two cords will be our filler cords for the entire project.
-
Take the left cord and create a loose “4” shape over the second cord. Wrap it behind that cord, and pull the bundle through the loop created. Tighten this knot so it sits right below the Reverse Lark’s Head Knots created in steps 1 and 2.
-
Repeat by creating a loose “4” shape again with that same cord, but this time cross it over both center cords, wrap it behind these two center cords and pull the bundle through the loop created. Tighten to the knot above.
-
Repeat steps 3 and 4, but this time create a loose backward “4” shape with your farthest right cord. Take the right cord and cross it over the cord closest to it. Wrap it behind that cord, pull the bundle through the loop created and tighten. Do the same with both center cords just as you did on the left.
-
Continue this pattern by alternating the left cord and the right cord as your working cords all the way down for 5 feet (1.5 m). Adjust the leash on your clipboard as necessary. Pull cord from each bundle as needed so you have a comfortable amount of cord to work with.
-
Once this first section of knots measures at 5 feet (1.5 m) in length, it is time to create the handle of your leash. Measure 2 inches (5 cm) down from your last knot and create a Square Knot using the same working cords. From there, continue making Square Knots until this section of Square Knots measures at 15 inches (38 cm) in length.
-
Remove the leash from the clipboard and fold this section of Square Knots in half. You will see the handle start to form.
-
Take the two filler cords and feed them through the center of the 2-inch (5-cm) opening you created.
-
Using your working cords, create Square Knots around all six cords until you hit the section of knots below.
-
Take the 4-foot (122-cm) three-strand off-white piece of cord and tie a Gathering Knot around this most recent section of Square Knots.
-
Make sure this knot is nice and tight! Once you feel it is secure, cut off all the ends as close to the Gathering Knot as possible. You can also use the tip of your scissors to help push any excess ends into your Gathering Knot for a cleaner look.
Credit:
Reprinted with permission from The Complete Beginner’s Guide to Macramé by Alisha Ing. Page Street Publishing Co. 2024. Photo credit: Alisha Ing and Alyssa Vela.
Read NextDIY Puppy Paw Cleaning Rag


