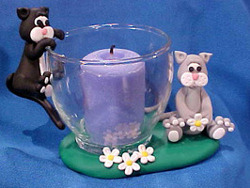
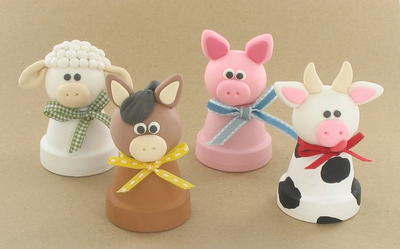
4 Barnyard Polymer Clay Ideas
Old McDonald had a farm, but you are going to have even more fun when you learn how to use polymer clay to create this squadron of barnyard friends. The Clay Pot Farm Animals is an adorable collection of simple clay projects that will moo, bah, and oink their way into your heart. These too cute clay project ideas would make fantastic decorations for your front porch or entryway this fall. Easy to make and even easier to customize, these cuties could easily double as holiday projects with the right amount of flair.These clay pot farm animals from Polyform make great craft ideas for clay pots. Use our polymer clay tutorials to make a pig, horse, sheep, and cow out of clay.


You can find this project, as well as many other Polymer clay tutorials, in our free eBook, 24 Polymer Clay Tutorials: Polymer Clay Jewelry, Decor and More! Find clay project ideas to decorate the home, give to friends, and more in this adorable collection of clay craft ideas.
4 Barnyard Polymer Clay Ideas
Materials:
- Pluffy™:
- Beige - 4 oz-- 1 block
- Black - 4 oz-- 1 block
- Pink - 4 oz-- 1 block
- Brown - 4 oz-- 1 block
- Hot Pink - 4 oz-- 1 block
- White - 4 oz-- 1 block
- Tool Set
- Four 1 ½” mini clay pot
- Acrylic craft paint: Black, White, Brown, Pink
- Paintbrush
- Ribbon (optional)
Instructions:
Preheat oven to 275°F for perfectly cured clay. Condition each color of clay for at least 2 minutes before you use it. For best results, clean hands in between colors.
Cow:
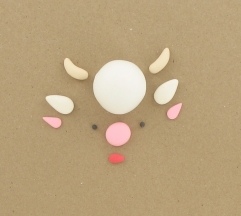
- Paint flowerpot white. Allow to dry.
- Paint black spots.
- Make 1 ¼” white ball and press on flowerpot for head.
- Make ½” pink oval and press on for snout. Use tool to mark nostrils.
- Make two 1/8” black balls and press on for eyes.
- Make two ½” beige teardrops and press on for horns.
- Make two ¾” white flat teardrops. Make two 1/2 pink thin teardrops and press on white teardrops. Press on head for ears.
Horse:
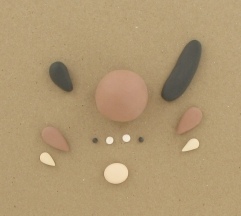
- Paint flowerpot brown. Allow to dry.
- Make 1-1/4 brown ball and press on flowerpot for head.
- Make 1/2 beige oval and press on for snout. Use tool to mark nostrils.
- Make two 1/4 white balls and two 1/8 black balls. Press on for eyes.
- Make 3/4 black teardrop. Press on top of head for hair. Make 1/2 x 1/1/2 black strip and press on back of head for mane. Use tool to press in lines.
- Make two 3/4" brown flat teardrops. Make two 1/2 beige thin teardrops and press on brown teardrops. Press on head for ears.
Pig:

- Paint flowerpot pink. Allow to dry.
- Make 1-1/4 pink ball and press on flowerpot for head.
- Make 1/2 pink oval and press on for snout. Use tool to mark nostrils.
- Make two 1/4 white balls and two 1/8 black balls. Press on for eyes.
- Make two 3/4" pink flat teardrops. Make two 1/2 hot pink thin teardrops and press on pink teardrops. Press on head for ears.
Sheep:
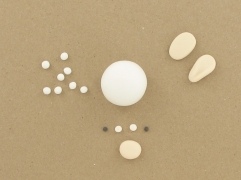
- Paint flowerpot white. Allow to dry.
- Make 1-1/4 white ball and press on flowerpot for head.
- Mix beige and white to make light beige. Make 1/2 light beige oval and press on for snout. Use tool to mark nostrils.
- Make two 1/8 black balls and press on for eyes.
- Make two 3/4" light beige flat teardrops. Press on sides of head for ears.
- Make approximately forty 3/8 - 1/4 white balls. Press on head.
- Bake all of the farm animals according to package instructions. Allow to cool. Tie on ribbon if desired.
Find even more clay projects in our full collection of Polymer clay ideas!
Read Next4 Barnyard Polymer Clay Ideas
Your Recently Viewed Projects
Thanks for your comment. Don't forget to share!
Mistress of All Ev il
Oct 20, 2017
I cannot get over how cute these are. I haven't worked with clay yet, but I might have to pick this up as a new hobby because I REALLY want to decorate my place with an army of these.
Hannah
Oct 20, 2017
These are adorable! These clays are those that can be bought from a bookstore?
mulberrygalprinces s
Oct 26, 2016
These are just too cute. I have been working with Clay for a few months now but only making jewelry items. I have not attempted any characters or dolls. This has me excited though. These would make great gifts. And with a little imagination, I am sure you could make them into other animals. Dogs, cats, etc. thank you for sharing.
cncgirl00
Apr 27, 2012
These are adorable! I'm going to add a jingle bell to the inside when I make this.
gramsof2ks 7990351
Aug 13, 2011
I just love these farm animals, they are so cute, i add them to my packages, as gifts.
monktonmama
Jul 17, 2011
I love this and would like to modify it to do with my toddler. I will use pom-poms, felt, and glue-on eyes.
angeltea9 9248850
Jul 16, 2011
Yeah I agree-They are Really Cute.I collect Pigs & have 2 Cows,But These Are All Too Cute! I'll have to make some too! : )
CreativityGoddess
Jul 07, 2011
Hi katzdu4 1871934 - According to the instructions, it appears that you put the head on the pot and then bake it. Hope this helps! -The editors of FaveCrafts
dotsiem
Jun 07, 2012
I don't think you glue first - the glue in a hot oven wouldn't hold up. I think you glue the head on the clay pot afterwards.
Member 15424
Jun 21, 2011
These are just the cutest things they really make you want to make them all.
Report Inappropriate Comment
Are you sure you would like to report this comment? It will be flagged for our moderators to take action.
Thank you for taking the time to improve the content on our site.