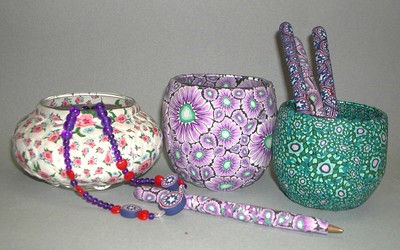
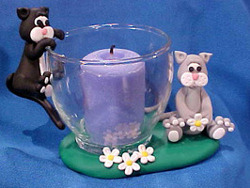
Cat Votive Holder
Follow Becky Meverden's great instructions on how to make a votive holder. The cats on this piece are just so cute. This project takes some time to do but once you're finished you can have it out for everyone to see.

Materials:
- 3 oz. each Kato Polyclay: green, white, black, yellow, red
- Pink clay: 9/32" ball white + 1/8" ball red
- Gray clay: 1-1/2" ball white + 7/8" ball black
- Votive candle holder
- 2 straight pins
- Paintbrush
- Round toothpick
- E6000 adhesive
- 2 glass or ceramic objects for propping (coffee cups)
- Circle template (optional)
Steps:
- Condition clay according to manufacturer's instructions.
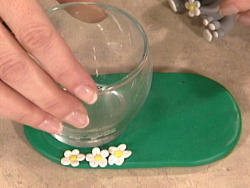
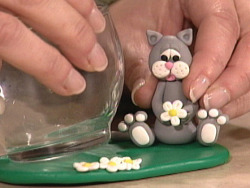
- For the base, flatten a 1-5/8-inch ball of green into a 3-3/4" x 2-1/2" oval. Press the votive into the left side of the base.
- For the daisies, flatten five 1/8-inch balls of white into teardrops. Use a toothpick to indent each petal. Press the narrowest ends of each petal together to form a flower.
- Roll a 3/32-inch ball of yellow and press into the center of the petals. Make four flowers. Press three onto the base in front of the votive and put the extra one aside for later.
- For the kitty's body, roll a 13/16-inch ball of gray into a cone. Press a straight pin halfway into the top of the body to stabilize the head.
- For the legs, roll two 1/2-inch balls of gray into 1-inch-long tapered logs. Press the widest end against a flat surface to shape into a foot. For the pads, flatten two 3/16-inch balls of white into ovals and press onto the end of each foot. For the toes, roll six 3/16-inch balls of gray. Roll six 3/32-inch balls of white and press onto each toe. Press three toes to the top of each foot. Press legs to both sides of the body.
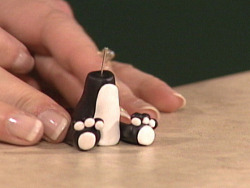
- For the arms, roll two 3/8-inch balls of gray into 1-inch-long tapered logs. Use your finger to flatten the widest end slightly. Use a toothpick to indent two finger lines in each hand. Press the arms onto both sides of the body.
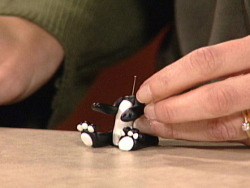
- For the head, roll a 11/16-inch ball of gray into a rounded triangle. For the eyes, flatten two 1/8-inch balls of white into teardrops and press onto the head. For the pupils, flatten two 1/16-inch balls of black and press onto each eye. For the eyebrows, roll two 3/32-inch balls of gray into tapered logs and curl above each eye.
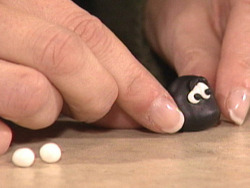
- For the snout, flatten two 1/4-inch balls of white. Press together slightly and press onto the head. Use a toothpick to make holes in the snout. For the mouth, use the blunt end of a paintbrush to make a hole under and in the center of the snout. Roll a 1/8-inch ball of pink and use the paintbrush to press into the hole.
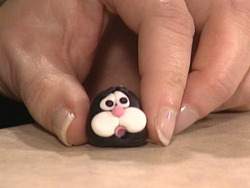
- For the nose, flatten a 3/32-inch ball of pink into a triangle and press onto the center of the snout.
- For the ears, flatten two 7/32-inch balls of gray into triangles. Press onto both sides of the head. Use the blunt end of a paintbrush to indent each ear. Press head onto the top of the body.
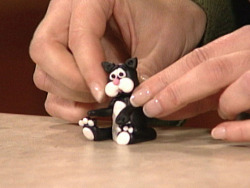
- For the tail, roll a 2" x 3/16" log of gray. Press onto the back of the body.
- Place the extra daisy into the hands of the cat. Place the cat onto the base.
- For the black cat's body, roll a 13/16-inch ball of black into a cone. Flatten a 3/8-inch ball of white into a 1-inch-long oval. Press onto the center of the body. Press a straight pin halfway into the top of the body to stabilize the head. Continue to make this cat as the gray cat above, only use black clay.
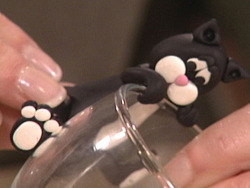
- Gently remove votive from base. Place the black cat with its hand curled over the top onto the votive. Lay the votive on its side with the cat on top and prop between two coffee cups to prevent it from moving during baking.
- Bake votive and base in a 275 F degree oven for 30 minutes. When cooled, glue votive to base. Remove the black cat when burning a candle to ensure the clay doesn't burn.
Read Next4 Barnyard Polymer Clay Ideas
Your Recently Viewed Projects
Thanks for your comment. Don't forget to share!
mayzie07 9959734
Apr 27, 2012
Is there any kind of clay you can use that would be food safe, to use as cake decorations?
sandy Q
Jul 31, 2011
this would be very cute on a larger scale on a fish bowl with a goldfish in and given to a child or decor for a party. also for a cat lover with fish floating candles if they exist.
mayzie07 9959734
Apr 27, 2012
You could use those silicone ice cube trays to make your candles. I've seen them in fish shapes. Pour hot melted wax into molds, cool and pop them out. They should float, or put them into a bowl filled with clear gel wax.
Crafter 5237235
Aug 16, 2010
I saw something siimilar on Carol Duvall years ago. This is soooo cute!
Report Inappropriate Comment
Are you sure you would like to report this comment? It will be flagged for our moderators to take action.
Thank you for taking the time to improve the content on our site.