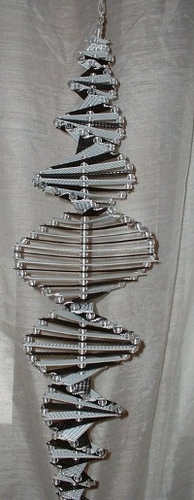
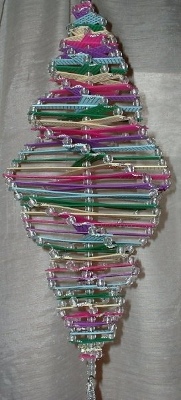
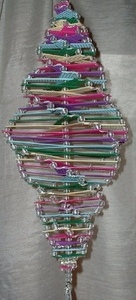
Plastic Canvas Wind Spinner
This garden decoration is beautiful and unique! Use these free patterns from Amy Lynn for plastic canvas to make wind spinners to hang outside. Use whatever colors you like and watch it spin in the wind.
Materials:
- 1 pair of scissors
- 1 yarn needle
- 232 Clear "Pony Beads"
- 1 18 inch wire
- 5 sheets of different color plastic canvas
-
1 Silver/white Metallic Cord
Instructions:
-
First we have to cut our plastic canvas into the sizes we need. For my example I'm going to use pink, purple, blue, green and yellow.
-
The pink count out and cut 2 of 5 square across by 5 square down, creating square pieces. Cut out 4 of 5 square across by 15 square down pieces. Cut 4 of 5 square by 25 square down pieces. Cut out 4 of 5 square by 35 square down pieces. Cut 2 of 5 square by 45 square down pieces.
-
The purple cut out 2 of 5 square across by 7 square down, creating square pieces. Cut out 4 of 5 square by 17 square down pieces. Cut down 4 of 5 square 27 square down pieces. Cut out 4 of 5 square by 37 square down pieces.
-
The blue cut out 2 of 5 square across by 9 square down. Cut out 4 of 5 square by 19 square down pieces. Cut out 4 of 5 square 29 square pieces. Cut out 4 by 5 square by 39 square pieces.
-
The green count out and cut 2 of 5 square across by 11 square down. Cut out 4 of 5 square by 21 square down pieces. Cut out 4 of 5 square 31 square pieces. Cut out 4 by 5 square by 41 square pieces.
-
The yellow count out and cut 2 of 5 square across by 13 square down. Cut out 4 of 5 square by 23 square down pieces. Cut out 4 of 5 square 33 square pieces. Cut out 4 by 5 square by 43 square pieces.
- Now make sure the length of the wire is perfectly straight. Bend until you can achieve it to the best of your ability. A hanger will work well.
-
Form a small loop at one end of the wire, no bigger than a fingernail.
-
I find it's best to lay out all the plastic canvas pieces, starting with the smallest pieces 5 by 5 square to the largest 5 by 45 squares.
-
Put 3 beads onto the end of the wire.
-
This is the hard part because you have to find the EXACT center of each of the pieces, other wise it will hang funny. TIP: You could use a marker and mark them out ahead of time if you wanted to save yourself some time while creating the spinner.
-
Take the 5 by 5 pink strip and weave it up the wire in the center of the square, add a bead. Next take the 5 by 7 purple strip adding it in the exact center of the square to the wire and add a bead. Then string on a 5 by 9 blue strip in the exact center and add a bead. Then string on a 5 by 11 green strip in the exact center and add a bead. Then take the 2 5 by 13 yellow strips and weave them on the wire and add a bead, making sure you are still placing them of the wire in the center of each and every strip. If you look at the photo attached you should get a better idea of what I mean.
- From this point on you will be adding the 2 matching strips we cut in the above order. Each set of the strips will be ever so slightly larger than the size you placed on before. Continue adding these strips and beads until you have added the largest strip on, which should be the pink piece. Be sure to add a bead.
-
Keep working your way down the wire in reverse from the largest to the smallest strips in color order placing a bead in between each strip as you have been.
-
When you finally have reached the last single sets of strips of the plastic canvas, blue, green, yellow, and pink add on the wire 3 beads, just like you started the wire. TIP: If everything doesn't match from top to bottom like 2 triangles, one upside down then something is wrong, check to make sure you put them all on the wire in the middle.
-
Bend the end of the wire into another loop matching the top size of a finger nail and carefully cut the extra wire off. Check that the beads and plastic canvas are somewhat snug on the wire not too tight that you can't move it but enough that you can.
-
Cut a length of cording about 44 inches long and tie a single overhand knot as close to the end of the cord and cut off the extra. Once again be sure it's tight and secure by tugging on it.
-
Thread the other end of the cording through the yarn needle. Starting with the top piece of plastic canvas just as we did on the other side, thread cord from the top through the other open end corner of this top piece and out from underneath, simple and basic but its about to get slightly confusing. Take the 5 by 5 square enter the top going down now wrap around to the top right side of where you went down in. In the left side hole go down once through that square add a bead and connect to the purple strip right under it. Continue on until you reach the yellow double strips. Only take the top strip, move the bottom strip a side just as you have already done.
-
When you reach the bottom, tie a knot.
-
Go back to the top, cutting a piece of cording about 38 inches long. Attach the cording to the top most yellow strip on the same side you have just completed, and join the bottom strips exactly like you did the top.
-
Repeat the above steps to finish the other side of your wind spinner. It will be harder to get the other side done then it was the first side and tops you just finished.
-
When you have completed both sides the top strips and the bottoms, its time to finish up the very bottom.
-
Cut 2 pieces of cording, each about 14 inches long, and fold them both together to the bottom of the loop we created earlier. Mix it up a bit by adding the left over beads making each cord that's hanging a different size. Be sure to double knot each stand and cut off the extra. TIP: You can add a drop of super glue if you wish.
-
Tie a loop to the top with the cording for hanging.
- Something I noticed odd is you will have to separate the chris crossing of the strips to make it lay correctly, other wise it will lay as one swirl. You can super glue it so it stays that way or push it past its limit to get it stuck to how it should appear.
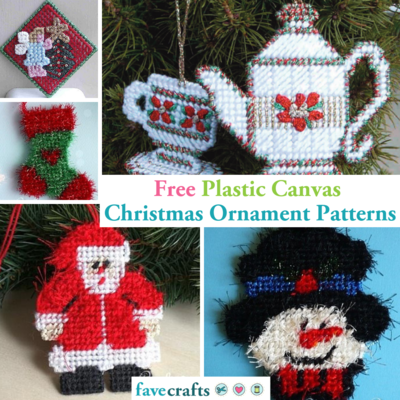
Read Next29 Free Patterns for Plastic Canvas
Your Recently Viewed Projects
Thanks for your comment. Don't forget to share!
mulberrygalprinces s
Oct 03, 2018
I have seen these and admired them but never tried making one. I read thru the directions and I got very confused. I was about to give up when I saw a previous post listing a you tube tutorial about this. It saved me. I suggest every one watch it before attempting to make this.
rebel3217 0558329
Jun 20, 2018
I am confused about step 18. it says "Thread the other end of the cording through the yarn needle. Starting with the top piece of plastic canvas just as we did on the other side" but we never did that. I tried looking for the designer's website as suggested but could not find anything related to this project.
Editor Dana
Jun 26, 2018
HI there! I found a video on YouTube about making wind twirlers that I hope will help. Here's the link: https://www.youtube.com/watch?v=YlpgdOXD9EQ Good luck!
fallbaby1011 82578 30
Jan 07, 2013
Have made these before. They are beautiful and you can use any color you want.
zigark 3400045
Sep 15, 2012
I am trying to make this I am confused with the yarn and beads in joining the piece together can you help me with this for some reason i do not understand the part of where you work to the first double yellow do you work to the double yellow tie it off and work the next section to the double yellow and the next section to the double yelllow. The other question that I have is do you put a bead between the 2 yellows.
grand30 5881817
Jul 04, 2012
I think this one is nicer looking but lots of work. The other looks like a childs craft but would be great to have the kids do one for us, and keep them occupied during holidays.
millerkassandra 72 53032
Jul 01, 2012
What does "2 of 5 square across by 5 down" mean? (and the rest of the "#of square across by # down")
rosebug13 5829500
Jul 01, 2012
this spinner is very colorful and and different from the other one. I very much like it better. I will try to make it and if I get it right I will make one for my Mother. Love it.
peggysue1957
Jul 01, 2012
I think the wind spinner is so pretty. I like it best out of the 2. Looks like something I might try to make.
Report Inappropriate Comment
Are you sure you would like to report this comment? It will be flagged for our moderators to take action.
Thank you for taking the time to improve the content on our site.