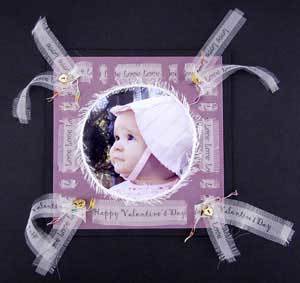
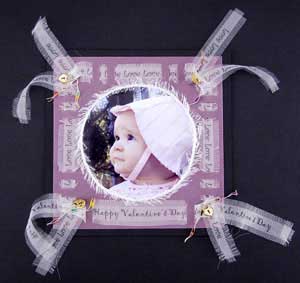
Personalized Handmade Valentine's Day Card
Here’s a fun way to use personalized ribbon made from ExtravOrganza to make a card from Jacquard Products!
Materials:
- favorite photo
- Jacquard ExtravOrganza
- decorative thread and yarn
- card stock
- glue
- white vellum paper
- charms
- double stick tape (optional)
Steps:
- Making Ribbon. I always test on plain paper before I print on ExtravOrganza. Set the page layout to "landscape" so the ribbon is as long as possible. Check the size of your text and the spacing to make sure it fits on your page and leave enough room at the margins and between lines of text to allow for cutting & fringing. Choose print settings for thicker paper and maximum ink flow. Load ExtravOrganza into your printer one sheet at a time. Print on the fabric side of the sheet. Cut the text ribbon, peel off paper back and fringe. Tip: For a tidy look I only pull a couple of threads at one time, especially on a long length and when making longer fringe. If you try to pull too many threads at once, the ribbon will gather, threads may break and it can get generally frustrating.
- Cut the photo. I cut mine by hand into a 3 1/2" circle. It would be fun to use a punch for other interesting shapes.
- Cut the background paper in a square large enough to frame your photo with room to weave the size of ribbon you created. I used pink card stock and white vellum cut into 6" squares.
- Attach the vellum paper to the card stock with your favorite adhesive or double-sided tape.
- Using a craft knife, make cuts for weaving in the background paper perpendicular to, and about 1/4" from the edge of the paper, working your way around all four sides. I made my first cut 1" from the edge, about 1/2" long and about 1/4" apart. Get creative here. Space cuts evenly for a refined look or vary the distances for a bit of funk. Smaller cuts will scrunch the ribbon, wider cuts will allow the ribbon to lay flat. Use punches to create different shaped holes to weave through .
- Weave the ribbon like to use a paper clip to push the ribbon through the cuts .
- Tie the ribbons at the corners and stitch down using decorative thread and a charm.
- Glue or tape the photo to the background. Mine is placed in the center of the square.Glue decorative yarn around the photo.
- Viola! A wonderful scrapbook element or a card to send to Nana!