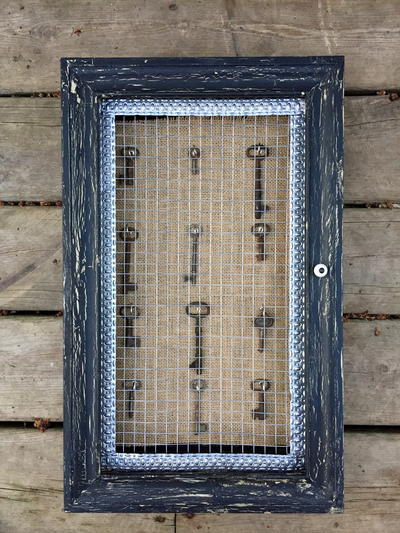
Vintage Inspired Key Cabinet

In the Designer's Words: "Never loose your keys again! Vintage keys (or your car keys) find a new home in this thrift store upcycle. Crackle paint, wire mesh, burlap, and some hinges from the hardware store all help to transform a thrift store frame and wood tray, into a vintage inspired key cabinet. When working with the crackle medium, a smooth thin coat will produce tiny cracks, a thicker coat will produce cracks that are wider exposing more of the undercoat. Remember to wear protective eyewear when cutting the wire mesh, the tiny pieces fly everywhere. Use a drill to predrill holes for hinges especially on softer wood (or particle board.) This will help keep the wood from splitting."
Estimated Cost$21-$30
Time to CompleteIn an evening
Primary TechniqueWood Crafts

Project TypeMake a Project
Materials List
- Plaid Delta Ceramcoat Chalk Paint-Raven
- Plaid Delta Ceramcoat Select Multi Surface Satin-Bamboo
- Plaid Delta Ceramcoat Crackle Medium
- Plaid Delta Ceramcoat Wax-Clear
- Wood Tray (from thrift store)
- Wood Frame large enough to cover edges of tray
- Piece of burlap fabric to cover inside of tray
- Thermoweb Fabric Fuse
- Hinges from hardware store
- Wire mesh from hardware store
- Staple Gun and Staples
- Wire cutters
- Metal Ribbon enough to line inside of frame
- Knob
- Latch
- Paint brushes
- Cup hooks
- Protective eyeware
- Needle nose pliers
- Drill and bits
- Screwdriver
- Heat gun
- Sandpaper
- Black Stazon Ink
Instructions
-
Remove glass from frame and hardware if necessary. Lightly sand all wood surfaces.
-
Apply base coat of paint (the color bamboo shown) and allow to dry.
-
Apply crackle medium on all wood surfaces. Use smooth strokes. The thicker the coat the deeper the cracks when finished. Allow to dry.
-
Apply top coat of paint (Raven shown.) Use long smooth strokes for best results, allow to dry.
-
Brush on Ceramcoat wax to entire painted surface allow to dry and then buff with a soft cloth.
-
Cut 4 pieces of metal ribbon slightly longer than inside opening of of frame. Lightly sand and then rub on Stazon ink and wipe immediately off. Ink will settle into recesses of the ribbon and grooves made by sanding to give an "aged look" Heat set in being careful because the metal gets hot. Staple metal ribbon in place on back side.
-
Cut wire mesh to cover the backside of frame. Using staple gun, staple into place.
-
Cut burlap to fit inside wood tray, using a brush, apply Fabric Fuse to inside of tray, glue burlap to inside of tray, smoothing out fabric. Slightly fray edges of burlap if desired.
-
Line up frame with wood tray, Making sure to center frame over wood tray. Using drill, install hinges so the frame becomes the door of the cabinet.
-
Install knob to front of cabinet, install latch to close on side of cabinet.
-
Install cup hooks inside cabinet to hang keys, install hangers on back of cabinet to hang on wall.
Read NextVintage Inspired Key Cabinet