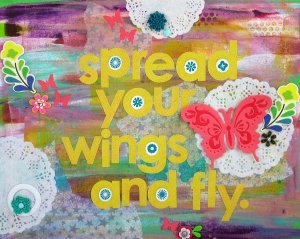
Spread Your Wings and Fly Canvas
Use fun painting techniques to create this lovely Spread Your Wings and Fly Canvas. With a variety of materials used, this mixed media canvas is great for crafters of all ages. This DIY canvas art also makes a great gift for a teen for a graduation or birthday. Customize the message to say whatever you'd like!

Materials:
- Jenni Bowlin Lever Punch - Jenni’s Butterfly
- Fuse Creativity System® Starter Set
- Medium Design Set 101060 - Butterfly
- Monthly Mixed Media Ideas #5
- Blank Artist Canvas 11” x 14”
- Gesso
- Acrylic Paint (Liquitex)
- Tissue Paper
- Mist (Tattered Angels)
- Alphabet Stickers (Sassafras Lass)
- Paint Brush
- Foam Sponge
- ModPodge Matte Medium
- Paper Towel
Instructions:
-
In this project, I’ll show you a fun way to incorporate your texture plates on an altered canvas project to give a great pattern and visual dimension to the overall project. I’ll also show you how to use your punches to create a mask for painting and/or misting to create even more visual layers. Each of these techniques adds quite a bit of depth and character.
-
To start, if your canvas isn’t already primed, you’ll need to prep your blank canvas with a layer or two of acrylic paint, or gesso if you have it, and allow to dry. Then, puddle several different colors of acrylic craft paint across the canvas.

-
Use the long edge of one of your texture plates to drag the puddles of paint across the canvas. Move in both the vertical and horizontal directions. You may choose to wipe the plate clean with each pass so the colors don’t muddle as much. As you do this, don’t panic if the colors aren’t turning out exactly as you like, as you can add more color with the next layer. The important thing to remember is to work in thin layers and allow each layer to dry completely before starting the next. That will ensure your colors are bold and vibrant and not muddy from blending together.

-
After you get your last layer of paint on the canvas (which can be after just one layer, or several), take your texture plate and press it into the wet paint. Lift and repeat across the surface of the canvas in a variety of places.

-
Once the paint is dry, add another layer of depth to your canvas by applying thin patterned paper, randomly across your canvas. Thin book pages, sewing pattern pieces and printed tissue paper all work well for this step.

-
Apply these by spreading a thin layer of matte medium such as Mod Podge onto the canvas, then spreading another thin layer over top sealing the piece entirely. Again, allow to dry completely before adding anything additional.

-
Use your squeeze punches, any shape will do, to create a mask. Basically, you’re utilizing the negative space the punch creates instead of using the punched piece itself. Adhere the mask to an area on your canvas using temporary adhesive. Use additional cardstock scraps to cover any other areas of the canvas that you don’t want sprayed with mist. Apply mist in short even bursts. Allow to dry completely before removing mask.

-
Apply alphabet stickers to spell out your phrase and three doilies using ModPodge Matte so that they create a visual triangle. Allow two of the doilies to hang off the edge of the canvas. Add small butterflies punched from Jenni’s Butterfly Lever Punch using the same matte medium. Finally, apply a thin layer of matte medium over the entire canvas being careful not to brush too much so the paint doesn’t soften up and smear.

-
Use your Fuse Creativity System® along with the Medium Butterfly Design Set to create a large letter pressed die-cut to use as embellishment on your canvas. Apply to canvas using a strong adhesive on the body of the butterfly. Place foam dimensional adhesive under each wing to give your butterfly a 3-dimensional look.

-
If you’re like me, you can’t call a project complete without adding more dimension with little bits and baubles. Take a moment to scatter some color and dimension with the use of chipboard pieces, small rhinestones, brads, and crocheted flowers. Once it all looks visually pleasing to you, start adhering them to the canvas, piece by piece. If puncturing through the canvas is difficult when trying to attach brads, use your craft knife or fingertip knife to cut a small slit for the prongs to pass through. The back end of the craft knife is also a great help when trying to open and flatten the prongs on the back of your canvas.

Read NextBlack and White Wall Art