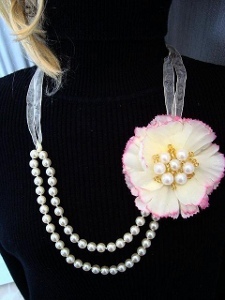
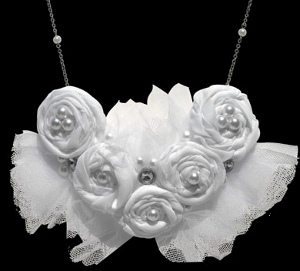
Pearl Rosette Bib Necklace
How do you make fabric rosettes? Find out with this tutorial, then arrange them into a chic pearl rosette bib necklace, perfect for a special occasion like your wedding day. This feminine necklace is so simple to make!
Materials:
- Glamour Gems Buttons: #5210 (2 cards)
- La Mode® Buttons: #4612 (5 cards)
- ½” yard soft white fabric
- Kunin felt square: white
- White tulle
- Premade chain with pearls
- Toggle clasp
- 2 7mm jump rings
- Scissors
- Ruler
- 2 pairs chain nose pliers
- Wire cutters
- Hot glue gun and glue
- Pencil
Instructions:
- Tie an overhand knot in the center of a strip of fabric. Hold the fabric at the knot with two tails together. Twist a short section of the two tails. Wrap it around the knot, which will be the center point of the rosette. Tack in place with glue. Continue wrapping and tacking until rosette is the size you want. Repeat for four more rosettes.
- Lay the rosettes on the felt. Loosely trace with pencil. Cut felt a bit smaller than the traced line. Cut out.
- Glue rosettes to felt. Folding pieces of tulle in half, glue them under and around rosettes. Glue buttons as rosette centers and accents.
- Cut two lengths of chain to make the necklace the needed length. Glue the end of one chain on the back of the necklace piece at the top left. Repeat with other chain at top, back right.
- Use jump rings to attach toggle pieces to loose ends of chain.
Tips:
- Refer to photo for placement and assembly.
- Cut tulle into 2” x 6” pieces.
- Cut or tear white fabric into 2” strips. The length of the fabric will determine the diameter of the rosette. Make them any size you desire.
- When tacking rosette with glue, use a tiny amount, trying not to let it show on the surface of the rosette.
- when gluing chain to necklace, use a lot of glue. Let it dry before continuing.
- Using a jump ring: grab ends of jump ring at either side of cut with pliers. Twist ring open. String through loop of toggle clasp. Twist tightly closed.
Read NextGorgeous DIY Key Necklaces
Your Recently Viewed Projects


Thanks for your comment. Don't forget to share!
Marilyn B
Apr 25, 2017
Thank you for this great tutorial! I am making a floral newborn baby headband, and these flowers and technique will work perfectly for my project, which sort of resembles a bridal project even thought it is for a newborn! I like the idea of adding the softer fabric around the flowers for a nice soft feminine flowing look! Super project and ideas, thanks again! )
Report Inappropriate Comment
Are you sure you would like to report this comment? It will be flagged for our moderators to take action.
Thank you for taking the time to improve the content on our site.