This project was submitted by one of our readers, just like you.
Easy Large Macrame Wall Hanging

Easy Large Macrame Wall Hanging
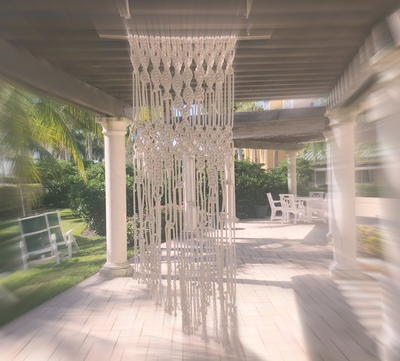
"If you’re dying to make a large, impressive macrame wall hanging but haven’t yet conquered all those intricate knots, this project is for you. This wall hanging is comprised of only one knot – the Square Knot plus a few of its variations. But the chunky rope and striking size make this tapestry a focal point of any room. Check out this step by step tutorial for making this impressive wall hanging. You'll fall in love with it."
Primary TechniqueOther

Materials List
- 3 ft. wooden dowel
- 3/8 inch cotton rope - 600 feet
- scissors
- tape
Instructions
-
Cut 20 pieces of rope, each measuring 30 feet long. Wrap a small piece of masking tape around each end of rope to prevent fraying while weaving the design. Next, tie each piece to the wooden pole using a Lark’s Head Knot.
-
You now have 20 Lark’s Head Knots tied onto the pole and 40 individual cords hanging. To follow the instructions correctly, you need to understand the following key. While knotting, try to keep each horizontal row even, and always go from left to right. To make a proper Square Knot, see the tutorial here.(Key is shown on my blog.)
-
Row 1 – start with 1st cord: 10K (starting with 1st individual cord from the left, tie 10 Square Knots)
-
Row 2 – start with 3rd cord: 9K (starting with 3rd individual cord from the left, tie 9 Square Knots)
-
half square spiral knot Row 3 – start with 1st cord: 10 Half Square Spiral Knots* (which vary in length to form a downward angle)
-
*HALF SQUARE SPIRAL KNOTS: To learn to make this knot, see my tutorial video below. The red numbers in the photo above indicate how many ties are made in each knot.
-
Row 4 – start with 19th cord: 1 HALF SQUARE SPIRAL KNOT (The length of this knot is 6 ties; it creates the “peak” of the downward angle design.)
-
back to square knots Row 5 – start with 1st cord: 10K
-
Row 6 – start with 3rd cord: 9K
-
Row 7 – start with 1st cord: 10K
-
Row 8 – start with 3rd cord: 9K
-
Row 9 – start with 1st cord: 10K
-
Row 10 – For this next section, refer to the photo below. Starting with the 5th individual cord from the left, add two more vertical Square Knots (as shown in section A). Then add 4 more vertical Square Knots in the next column (section B), and 2 more vertical Square Knots (section C). Now skip 8 individual cords. Continue in this fashion: add 2 more vertical knots to columns D and F, and add 4 vertical knots to column E.
-
finishing touches About 6 inches below the last knot in the first column, starting with the first individual cord on the left, make a Square Knot. Continue making a horizontal row of Square Knots, space at varying heights. See photo below.
-
Lastly, tie random small knots in each individual cord. Then trim the bottom in an angled slant. Fray the ends. The finished size of this simple but stunning macrame wall hanging is 30″ wide x 88″ long.
NotesRefer to the full tutorial on my blog for a step by step tutorial with photos.

Read Next64 Crafts to Do When Bored


Thanks for your comment. Don't forget to share!
Report Inappropriate Comment
Are you sure you would like to report this comment? It will be flagged for our moderators to take action.
Thank you for taking the time to improve the content on our site.