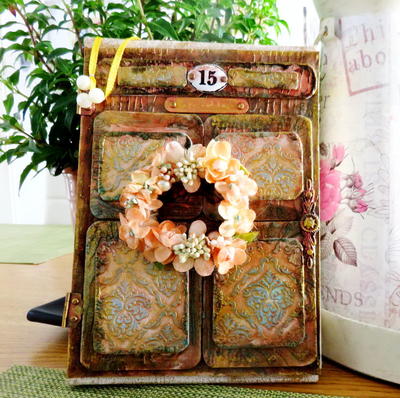
Hope and Love Altered Planner

"For a very long time I wanted one of those fancy planners, but they very expensive. So I bought one cheap office planner and decided to upgrade it with some of the swag I got during the Blogger event and some of not expensive products I already had at home. I loved the door concept as the planner to the New Year is like a new door opened to the world. I add this HOPE AND LOVE metal sign as a family name and made it in general vintage colors and design, so it can fit my own style. But if you change the colors, stencil designs and flower style you can make it shabby, modern, classic or whatever style you like."
Estimated Cost$11-$20
Time to CompleteIn an evening
Primary TechniqueMixed Media

HolidayNew Year
Project TypeMake a Project
Materials List
- Thin and thick chipboard
- Office planner
- Dedicated corner rounder from Tonic Studios
- Kushgrip Craft knife Tonic Studios
- Adhesive Dodz large - 3L
- E-Z Runner Ultra refillable dispenser -3L
- Petallo Botanica collection- Peach minis 12- FloraCraft
- Mod Podge Gloss Plaid
- FolkArt Acrylic Azure blue- Plaid
- FolkArt Acrylic Aqua- Plaid
- FolkArt Metallics Antique Gold- Plaid
- FolkArt Brushed Metallics Copper- Plaid
- Black and white gesso
- Texture paste
- Wood grain stencil- TCW
- Gothic stencil- Tim Holtz
- Metals, brads, hemp
Instructions
-
Cover your new planner with natural linen fabric using Tonic Studious craft knife and 3L Ultra glue runner.Cut the piece of thin chipboard to 9*7'' size. Cover it with white gesso to seal it and let it dry. Cover it with black gesso layer and let it dry.
-
Cut 12 pieces of thick chipboards: 2 pieces 3 3/4*3''; 2 pieces to 3*2 1/2''; 2 pieces to 3*3''; 2 pieces to 2 1/2*1 7/8''; 2 piece to 2 3/4*1'' and the last 2 piece to 2*1/2''. Round all 12 pieces' corners with Tonic corner rounder.Paint each of them with white and then black gesso.
-
Use any texture paste and a woode grain stencil over the large chipboard piece. Use the same stencils on 6 pieces of chipboard that will be the bases on the door. Use Tim Holtz stencil on the rest 6 pieces that are going to be upper door piece. After all texture paste is dry paint all pieces with copper paint. Add aqua and blue paints over the raised areas. Continue to add more paint layers of copper and aqua. When dry- add a bit of gold paint over the raises areas.Add some gold paint over all edges of all chipboard pieces.
-
Make the wreath using soft clay (can by any air dry clay) and let it dry. Cover it around with natural thin hemp. Glue the FloraCraft flowers over the wreath using 3L Dodz. Add pearls as shown using Mod Podge to glue them over the flowers. Paint the metal pieces with copper and gold paints and let them dry. Distress the paint for the aged look.
-
Arrange the door as shown on the photo of finished project. Make holes and add the number on the top. Add the Hope and love metal sign as the " family name". Glue the flower garland in the middle of the door using 3L Dodz. Connect the door handle and the hinges. Glue the chipboard altered piece to your fabric covered planner using Plaid Mod Podge.
Read NextCactus Painted Rocks with Yarn Pots