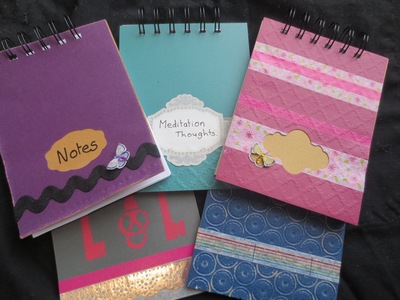
Decorated Notebook Cover DIY Craft Project

Kids will love heading back to school when they have this Decorated Notebook Cover DIY Craft Project. With a few simple papercraft materials, you can learn how to decorate a composition notebook. Create personalized notebooks to suit any occasion or style. They can be pretty and girly, or funky and full of swagger - or a little bit of both. Have fun mixing and matching paper colors and using craft techniques to send a unique message to friends and family. These notebooks will stick out from a sea of generic office supplies and will serve as a place where kids and adults alike can express their creative thoughts and ideas. This is also a great gift idea - it costs almost nothing to complete but it packs a real punch.
Estimated CostUnder $10
Time to CompleteUnder an hour
Primary TechniqueMixed Media
Project or Page SizeCard
Type of Paper UsedScrapbook Paper
Materials List
- Core'dinations Kraft-Core Nostalgic Collectins cardstock
- Sizzix embossing folder & die
- Little B tape and 3d stickers
- FolkArt stencil
- Wrights Jumbo Rick Rack
- Aleene's Turbo Tacky Glue
Instructions
-
Choose a color of cardstock and add coordinating tape.
-
Insert into a Sizzix embossing folder and run through the Sizzix machine.
-
Use the Sizzix dies to cut out front window and glue contrasting coloured cardstock to back.
-
Add butterfly sticker as embellishment.
-
Options include running a piece of cardstock through the Sizzix embossing folder (dark blue) and then add patterned tape.
-
Another alternative is to only emboss a section of the cardstock (green) by placing the cardstock into the embossing folder with some of it hanging out. Then use tape and a sticker to dress up.
-
Adding rick rack is a fun way to add dimension to your notebook cover.
-
Or use paints and stencils to add an image and dress up with silver and pink tape.
-
When your cover is dry, cut a piece of card and some notepaper to a matching size.
-
Bind the pages together into a notebook. Here we've used the Zutter system.
Read NextCactus Painted Rocks with Yarn Pots
Your Recently Viewed Projects
Thanks for your comment. Don't forget to share!
Member 9516598
Jun 20, 2016
I thought this craft was s and fun to make! I like this diy because its really cheap and this is a diy that wont turn out bad. I think this rating would be an all time 5 stars! #bestidea
Report Inappropriate Comment
Are you sure you would like to report this comment? It will be flagged for our moderators to take action.
Thank you for taking the time to improve the content on our site.