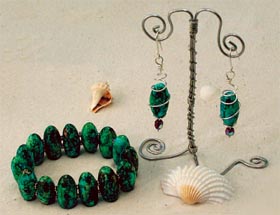
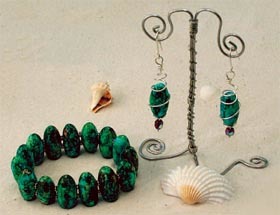
Faux Turquoise Jewelry
Get the look of turquoise jewelry for a fraction of the price. Creating your own jewelry is a great feeling, giving it as a gift is even better, like with this great collection from AMACO.
Materials:
- FIMO® Soft Polymer Clay - White
- Amaco® Pro Bead Roller #3
- Pinata Alcohol Inks – Lime Green, Baja Blue, Havana Brown
- Make-Up Sponge
- 91% rubbing alcohol in spray bottle
- Stretch Jewelry cord
- Misc. silver beads
- Future Acrylic Floor Wax
- Soft brush
- Optional – Amaco® Bead Baking Rack - not necessary, but extremely helpful
Designer's Note: This project is very addicting! Experiment with base colors of beads and unusual color combinations. With a little practice you will be able to “eye” the amount of clay that you will need for the bead rollers. Instructions for measurements of clay are included in the package. I recommend though that you experiment with different amounts of clay. Doing so will create slightly different shapes. You can also flatten the beads creating unique shapes as well.
Steps:
- Roll a ball of white clay. Place into the channel of the bead roller. Match up the lid. Follow the instructions with the bead roller to create the beads.
- These beads have been pierced from the side using the piercing pins included in the bead rollers. To pierce even holes, slightly rotate the pin back and forth like a drill as you apply gentle pressure. When the end begins to poke through the other side, retract pin and press through other side. These beads have two holes each, poked on the side approximately 1/4" apart. You will need approximately 14 beads for an average size wrist. Adjust your beads up or down according to your wrist size. Additional beads may be made for coordinating necklace and earrings.
- Bake all beads at 265ºF (130ºC) for 1 hour. Allow to cool.
- TIP: For this step, you may want to use rubber gloves. Apply a small amount of lime green ink to make up sponge and daub onto bead randomly. Repeat with baja blue and add a small amount of brown. Notice that when the colors overlap they darken and blend. Spritz the alcohol into the air and allow the droplets to fall onto the bead. You will notice a watermarking effect. You can add more by repeating until the desired effect and color have been achieved. If you happen to apply too much alcohol and the colors run, simply daub off excess, re-ink and spray again. It takes a little practice, but practice makes perfect. When finished, apply acrylic sealer and allow to dry thoroughly. String onto stretch cord and add coordinating silver spacer beads as desired.
Read NextWoodland Brooch
Your Recently Viewed Projects

Thanks for your comment. Don't forget to share!
traceyleigh
Jan 12, 2010
I haven't tried this yet. I need to get the alcohol inks, but i think it looks like a great project that you could do with any color of clay. I especially like the idea of flattening the rolled bead.
Report Inappropriate Comment
Are you sure you would like to report this comment? It will be flagged for our moderators to take action.
Thank you for taking the time to improve the content on our site.