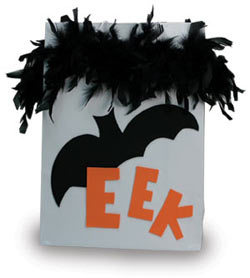
Trick or Treat Bags
Greet your hosts and collect your booty with these hauntingly clever Trick-or-Treat bags from Glue Dots. The black feather boa and Halloween-themed garland make this an easy homemade trick-or-treat bag.

Materials:
- Craft Glue Dots
- Continuous Glue Lines
- Paper gift bag
- Feather boa or Halloween themed garland
- Scissors
- Black and orange foam
Additional supplies for skeleton bag:
- Pop Up Glue Dots
- White foam
- Sharpie marker
Bat bag Steps:
- Apply Continuous Glue Lines all the way around the top of the bag. Burnish the glue to the bag before removing the plastic liner.
- Remove the plastic liner and attach the feather boa to the Continuous Glue Lines, cutting any excess.
- Trace and cut out the bat image and letters from the black and orange foam.
- Attach the bat and letters to the bag with Craft Glue Dots.
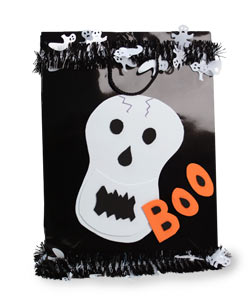
Skeleton bag Steps:
- Apply Continuous Glue Lines all the way around the top of the bag. Burnish the glue to the bag before removing the plastic liner.
- Remove the plastic liner and attach the Halloween themed garland to the Continuous Glue Lines, cutting any excess.
- Trace and cut out a skeleton image, eyes, mouth and letters from the white, black and orange foam. Cut out a mouth shape in the white foam and adhere to the skeleton face with Pop Up Glue Dots. This adds dimension.
- Make zig-zagged skull cracks with the Sharpie marker.
- Attach the skeleton, facial elements and letters with Craft Glue Dots.
Check out this Halloween bag!