Personalized Halloween Pendants
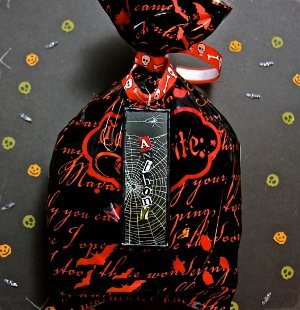
Having a Halloween party? These personalized Halloween pendants from Suzann Sladcik Wilson can make a fun treat for your guests! Made from microscope slides, these spooky pendants can be used to tie up Halloween candy bags, then be worn as necklaces even after the party is over.


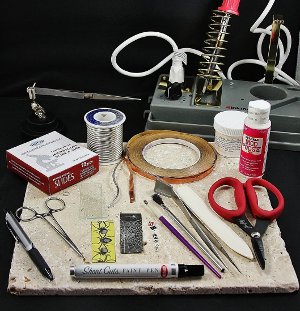
Materials:
- Soldering Iron
- Heat Resistant Surface (Tip: Remnant large ceramic tile works well.)
- Copper Foil Tape – 1/4 inch wide
- Gel Flux & Brush
- 2 Microscope Slides
- Lead Free Solder
- Sterling Silver Jump Ring
- Bone Folder
- Hemostats
- Tweezers
- Martha Stewart Halloween Scrapbook Paper
- Scissors
- Third Hand
- Letters from magazines to spell names
- Mod Podge w/ brush
- Krylon Craft Paint Pen in Black
Instructions:
- Trace an image you want to use from the Martha Stewart Halloween Scrapbook paper using a microscope slide and pen.
- Cut out your image. Make sure your image fits inside the glass. Trim off any paper that extends past the edges of the slide.
- Apply the letters from magazines to spell the name of your guest on your paper using Mod Podge. (Tip: Rub the shovel-end of the bead tweezers over your letters to ensure they are lying flat.)
- Place your piece of paper with the name between two slides.
- Wrap copper foil around the edges of your slides. Make sure your slides are in the center of the tape. This will ensure that the copper tape will be even on both sides.
- Press down the tape onto the slide with your fingers. Use your fingernail to press down the corners. Rub the tape with a bone folder to ensure the tape adheres tightly.
- Brush flux gel onto the copper tape, covering it completely. The flux is what helps the solder adhere to the copper foil tape.
- Lay your pendant on a heat-resistant surface. Use your soldering iron to pick up a small amount of Lead Free Solder. Skim the tip of your soldering iron with the solder over the copper tape on the front of your pendant. Once the solder has cooled, repeat on back.
- Use your tweezers to hold your pendant on the heat-resistant surface so you are able to solder around the edges in the same manner you did the front. You may need to do more than one coat to build up the amount of solder you like.
- Once you are finished soldering around the edges, use a third hand to hold your pendant so the bottom is flat against your heat-resistant surface.
- Grasp your jump ring with your hemostats. Brush the bottom of the ring with flux so it will easily attach to your pendant.
- With one hand, use your hemostats to hold the jump ring in place on the center of the top of your pendant. Use your soldering iron to slowly melt the metal on either side of the jump ring. You will know it is attached when you feel the jump ring “drop” into the metal.
- Remove the hemostats from the jump ring and let the pendant cool before removing from the third hand.
- Color the silver solder black using the Krylon Craft Paint Pen to give the pendant a more festive look.
- Tie onto your Halloween Treat Bags for your guests to enjoy!