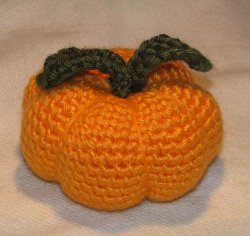
Orange Pumpkin Crocheted Pincushion
Do you love to crochet and sew? If "sew" this is a great project for you. Crochet a cute pumpkin pincushion to hold all your sewing needles. It's an easy crochet pattern just for the holidays.
Check out this project and more ideas in 17 Pumpkin Patterns: Free Projects for Halloween!

Materials:
- Size US-E/3.5 mm Crochet Hook
- Caron Simply Soft - Mango
- Caron Simply Soft – Dark Sage
- Polyester Fiberfill
- Pumpkin measures 3” wide and 1-1/2” tall.
Notes:
- Worked in continuous rounds; do not join and do not turn unless specified.
- Use stitch marker to indicate beginning of rounds.
- Yarn listed is what I used – Size may vary with other yarns.
Abbreviations:
• SC = Single Crochet
• Ch = Chain
• Rnd(s) = Round(s)
• Beg = Beginning
• SL ST = Slip Stitch
• Sts = Stitches
• 2tog = Crochet 2 stitches together (decrease)
• * = Repeat stitches from * to end of *
• HDC = Half Double Crochet
• DC = Double Crochet
• TR = Triple Crochet
• 2nd = Second
Pumpkin:
Rnd 1: Work 5 sc in 2nd ch from hook = 5 sc Rnd 2: Work 2 sc in each sc = 10 sc
Rnd 3: *Sc in first sc, 2 sc in next sc*, repeat from * around – 15 sc
Rnd 4: *Sc in next 2 sc, 2 sc in next sc*, repeat from * around = 20 sc
Rnd 5: *Sc in next 3 sc, 2 sc in next sc*, repeat from * around = 25 sc
Rnd 6: *Sc in next 4 sc, 2 sc in next sc*, repeat from * around = 30 sc
Rnd 7: *Sc in next 5 sc, 2 sc in next sc *, repeat from * around = 35 sc
Rnd 8: *Sc in next 6 sc, 2 sc in next sc*, repeat from * around = 40 sc
Rnd 9: *Sc in next 7 sc, 2 sc in next sc*, repeat from * around = 45 sc
Rnd 10: *Sc in next 8 sc, 2 sc in next sc*, repeat from * around = 50 sc
Rnds 11-16: Sc in each sc around
Rnd 17: *Sc in next 8 sc, sc 2tog*, repeat from * around = 45 sc
Rnd 18: *Sc in next 7 sc, sc 2tog*, repeat from * around = 40 sc
Rnd 19: *Sc in next 6 sc, sc 2tog*, repeat from * around = 35 sc
Rnd 20: *Sc in next 5 sc, sc 2tog*, repeat from * around = 30 sc
Rnd 21: *Sc in next 4 sc, sc 2tof*, repeat from * around = 25 sc
Rnd 22: *Sc in next 3 sc, sc 2tog*, repeat from * around = 20 sc Rnd 23: *Sc in next 2 sc, sc 2tog*, repeat from * around = 15 sc Fasten off, leaving a very long tail for sewing. Stuff pumpkin, sew opening closed.
NOTE: You will use this long tail of yarn to sew the seams for the pincushion – make sure you leave a very long tail.
To Sew Seams:
- Thread long yarn on to needle.
- Insert needle with in bottom center of pumpkin and bring out to top center, pulling yarn tight..
- Bring yarn over side and insert needle into bottom center, pull needle through center top and pull yarn tight.
- Bring yarn over side and insert needle into bottom center, pull needle through and pull yarn over other side, pull yarn tight.
- Bring yarn over side and insert needle into bottom center, pull needle through and pull yarn through other side, pull yarn tight.
- Repeat one more time, dividing pumpkin into 4 sections.
- Now repeat inserting needle and pulling yarn through between the 4 sections; you will have a total of 8 sections for the pumpkin. Weave in yarn, trim.
NOTE: Make sure you pull the yarn tight.
For Leaves (Make 2):
With Dark Sage Yarn, Ch 10
Rnd 1: Sc in sec ch from hook
Rnd 2: 1 TR in next 2 ch
Rnd 3: 1 DC in next 2 ch
Rnd 4: 1 HDC in next 2 ch
Rnd 5: 1 sc in next ch
Rnd 6: Sl st in last ch
Fasten off, leave a tail long enough for sewing. Sew leaves on top of pumpkin, one on each side. Weave in yarn and trim.
VARIATION:
Turquoise Yarn (or any color)
Black Yarn (for sectioning)
Decorative Button
Make pincushion following pattern directions for pumpkin.
Use black yarn to section the pincushion.
Sew a decorative button on top for finishing.
A quick and easy project – makes a nice gift.

Your Recently Viewed Projects
Thanks for your comment. Don't forget to share!
Kelcey
Sep 18, 2012
It DOES start with 2 ch NOT 6. And since it is done in continuous rnds there is no "turning" and the instructions say NOT to join rnds.
Spirit
Nov 23, 2010
Instructions have a few errors, easy to fix. Very easy to make, quick. I used Peaches and Cream yarn and my pumpkin came out 5 1/2" wide and 3" tall so I made 4 leaves instead of 2, looked much better. Sent it to a friend and she is receiving lots of compliments on it.
Spirit
Nov 13, 2010
To begin it is ch 6. At the end of each row ch 1 and turn then single crochet in first stitch. I just started mine and almost done. I'll see how the piecing it together and the leaves come along.
Upfrunt
Nov 03, 2010
Are you sure that you begin with 2 ch? Also since you are a beginner, the term "ch" is always "ch" as it does not need to be plural as the number preceeding it lets you know how many are required. ;)
Crochet Ginger
Nov 02, 2010
Just a tiny error and a suggestion. You forgot to mention to ch 2 when starting the pumpkin. Also, on the leaves, it's a little confusing, especially for a beginner. You should put an 's' after the word 2 ch, so it reads 2 chs. (on rounds 2, 3, 4). Otherwise, looks like a cute pattern for a pincushion. Thank you.
jcsallen3
Oct 27, 2010
Absolutely fabulous....color can be decided on to fit a holiday or a special day. Thank you for sharing. JCAllen
Report Inappropriate Comment
Are you sure you would like to report this comment? It will be flagged for our moderators to take action.
Thank you for taking the time to improve the content on our site.