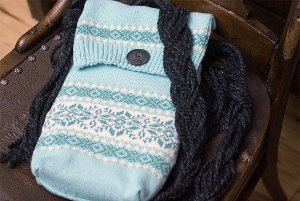
Ugly Sweater Purse
Just can't bear to toss that ugly sweater? Turn it into a cute purse instead! This Ugly Sweater Purse is a great way to get the look of a cute knit handbag with absolutely no knitting involved at all! Crafts with old sweaters are great for helping to clean out your closet and make room for more clothes. This is also a fun project to do with your daughter or granddaughter.

Materials:
- Cutting Mat (18" x 24")
- Titanium Comfort Stick Rotary Cutter (45 mm)
- Coastal Colors Acrylic Ruler (3" x 18")
- Thrifted sweater
- Material for lining
- Thread
- Yarn for shoulder strap
- Button
Instructions:
-
This is what I started with.

-
As I examined it, I decided to turn the sweater upside down and use the ribbing along the bottom as the edging for the flap of my purse.

-
I started by turning the sweater inside out and cutting off the sleeves.

-
Next, using a Fiskars acrylic ruler, cutting mat, and rotary cutter, I cut the panels for my purse from the front and back of the sweater and the lining panels from a lightweight denim. The sweater panels were cut to 19 1/2 inch x 9 1/4 inch. The lining panes were cut to 14 3/4 inch x 9 1/4 inch and 14 1/4 inch x 9 1/4 inch. On the top sweater panel, I measured down 5 1/4 inches and cut across the panel and left it in place. I cut a 1 1/2 inch x 1 1/2 inch notch out of the bottom corner of the panels so I could create a box bottom to the purse and have a little more room inside of it.

-
To connect my panels, I stitched a 1/2 inch seam down both sides of the panels and along the bottom of it. When I stitched down the 5 1/4 inch section, I only stitched the sides down. I don't own a serger so I I zig-zag stitched in the seam allowances to prevent the knit material from unraveling.

-
To box the base, I held the panels like this.

-
Next, I pinched the two seams together.

-
Then I stitch a 1/2 inch seam across the opening. Keep the lining turned inside out.

-
To attach the lining to the outer layer, I began by placing the edges of the short sweater panel and the short lining panel, right sides together, and stitching them with a 1/2 inch seam allowance.

-
Then, I flipped the lining over and tucked it down inside the bag. I folded the other edge of the sweater panel under 1/2 inch and pinned it to the lining, attaching the 2 by hand stitching them together. I used this same method to finish the sides of the opening. Finally, I slip stitched the ribbed edges of the panels together. I could have machine stitched them together earlier in the process, but I didn't want to give up any of my ribbed edging to the seam allowance.

-
I braided 3 groups of 3 strands of yarn together to make the shoulder strap. I knotted close to each end and stitched the knots to the sides of the purse.

-
To complete the purse, I stitched a giant button to the flap. And without a single knit or purl, I have a pretty little sweater knit purse!