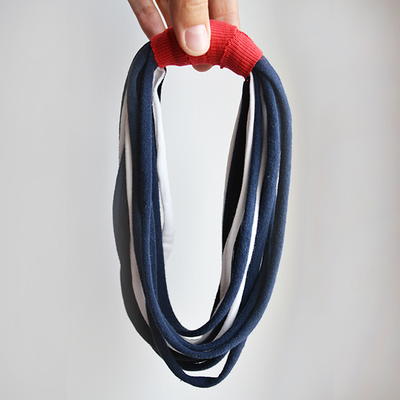
Last-Minute T-Shirt Necklace

Scrap fabric crafts look great and help you use up materials you already have. Save some old t-shirts and use them to create your own Last-Minute T-Shirt Necklace. Make sure you use a variety of shirts to give your piece a more personalized look. If you like easy craft projects and don't have a ton of time to work on your next creation, consider making your own version of this project. This is also a great gift to make at the last minute. No one will realize that you waited until the eleventh hour to complete this funky and eye-catching handmade necklace.
Primary TechniqueGeneral Crafts

Materials:
- Old t-shirts
- Sewing machine
- Pencil
- Rotary cutter
- Cutting mat
Instructions:
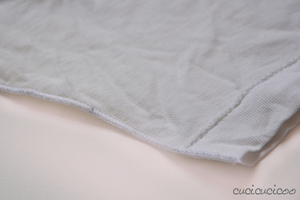
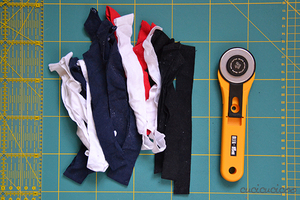
- First gather up your sleeves. You want sleeves that have a decent amount of fabric between the armpit seam and the sleeve hem, so these sleeves in the photo above are not good candidates. Use sleeves that look like the first image of this post, which are generally found on men’s t-shirts.
- First of all, make a stack of your sleeves, lining up the hems and the top fold. They don’t need to all be the same width, but if you have one or two sleeves that are considerably wider than the others, like my white sleeve above, you might consider making it less wide. This step is completely optional, which is why this can be a no-sew project.
- To do this, turn the too-wide sleeve inside-out and place a regular-width one on top of it. Draw a line along where the edge of the regular one is, then stitch along it and trim and discard the extra width.
- I just serged along the line, to sew and cut in one step.
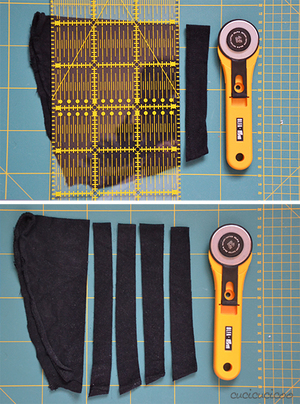
- Now lets get cutting! It’s super easy to use a rotary cutter and cutting mat for this, but you can use regular scissors. First cut off and discard the hems (top). Then slice up the sleeves (bottom). It’s up to you how wide to cut them. 1 cm strips will give you longer and thinner loops while 2 cm strips will be shorter and chunkier. Mine here are about 1 1/2 – 2 cm wide.
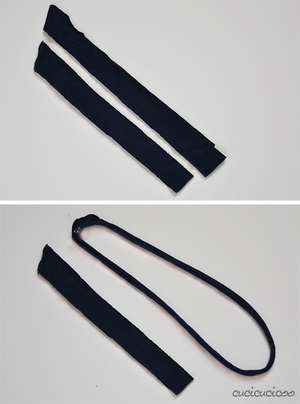
- Now we need to stretch our loops out. Hold one in two hands and gently stretch the loops out. Don’t yank too hard or you could tear the seam, which is now weakened after having been cut into. Once it’s been stretched out, the loops will be thinner and longer.
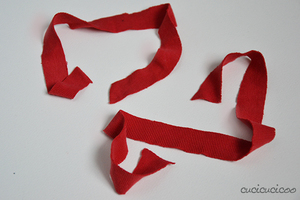
- Note that not all t-shirt fabric stretches. If you have the type with thin ribs, it probably won’t stretch out. That was the case with this red fabric, but that’s ok because we need a t-shirt strip to wrap around the loops, so we’ll use these anyway.

- Get all your stretched strips and your non-stretched strip to wrap around ready.
- Layer your loops around your hand with the seams all more or less lined up. Slip your non-stretched strip underneath the seams and start wrapping it around. If you have a shorter strip, you might want to add on another strip at one point, keeping the ends in place by wrapping around them. When you’ve finished wrapping around the loops so that all the seams are covered, tuck the end of the strip underneath itself and tuck the end under another bit of the strip, hiding it.
More Recycled Crafts You'll Love
If you enjoyed making the Last-Minute T-Shirt Necklace, we have some fantastic craft project ideas for you to try next! One project we recommend is turning old magazines into colorful rolled paper beads. This is a fun and eco-friendly way to upcycle old magazines into stylish jewelry pieces. Another great project to consider is making your own custom stamped metal jewelry. This project allows you to create personalized pieces that make for wonderful gifts or memorable keepsakes. Lastly, why not try your hand at creating your own woven wall hanging? This trendy craft project is a great way to add some boho flair to your home decor and can be customized to match your personal style and color palette. Whether you're looking for a quick and easy project or a more detailed and personalized craft, we have plenty of ideas to keep you inspired and creating!
Read NextSecretly Cheap DIY Flower Vase