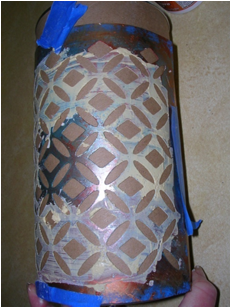
Faux Antique Copper Recycled Container
Turn an unrecyclable container into a functional decorative object using Earth Safe Finishes! Keep containers such as this out of the landfills by creatively converting them with easy to use and environment friendly products. This container would be great for storing art supplies, kitchen utensils, or even flowers. You could also simply leave it on display for all to see and admire. This is a great trash to treasure craft that costs near nothing to make!


Materials:
- Choice of container
- Earth Safe Finishes Products:
- Texture, smooth
- Generation Green acrylic paints- Clay Red Brown, Ocean Blue
- Satin Varnish
- Gel Glaze
- Colorants- Moss and Raw Umber
- Shimmer Copper
- Pattern stencils
- Palette knife or thin spackle knife
- 1” Wash brush
- Sea Sponge
Instructions:
-
Remove paper label from container. Tape stencil around sides of container.

-
Apply Texture using a palette knife skimmed over the stencil. Repeat to cover container surface then allow to dry.
-
Paint container and lid using Clay Red Brown Allow to dry.
-
Brush on one coat of Satin Varnish, allow to dry.
-
Mix drops of Raw Umber into Gel Glaze. Brush over container and lid. Dab off excess glaze using sea sponge or paper towel.
-
Wet sea sponge with water so it is very saturated. Dip sponge into a small amount of Ocean Blue then squeeze over container to create patina like runs. Place container upright for vertical runs. Use wet sponge to apply some Clay Red Brown mixed with a drop of Raw Umber and plain Clay Red Brown. Allow to dry then decide if you need more color runs.
-
Brush on one coat of Satin Varnish, allow to dry.
-
Use a finger tip to apply dabs of Copper Opulence here and there to high points. Rub in Opulence in random clouds to give a slight metallic glow. Allow to dry.
- Brush on one coat of Satin Varnish, allow to dry.
Read NextVintage Photo Display
Your Recently Viewed Projects
Thanks for your comment. Don't forget to share!
sdsemail 4622725
Jan 03, 2012
I did not find a place in the instructions where it said to remove the stencil. Is it a permanent part of the project?? I would also like the answer to Craftnredhd's question on Apr 23, 2010 about using the exact products recommended. Thank you. sd's email
CRAFTNREDHD
Apr 23, 2010
I would really like to make this project using -EXACTLY-the products recommended..but specific brand names or sources where they can be purchased are given!!! I find that most of the projects @ Favecrafts...as well as many other sites...are guilty of the same ommissions!! I hope they are reading this..just a friendly complaint suggestion from a frequent guest!! redhairsenior
Report Inappropriate Comment
Are you sure you would like to report this comment? It will be flagged for our moderators to take action.
Thank you for taking the time to improve the content on our site.
![Pill Bottle Crafts: Reuse Pill Bottles [15 Ideas]](http://irepo.primecp.com/2017/06/334076/PILL-BOTTLE-CRAFTS-Header_Category-CategoryPageDefault_ID-2274135.jpg?v=2274135)