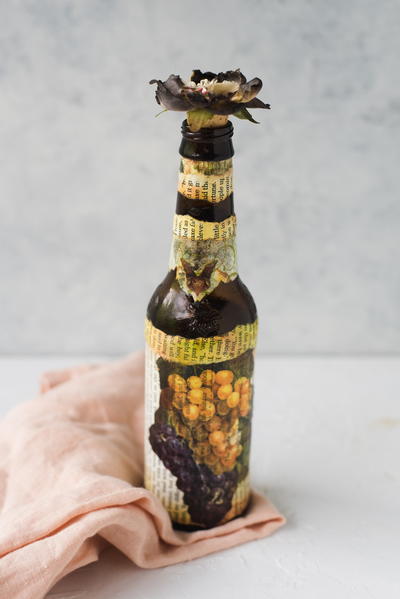
Beer Bottle Napkin Decoupage Technique
Recycled beer bottle crafts like this one are quite lovely!

Decoupage is a magical and diverse crafting method that can be used to upcyle all KINDS of items! Simply attach papers and cut out images to hard, nonporous surfaces such as glass, metal or ceramic using basic tools and decoupage medium. Plus, decoupage offers great opportunities to recycle, repurpose and reuse. It is very easy for people of all ages and skill levels to transform a beer or wine bottle into a stunning vase…as well as rewarding, knowing that this special item was created by your own hands.
While many traditional decoupage projects are done using images or shapes cut from printed paper or cardstock, lightweight papers like printed napkins and pages torn from books will give the colored glass bottle a distinctly unique mixed media effect. Decoupage projects on colored glass such as that found in beer or wine bottles can be particularly striking when printed pages and paper napkin images are combined with inky techniques.
How do you decoupage with napkins on glass? The delicate nature of paper napkins and other lightweight papers requires gentle application. The key to smooth application onto your surface and preventing potential tearing is to work quickly in small sections at a time and to keep fingertips and brush clean and free from glue buildup—especially as the decoupage medium begins to dry and turn tacky.
Decoupage Tips Before You Begin
- Prior to beginning the decoupage process, apply rubbing alcohol to clean off all fingerprints from glass, ceramic or metal.
- Wear latex-free gloves to avoid adding additional oils from your fingers.
- When grunging, only use ink pads with ink that is not water soluble when dry.
Upcycled Beer Bottle

Materials
- Clearsnap Holdings: Colorbox®️ Archival Dye Inkpads (Putty, Squash, Saddle)
- Art Daubers
- 2-ply printed paper napkin with grapes or other images of your choice
- Mod Podge®️ Gloss Waterbase Glue and Sealer
- Mod Podge®️ Furniture Gloss Waterbase Glue and Sealer
- Colored beer bottle
- Printed text page from a book that will fit around the bottle circumference
- 3/4”-1” Taklon paint brush
- Styrofoam plate or other non-porous palette
- Non-stick teflon coated mat or mats placed side by side
- Dishwashing liquid
- Rubbing alcohol
- Lint-free towel
- Latex-free gloves
- Scissors
- Optional: Silk flower and cork; hot glue or other permanent adhesive
Instructions:
- Remove label from the bottle; clean thoroughly with dish soap and water; wipe dry with a lint-free towel.
- Measure the bottle circumference. Tear out book page and check to make sure it will wrap around the entire circumference.

- Place book page flat on work table. Hand tear the long edges. Using art daubers, apply ink (from light to dark) around the edges of the page; dry.
 around the edges of the page; dry.")
- Cut grape and leaf images (or images of your choice) from the paper napkin, making sure to cut through both layers.
 from the paper napkin, making sure to cut through both layers.")
Dab the darkest ink color around the edges of the image.

- Hand tear strips from remaining scraps of the napkins in lengths that will wrap around the neck of the bottle.
- Put the gloves on. Brush a thin coat of Gloss Mod Podge®️ (or another decoupage medium) around the center of the bottle and then onto the back of the text page. Carefully place the text page onto the glass, beginning at one edge and gently pressing and rolling around the bottle with your fingers, working small sections at a time. Work out any air bubbles or creases by smoothing with your fingers, being careful not to tear the paper. Dry.
- Apply another thin coat of Gloss Mod Podge®️ over the center of the bottle where you will be placing your napkin cut outs. Carefully apply a thin coat on the reverse of the base layer of your cutout so both layers attach together. Place your larger image onto the bottle. Beginning in the center, gently press and wrap around the bottle with your fingers, working small sections at a time. Reduce creases very gently smoothing with the brush or your fingers.

Use a very light touch and keep your brush or finger wet so you do not tear the paper. Dry.
- Repeat the process to wrap the remaining napkin strips around the neck of the bottle. Dry completely.
- Apply a light coat of Furniture Gloss Mod Podge®️or another high gloss finish over the entire bottle. Repeat with several coats as desired, drying completely between coats.
- If desired, add dimension by gluing a silk flower onto a craft cork and inserting into the bottle opening!
What is the most creative recycled craft idea you've seen?
Read NextRusty Nail and Wire Cross

![Pill Bottle Crafts: Reuse Pill Bottles [15 Ideas]](http://irepo.primecp.com/2017/06/334076/PILL-BOTTLE-CRAFTS-Header_Category-CategoryPageDefault_ID-2274135.jpg?v=2274135)