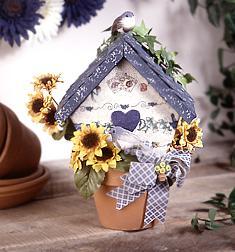
Clay Pot Spring Birdhouse
Clay pots are the perfect spring decor. Decorate your backyard with this great birdhouse. You need some garden print fabric, some floral ribbon and a few other materials. Once you make this the birds will be flying high.

Materials:
- STYROFOAM* Brand Products:
- Sheet 1/2" thick STYROFOAM* 10" X 12"
- 7" x 20" Piece "Garden" Print Fabric
- 6" Square Blue Felt
- Renuzit Adjustable Air Freshener
- 4" Clay Pot With Saucer, 3 1/2" High
- 54- 1" Square Wood Pieces
- 6- Jumbo Craft Sticks
- 5- " of 24 Gauge Wire
- 1" Sunflower-shaped Button
- 2- " of 3/16" Wooden Dowel
- Acrylic Paints: Blue, Ivory
- 2- 2-1/2" Birds
- 32- " of 1" Wide Blue Plaid Floral Ribbon
- 3- Sunflower Floral Picks
- Stem From Silk Ivy Bush
- Low-temp glue gun & glue sticks, paper, pencil, ink pen, ruler, toothpick, scissors, craft snip, craft knife, paint brush, sea sponge and paper towel.
- Pattern
Instructions:
-
BIRDHOUSE: Trace birdhouse pattern onto paper; cut out. Place pattern onto sheet of STYROFOAM and trace around pattern with ink pen; cut out with craft knife. Trace and cut a second piece. From STYROFOAM, for sides, cut two 2 1/4" x 2 1/2" pieces; for roof, cut a 4 1/4" x 4 1/2" and a 4 3/4" x 4 1/2" piece. To cut fabric, position birdhouse front onto wrong side of fabric. With pencil, draw a line 1" away from edge of STYROFOAM. Cut fabric on line. To cover, center piece on top of wrong side of fabric. Carefully pull fabric around edges of STYROFOAM and glue 1" - 2" at a time to the back. Repeat to cut and cover remaining birdhouse pieces. To assemble birdhouse, apply glue to 2 1/4" side of house side piece and attach to wrong side of house front. Glue remaining pieces in same manner.
-
ROOF: Cut toothpick in half with craft snip. Insert half of each piece into one 4 1/4" edge of roof. Place glue along this edge and attach at a 90° angle to 4 3/4" edge of other roof piece.
-
SHINGLES & ROOF TRIM: To trim craft sticks to 1/2" width, measure and mark width with ruler and pencil. Score several times along pencil mark with craft knife. Snap along scored line and discard small piece. Use craft snip to cut one end of two sticks at a 45® angle. Place cut sticks along front edge of roof, butting angled at peak. Mark length of roof on sticks; cut and discard excess. Glue sticks in place. Repeat for back side. Mark and cut remaining sticks for side edge of roof and glue in place. For shingles, cut six wood pieces in half with craft snip. Glue square shingles to roof beginning at bottom right of roof. Aligning shingles with bottom of roof, glue four full and one half shingle to bottom row. For next row, begin at right again, using half shingle and then four full shingles. Glue to previous row, overlapping approximately 1/4". Continue adding rows, for a total of six, alternating the half shingle on left end of one row, on right end of next row, etc. Repeat to shingle other side of roof. Mix 1 part water to 1 part Blue paint. Paint the roof, trim and dowel with this mixture. Turn roof upside down and paint approximately 1" strip inside bottom edges of STYROFOAM for overhang. Let dry. Dip damp sea sponge into Ivory-colored paint, blot excess on paper towel. Lightly sponge paint roof and dowel. Let dry. Center and glue roof to top of birdhouse.
-
HOLE/PERCH: Cut heart from felt according to pattern. Center and glue to front of birdhouse. To make perch: Puncture small hole in fabric below heart with craft knife. Insert and glue dowel in hole.
-
FLOWERS & BIRDS: Position and glue ivy stem to top of birdhouse. Place Renuzit® Air Freshener into flowerpot. Place birdhouse on top of air freshener. Determine placement of sunflower picks. Remove house and glue flowers to inside edge of pot. Glue birds to dowel perch and the top of birdhouse.
-
BOW: Cut two 12" lengths ribbon. Set aside remaining 8" length ribbon. To make bow loops, with one 12" length ribbon, fold the cut ends toward center, scrunch together and secure with wire. For bow tails, scrunch center of 8" length ribbon, place under bow loops and secure with same wire. Notch ends of bow tails. Manipulate loops to fluff bow. Glue bow to top right of pot. Glue button to center of bow.
-
FLOWERPOT: From remaining felt, trace bottom of pot onto felt, cut out, trim as needed and glue to pot.
- GEL REPLACEMENT: When the original gel is depleted, simply replace with a new air freshener. For future projects: if your project base is decorated, remove dried gel. From a new container, remove new, non-toxic gel, then slip it over the post of the decorated base and reposition the decorated topper.
Your Recently Viewed Projects

Thanks for your comment. Don't forget to share!
Report Inappropriate Comment
Are you sure you would like to report this comment? It will be flagged for our moderators to take action.
Thank you for taking the time to improve the content on our site.