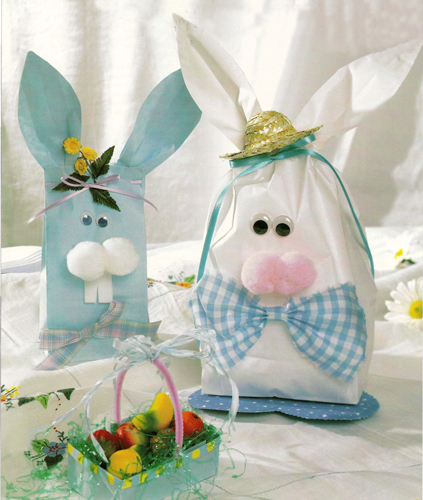
Paper Bag Easter Bunnies
Turn a plain paper bag into a fun Easter bunny to decorate the table and hold Easter treats. Make a matching Easter basket with another paper bag. These paper bag Easter bunnies and basket are a fun craft activity to do with kids. Project designed by Heidi Borchers.
Materials:
For each bunny:
- 1/4” - diameter hole punch
- Aleene’s Tacky Glue
- Pom-Poms-2 (1-1/2” diameter)
- Wiggle Eyes- 2
- Pattern
For white bunny:
- Paper Bags- white-2
- Cardboard square- 1 (7”)
- Fusible Web
- Fabrics: 2 squares blue print (8”)
- 1 piece (4” X 7”)
- 1 piece strip blue checks (3/4” X 2”)
- Pinking Shears
- Ribbon- (32”) length 1/4” blue
- Small straw hat
- Pattern
For blue bunny:
- Paper Bags- blue- 2
- Craft Foam- White 2” square
- Ribbon: 1 (16”) length 7/8”- wide pastel plaid
- 1 (21“) length 1/8” wide purple
- Silk Flowers and leaves
- Pattern
For basket:
- Paper bag -blue
- Sponge 3/8” square
- Acrylic Paint: Yellow
- Chenille Stem- 1 pink
- Raffia- Blue
- Pattern
Instructions:
Bunnies:
-
For each, punch holes around top of 1 paper bag. Glue pom-pom cheeks and wiggle eyes in place on front of bag. Transfer ear pattern to remaining bag and cut 2 ears. Slightly gathered area of ear to secure. Let dry.
-
For white bunny, transfer pattern to cardboard and cut 1 heart, cutting ¼” inside marked line. Following instructions on the fusible web, fuse the fusible web on wrong side of 1 (8”) square of fabric. Center cardboard heart on wrong side of fused fabric. With wrong sides facing, raw edges aligned, and heart sandwiched between, stack remaining fabric square on top of heart. Fuse fabric squares together. Use pinking shears to trim excess fabric from cardboard heart, leaving ¼” of fabric around heart.
-
To make bow, gather center of 4” X 7” fabric piece. Wrap 3/4” X 2” fabric piece around gathered area, overlapping ends, and glue. Glue bow to front of bunny. Let glue dry
-
Put gift inside bag. Glue heart to bottom of bag for feet. Thread ribbon through holes in top of bag. Tie ribbon on bow at front of bunny to gather top of bag. Glue ears to top of bag at back. Cut straw hat in half. Set 1 half aside for another use. Glue remaining half in place at top front of bunny. Let dry.
-
For Blue bunny, cut piece of foam to make teeth (see photo). Tie plaid ribbon in bow. Glue foam teeth and bow in place on bunny. Put gift in bag. Thread remaining ribbon through holes in top of bag. Tie ribbon in bow at front of bunny to secure top of bag. Slip gathered edge of 1 ear between front and back of bag, at each side and glue to secure. Glue silk flowers and leaves to top of bag as desired. Let glue dry.
Basket:
-
Mark a line around bag, 1-3/4” from bottom. Cut off top part of bag and set aside for another use. Fold down 1/4” around open edge of bag and crease. Dip dampened sponge into paint and press on turned down edge of bag to paint squares, spacing squares about 1/4” apart. Let dry. Shape chenille stem to form basket handle. Glue ends of stem inside basket at each side. Let dry.
-
Cut several lengths (18”) of raffia, tie strips in bow around chenille stem handle. Trim streamer ends to desired length
Read NextImpressive Cross Candle Holder
Your Recently Viewed Projects


Thanks for your comment. Don't forget to share!
paver2
Mar 21, 2018
Those are really cool! I wish we could look at the pattern before downloading it, though. It isn't that hard to do it oneself, once you see what she has done. I wonder if these would make good substitutes for Easter baskets for kids who have already had their big Easter basket?
Report Inappropriate Comment
Are you sure you would like to report this comment? It will be flagged for our moderators to take action.
Thank you for taking the time to improve the content on our site.