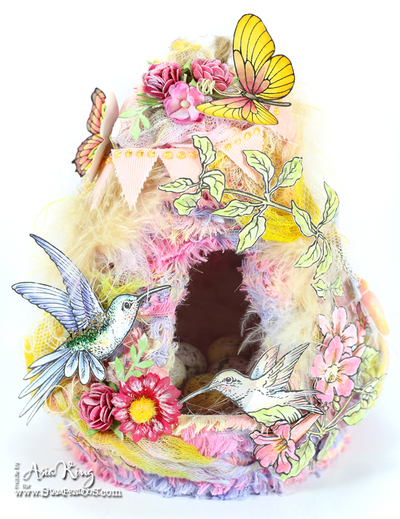
Fluffy Pastel Birdhouse Easter Craft Project
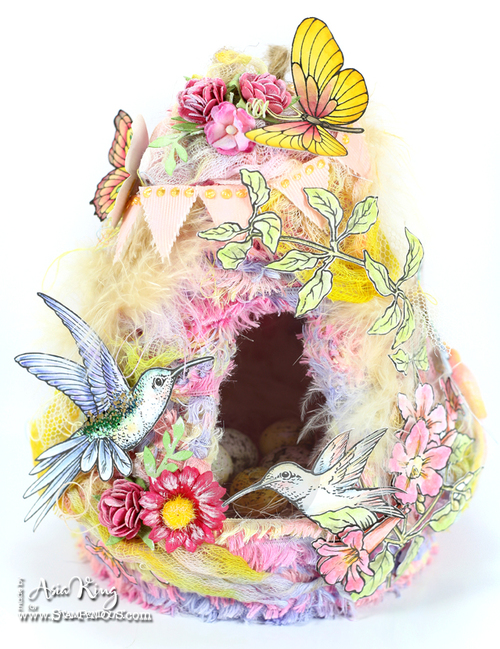
To create this Fluffy Pastel Birdhouse, weave together yarn, fibers, feathers and more. In fact, You may feel like a bird making a nest when you construct this birdhouse. DIY craft projects make Easter so much more fun and exciting. In addition to weaving together various materials, you'll have a chance to stamp and color paper. This is really the best project for anyone who loves all different kinds of crafts. Easter crafts for adults can be fun and playful but still interesting and challenging. This DIY project combines all of those aspects into one amazing design. Leave this on your table or mantel and be sure to throw in some Easter eggs.
Primary TechniqueGeneral Crafts

SeasonSpring
Materials List
- Stampendous Butterflies Die Set
- Stampendous Cling PenPattern Butterflies stamps
- Stampendous Cling Hummingbirds stamps
- Stampendous Hummingbirds Die Set
- Stampendous Aged Hunter Embossing Enamel
- Scrapbook Adhesives by 3L 3D Foam Pennants
- Scrapbook Adhesives by 3L 3D Foam Squares Regular
- Scrapbook Adhesives by 3L 3D Foam Squares Small
- Scrapbook Adhesives by 3L DODZ - 3D
- Plastic florist stand, Inktense pencils, fibers, yarn, embellishments, Memento Tuxedo Black Ink
- Ribbon, cheesecloth, watered down white acrylic paint in a spray bottle, feathers, Liquid Pearls
Instructions
-
Weave the yarns and threads through the gaps of a florist stand, leaving one gap open to create a nest's entrance.
-
Spray generously with watered down acrylic to tone down the bright colours. Repeat until you are happy with the result.
-
Wrap around with hand died cheesecloth and secure with matching threads.
-
Stamp the Hummingbirds and PenPattern Butterflies and colour them in. Die cut the images.
-
Add some Aged Hunter enamel to the birds' wings.
-
Stamp the flowers, colour in with pencils and cut them out.
-
Start layering the images over the nest as shown, securing them with DODZ and Foam Squares.
-
Embellish further with foam pennants, feathers and flowers. Add little eggs inside the nest.