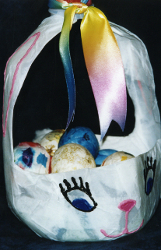
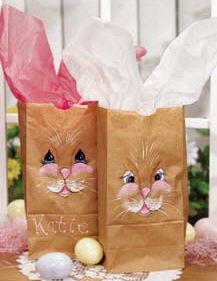
Easter Bunny Sacks with Tissue Paper Ears

With a simple painting pattern and floppy tissue paper "ears," turn inexpensive paper lunch sacks into Easter bunny bags. Use for decoration at an Easter brunch or egg-hunt. These absolutely adorable and insanely easy DIY crafts for Easter are a fabulous solution for anyone decorating on a budget this spring.
You probably have most of the needed materials for this Easter craft already stashed at home. The loving care you put into these Easter bunny crafts will be worth way more than some expensive Easter basket option or wrapping paper. If you are looking for a great goodie bag option, fill these cuties will jelly beans and you will be good to go.

Looking for even more Easter craft ideas? Head on over to our full collection of Easter craft ideas for Easter egg designs, DIY bunnies, Peeps-inspired crafts, and even more homemade cuties.
How to Make Paper Bag Easter Bunnies
Materials:
- DecoArt Products Americana Acrylics DA114 - Light Cinnamon
- Pattern
- Brushes - Synthetic Brushes for Acrylics: 8 Flat Brush, 1 Liner, Stippler or Sponge
- Supplies - Water container, paper towels, palette paper, tracing & graphite paper, pencil or stylus, white, pink or Easter print tissue
- Brown Paper Lunch Bags
Instructions:
Transferring Patterns
Lay tracing paper over pattern and draw the basic lines. Lay this tracing on the surface to be painted. Slip graphite paper between the tracing and the surface and secure. Trace with a pencil or stylus to transfer the design. Do not trace details until after basecoating has dried.
Preparation
Trace and transfer pattern lightly onto bags.
Painting Instructions
Helpful Hint: Remember to always dab your brush or sponge on a paper towel to distribute the paint in the bristles and to lessen the amount of paint on your brush or sponge.
- With a flat brush, basecoat nose and mouth Baby Pink; shade top and side of nose and upper part of mouth with Boysenberry Pink. With a liner and thinned Titanium White, highlight the nose with a couple of strokes. Side-load a flat brush with Light Cinnamon and shade the outside of the nose from the top of the head, past the eyes to the cheeks. Also shade under the lip.
- With Country Blue, basecoat the eye and shade with Sapphire on the outside edges. Basecoat the rest of the eye with Lamp Black. Outline eyes and paint the lashes with Lamp Black. Highlight with white strokes and a dot.
- Using a stippling brush or a piece of sponge squeezed together, pick up Baby Pink and, staring at the top of the cheek, work your way down with a light pounce.
- Do the same on the lower cheek, using white and starting at the lower area and working upward.
- With a liner, mix a little Lamp Black into the Light Cinnamon and outline the nose, the top and lower part of the cheek, top lip and a little on the bottom lip. Lightly brush in a little white on the lip and pull out some short hairs. With a liner and thin white paint, pull out whiskers and forehead hairs.
- Dab a few dots of the Lamp Black/Light Cinnamon mix on the jowls.
- Fill bag with treats and a sheet of tissue stuffed in the center area. Pull out the ends to resemble ears. Place a piece of tape between the ears to close the bag. Add bow or flower between ears, if desired. Bags may also be personalized by writing name with Baby Pink.
Side loading
Dip clean brush into water or extender; blot to remove excess. Dip corner or stroke side edge of brush into puddle of paint to pick up small amount. Remaining in the same spot on the palette, use short repeated strokes to gently move paint across hairs. Turn brush over and stroke through same spot until color moves across hairs, fading away before reaching opposite side.
Note:
- Americana Acrylics are artist-quality, water-based, non-toxic paints. They are intermixable and suitable for almost any surface. They are creamy to facilitate smooth and easy brush strokes, and highly pigmented for richer color and one-stroke coverage. The wide range of colors makes color coordination easy: It reduces the waste of mixing to get the perfect hue.
Read NextEaster Cardboard DIY Wreath
Thanks for your comment. Don't forget to share!
Weberme
Apr 05, 2017
Would you like to make your kids lunch around Easter time. Why don't you make a lunch bag using brown bags and pant or even color a bunny's face and add some ears of tissue paper and there you have it. How cool is that. Let your child design the face for even more fun. A new one each day for some extra fun. Why not even make on for yourself for some office or work talk. Super idea.
lpalmer59 7490208
Mar 06, 2016
This is one of the most original ideas I have ever seen. I have never thought of using lunch bags like this. This would be a wonderful alternative to traditional baskets. I would not have to be concerned about over filled baskets with candy and I can personalize each one with their own name.
Report Inappropriate Comment
Are you sure you would like to report this comment? It will be flagged for our moderators to take action.
Thank you for taking the time to improve the content on our site.