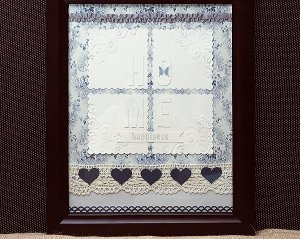
Home Is Where the Heart Is
This simple yet classic framed collage is a simple reminder of the happiness of home. Home Is Where the Heart Is is a great project for beginners and an easy way to use up some leftover paper scraps. This collage makes a wonderful gift for a housewarming and is an easy and sophisticated way to give your room a new look.

Materials:
- Fuse Creativity System® Starter Set
- Medium Design Set 101890 - Curvy Square
- Lacy Doubles Interchangeable Border Punch Cartridge
- Jenni Bowlin Lever Punch - Jenni’s Butterfly
- That’s Amore Squeeze Punch (Extra-Large)
- Premier No. 5 Micro-Tip® Scissors
- 1 sheet white cardstock
- 1 sheet other colored cardstock
- 1 sheet coordinating patterned paper
- 12 inch x 4 inch scrap of patterned paper for punching
- 12 inch lengths of crocheted trim
- Black stamp pad
- Frame with 11 x 14 opening
Instructions:
-
Begin by trimming an inch off one side of the full size sheet of patterned paper. If there is a uniform pattern to the paper, cut 1/2 inch off each side to keep the pattern centered.
-
Cut a strip of solid colored 11" x 3" inch strip of solid colored cardrstock and adhere it to the patterned paper, with the edge of the patterned paper lying over the edge of the cardstock strip, to create an 11" x 14" inch background.
-
Using the Fuse, place the uninked letterpress plate into the die, top with white cardstock, and create 4 diecuts.
-
Lay your trims on the background followed by the 4 diecuts to determine the placement and spacing between them. Using a Fiskars acrylic ruler, center the 4 diecuts on the background and adhere them.
-
Adhere the trims.
-
Print the letters for the word HOME (my letters are 1.5 inches tall) in reverse on white cardstock and cut them out using Fiskars Microtip Detail Scissors. Adhere them to the inner corners of each of the 4 diecuts.
-
Add a punched border along the bottom, punched hearts to the bottom trim piece, and a small punched butterfly to the letter "O."
-
Using the Fiskars For the Birds stamp set and black stamping ink, create a small banner from white cardstock. Adhere it to the bottom of the 2 lowest diecuts.
- Place the finished piece in the frame and it is ready to hang.