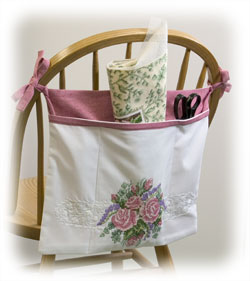
Rose Chair Caddy
A cross-stitch rose pillowcase transforms into a handy chair caddy, perfect for storing supplies at your craft desk. With a pre-stamped design, the cross-stitch design from Dimensions is simple to create on the pillowcase. You can also create a Rose Bed Caddy on this same idea.
Materials:
- One pillow case from kit #72759
- One 17" x 14-1/2" piece of calico for the lining
- One 17" x 1-1/2" strip of calico for the pocket binding
- Two 22" x 2-1/2" strips of calico for the ties
- Two 4" x 2-1/2" strips of calico for the seam bindings
Instructions:
NOTE: All seam allowances are 1/2". Cut off the hem of the pillow case. Pin the front and back together around the stitching. Treating the front and back as one, cut out the pocket as shown below. Save the top piece for the apron back.

Press one long edge of the pocket binding 1/2" to the wrong side. Place it right side down on the wrong side of the pocket, aligning the top edges. Sew them together. Fold the binding to the right side. Stitch the folded edge of the binding to the pocket, working as close to the edge as possible.

Press the short ends of the ties 1/2" to the wrong side. Press the ties in half by bringing the long edges together. Open them up and press the long edges in to meet the fold. Refold them along the fi rst fold and stitch the layers together along the open edge. Press the seam binding pieces in the same way, but don't stitch them together. Use the calico lining to cut out one back piece from the top of the pillow case you saved. With the right sides together, sew the lining and back together at the top 17" edge. Turn right side out and press the top edge. Sew the pocket to the back.

Cover the exposed seam allowances at the top of the apron with the seam binding.

Trim the seam allowances at the bottom corners, then turn the apron right side out. Press the seams. Stitch through all layers to make three sections as shown.

Sew the ties to the seam binding at the top corners of the apron.
Read NextNight Sky Bookmark


Thanks for your comment. Don't forget to share!
Iceni
Oct 12, 2020
What a great project during lockdown. I am going to make several for Christmas gifts and stuff little things into the pockets Thank yiou so much for the Tute!
quanahs 5032097
Mar 02, 2016
What a lovely use of a nice old linen. Does anyone else check the local thrifts and find you cannot pass up a beautifully embroidered pillowcase? I always imagine the person who spent their time trying to make something beautiful. This chair caddy is great and the instructions are simple. This would be good on the back of a high chair too, holding extra bibs and a packet of wipes. I think there could be a lot of uses for this project, please share your ideas.
Iceni
Oct 12, 2020
Oh dear, you have opened a can of worms there! i too am always picking up beautifully embroidered items at Thrift stores and garage sales. Can't bear the thought to leave them, even if they have holes or are discolored.Iam also a doily hoarder, but have made several bedcoverings out of sheets and doilies, for gifts. I do not embroider myself but soooo appreciate those who do.
Report Inappropriate Comment
Are you sure you would like to report this comment? It will be flagged for our moderators to take action.
Thank you for taking the time to improve the content on our site.