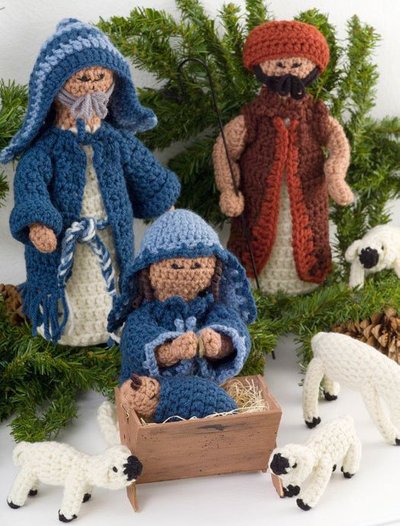
Crocheted Nativity
Create some new decor with these Christmas crochet patterns. The Crocheted Nativity dolls are adorable and fairly miniature in scale. Make these little dolls as gifts or put them under your own tree to add a touch of classic Christmas decor to your home. This is a simple project for crochet fans of all skill levels and a very unique way to create your very own holiday decorations this year.


Find this craft and more Christmas crochet projects in 34 Easy Crochet Christmas Gifts.
Materials:
For Joseph, Mary, and Shepherd
- 1 skein Red Heart Super Saver yarn in Ranch Red (F)
- 1 skein Red Heart Super Saver yarn in Coffee (E)
- 1 skein Red Heart Super Saver yarn in Windsor Blue (D)
- 1 skein Red Heart Super Saver yarn in Country Blue (C)
- 1 skein Red Heart Super Saver yarn in Aran (B)
- 1 skein Red Heart Super Saver yarn in Warm Brown (A)
- 4mm [US G-6]; 6.5mm [US K-10.5] crochet hooks
- Three 2" Styrofoam® balls
- Two 8" x 3" Styrofoam® cones
- One 6" x 3" Styrofoam® cone
- Six beige chenille stems
- Small amounts of black, brown and gray embroidery floss
- Six tiny pompom eyes
- Three small wooden craft sticks
- Three 3 oz pyramid shaped fishing weights
- Three 3" ivory felt circles
- Two small Velcro® squares
- Tapestry needle
- Craft glue
For Baby Jesus
- 1 skein Red Heart Super Saver yarn in Warm Brown (A)
- 1 skein Red Heart Super Saver yarn in Aran (B)
- 1 skein Red Heart Super Saver yarn in Country Blue (C)
- 3.25mm [US D-3] crochet hook
- 1" piece of curly Mary hair (see instructions for Mary)
- Small amount of black embroidery floss
- Small amount of fiberfill material
For Lambs
- 1 skein Red Heart Super Saver yarn in Aran (A)
- 1 skein Red Heart Super Saver yarn in Black (B)
- 3.25mm [US D-3] crochet hook
- Small amount of fiberfill material
- Four 12" 6mm white chenille stems
- Tapestry needle
- Craft glue
Gauge (for Joseph, Mary, and Shepherd): 16 sc = 4"; 16 rows = 4" with smaller hook.
Gauge (for Baby Jesus and Lambs): 20 sc = 4"; 20 rows = 4".
Special Abbreviations:
- Dec: [Draw up a loop in next st] 2 times; yo and draw through all 3 loops on hook.
- Hdcdec: [Yo and draw up a loop in next st] 2 times; yo and draw through all 5 loops on hook.
- Dcdec: [yo and draw up a loop in next st, yo and draw through 2 loops] 2 times; yo and draw through all 3 loops on hook.
Instructions:
Joseph and Shepherd are 10.5" tall without headdresses; kneeling Mary without headdress is 7.25". Baby Jesus is 4" tall. Large Lamb is 2¾" tall. Small Lamb is 2" tall.
Joseph
Head
- With smaller hook and A, ch 4; join with a slip st to form a ring.
- Rnd 1: Ch 3 (counts as 1st dc), dc 11 in ring; join with a slip st in top of ch-3 – 12 sts.
- Rnd 2: Ch 3, 2 dc in next st, * dc in next st, 2 dc in next st; repeat from * around; join – 18 sts.
- Rnd 3: Ch 2 (counts as 1st hdc), hdc in next st, 2 hdc in next st, * hdc in next 2 sts, 2 hdc in next st; repeat from * around; join – 24 sts.
- Rnd 4: Ch 2, hdc in each st around.
- Rnd 5: Repeat Rnd 4; insert Styrofoam® ball.
- Rnd 6: Ch 2, hdc in next st, hdcdec over next 2 sts, * hdc in next 2 sts, hdcdec over next 2 sts; repeat from * around; join – 18 sts.
- Rnd 7: Ch 2, hdcdec over next 2 sts, * hdc in next st, hdcdec over next 2 sts; repeat from* around; join – 12 sts.
- Rnd 8: Ch 2, hdc in each st around; join.
- Rnd 9: Repeat Rnd 8; fasten off.
Under Robe
- Rnd 10: Attach B with a slip st to last st, ch 1, 2 sc in next st, * sc in next st, 2 sc in next st; repeat from * around; join – 18 sts.
- Rnds 11-13: Ch 3 (counts as 1st dc), dc in each st around and join at top of ch-3.
- Rnd 14: Ch 3, dc in next st, 2 dc in next st, * dc in next 2 sts, 2 dc in next st; repeat from * around; join – 24 sts.
- Rnds 15-17: Ch 3, dc in each st around; join.
- Rnd 18: Ch 3, dc in next 2 sts, 2 dc in next st, * dc in next 3 sts, 2 dc in next st; repeat from * around; join – 30 sts.
- Rnds 19-24: Ch 3, * dc in next st; repeat from * around; join.
- Rnd 25: Ch 3, dc in next 2 sts, dcdec in next 2 sts, * dc in next 3 sts, dcdec in next 2 sts; repeat from * around; join – 24 sts.
- Rnd 26: Ch 1, sc around; join and fasten off.
Body
- Glue a 4" piece of craft stick into top of Styrofoam® cone (leave 1" protruding to glue into head). Allow to dry. Apply glue to remaining portion of craft stick and fit crocheted Under Robe over cone, carefully fitting stick into Styrofoam® ball. Cut pyramid shaped hole into bottom of cone and glue weight and felt circle into place. Wrap 2 chenille stems together and insert through body at bottom of second Under Robe row for arms (use a skewer or an awl to help guide the stem through). Position stem equally on body and fold over at each end (approximately ½") for hands. Dab a small amount of glue where arms and body meet and allow to dry.
Arms (Make 2)
- With smaller hook and A, ch 38; turn.
- Row 1: Dc in 4th ch from hook, dc in next 13 ch, hdc in next 8 ch, dc in last 14 ch, ch 3; turn.
- Row 2: Dc in next 13 sts, hdc in next 8 sts, dc in last 14 sts; fasten off, leave a 20" tail for sewing. Using tapestry needle, fold arm together (end to end) and stitch to fold. Turn and stitch first 4 hdc together. Fit onto wire arm, wrap tail around three times to form wrist, continue sewing up the arm then stitch to under robe at shoulders.
Face
- Using gray embroidery floss, cut a 30" and a 10" piece. Loop the 30" piece around a 5"piece of cardboard and sew at top of each ear. Loop the 10" section around a 2" piece of cardboard and attach above beard for mustache. The mustache may be tacked into place at the ends, if desired. Use black floss to form small lines for eyes and glue pompoms into place above each eye.
Robe
- With smaller hook and C, ch 36.
- Row 1: Dc in 4th ch from hook, dc in each ch across; turn –33 sts.
- Row 2: Ch 3 (counts as first dc), dc in next 5 sts, ch 3, skip next 3 sts, dc in next 16 sts, ch 3, skip next 3 sts, dc in last 5 sts and in top of ch-3; turn.
- Row 3: Ch 3, dc in each dc and in each ch across; turn.
- Rows 4-10: Ch 3, dc in each st across; turn.
- Row 11: Ch 1, sc in each st across. Fasten off.
- Fringe: Cut thirty six 4" strands of C and attach two in every other st on bottom edge of robe.
- Tie: With C, ch 55. Fasten off. Weave through first dc row at top of robe for neck gathering.
Sleeves (Make 2)
- With smaller hook and C and leaving 10" beginning tail for sewing, ch 12; join.
- Rnd 1: Ch 3 (counts as 1st dc), dc in each ch around; join – 12 sts.
- Rnds 2-4: Ch 3, dc around; join.
- Rnd 5: Ch 3, dc in next st, 2 dc in next st, * dc in next 2 sts, 2 dc in next st; repeat from * around; join – 16 sts.
- Rnd 6: Ch 3, dc in each st around; join.
- Rnd 7: Ch 3, dc in next 2 sts, 2 dc in next st, * dc in next 3 sts, 2 dc in next st; repeat from * around; join – 20 sts.
- Rnd 8: Ch 1, (sc in each st) around; join. Fasten off. Stitch each sleeve into place on robe.
Headpiece
- With smaller hook and C, ch 38.
- Row 1: Dc in 4th ch from hook and in each chain across; drop yarn, DO NOT TURN – 35 sts.
- Row 2: Attach D at top of 1st dc, ch 3 (counts as beginning dc), dc in each st across; drop yarn; turn.
- Row 3: Pick up C and slip stitch to top of last dc, ch 3, dc in each st across; drop yarn.
- Row 4: With D, repeat Row 3; turn at end.
- Row 5: With C, repeat Row 3. Fasten C off.
- Row 6: With D, repeat Row 3. Fasten D off.
- Fold tog end to end and with C, stitch last row together. With right side facing, attach D at one side of bottom and sc once in each st and twice around each post across. Fasten off.
Headband
- With larger hook, hold one strand each B, C, and D together as one; ch 45. Fasten off. Tie around Joseph’s head to hold headpiece in place.
Mary
Head & Under Robe
- Work as for Joseph.
Body
- Using the 6" Styrofoam® cone, measure 4" down back and 5" down front and cut at an angle. Glue a 4" piece of craft stick into top of cone (leave 1" protruding to glue into head). Allow to dry. Apply glue to remaining portion of craft stick and fit crocheted Under Robe over cone, carefully fitting stick into Styrofoam® ball. Cut pyramid shaped hole into bottom of cone and glue weight and felt circle into place. Fold excess Under Robe material under and stitch together to form kneeling legs. Wrap 2 chenille stems together and insert through body at bottom of second Under Robe row for arms (use a skewer or an awl to help guide the stem through). Position stem equally on body and fold over at each end (approximately ½") for hands. Dab a small amount of glue where arms and body meet and allow to dry.
Arms
- Work as for Joseph. Glue Velcro® onto hands for a praying posture.
Face
- To form Mary’s curls, wrap black and brown strands of yarn together around wooden skewer after dipping into a diluted glue solution. Allow to dry overnight. Unwrap, and sew small portions over ears, as desired; finish eyes as described for Joseph.
Robe
- With smaller hook and C, ch 31.
- Row 1: Dc in 4th ch from hook, dc in each ch across; turn – 28 sts.
- Row 2: Ch 3 (counts as 1st dc), dc in next 4 sts, ch 3, skip next 3 sts, dc in next 13 sts, ch 3, skip next 3 sts, dc in last 4 sts and at the top of 1st ch-3; turn.
- Row 3: Ch 3, dc in each dc and in each ch across; turn.
- Rows 4-7: Ch 3, dc in each st across; turn.
- Row 8: Ch 1, sc in each st across. Fasten off.
- Trim: With right side facing, attach D at the upper left front of robe. Ch 1, sc around post, * ch 1, sc around next post; repeat from * to bottom; ** ch 3, sc in next st, skip next st; repeat from ** across bottom; ch 3, sc around next post; repeat from * to top of right side. Fasten off.
- Tie: With C, ch 55. Fasten off. Weave through first dc row of robe for neck gathering.
Sleeves (Make 2)
- With smaller hook and C, and leaving 1st 10" tail for sewing, ch 12; join.
- Rnd 1: Ch 3 (counts as 1st dc), dc in each ch; join.
- Rnds 2-3: Ch 3, dc in each st; join.
- Rnd 4: Ch 3, dc in next st, 2 dc in next st, * dc in next 2 sts, 2 dc in next st; repeat from * around; join – 16 sts.
- Rnds 5-6: Repeat Rnds 2-3. Fasten off.
- Rnd 7: Attach D, * ch 3, skip next st, sc; repeat from * around; join. Fasten off. Stitch each sleeve into place on robe.
Headpiece
- With smaller hook and D, ch 6; join.
- Rnd 1: Ch 2 (counts as 1st hdc), hdc 11 times in ring; join to the top of 1st hdc – 12 sts.
- Rnd 2: Ch 2, 2 hdc in next st, * hdc in next st, 2 hdc in next st; repeat from * around; join – 18 sts.
- Rnd 3: Ch 2, hdc in next st, 2 hdc in next st, * hdc in next 2 sts, 2 hdc in next st; repeat from * around; join – 24 sts.
- Rnd 4: Ch 2, hdc in next 2 sts, 2 hdc in next st, * hdc in next 3 sts, 2 hdc in next st; repeat from * around; join – 30 sts.
- Rnd 5: Ch 2, hdc in each st; join.
- Rnd 6: Ch 1, sc in first 4 sts, dec in next 2 sts, * sc in next 4 sts, dec; repeat from * around; join – 35 sts.
- Row 7: Ch 3 (counts as 1st dc); TURN; dc in next 2 sts, dcdec in next 2 sts; [dc in next 3 sts, dcdec in next 2 sts] 2 times; dc in next 3 sts; turn – 18 sts.
- Rows 8-9: Ch 3, dc in each st across; turn.
- Row 10: Ch 3, dc in next st, 2 dc in next st, * dc in next 2 sts, 2 dc in next st; repeat from * across; turn – 24 sts.
- Row 11: Ch 3, dc in each st; join. Fasten off.
- Trim: Join C to last st, ch 3, sc in every other st and around each post around headpiece; join. Fasten off.
Shepherd
Head, Under Robe, Body, Arms, and Face
- Work as for Joseph. Using black yarn, finish face as for Joseph.
Robe
- With smaller hook and E, ch 31.
- Row 1: Dc in 4th ch from hook, dc in each ch across; turn.
- Row 2: Ch 3 (counts as 1st dc), dc in next 4 sts, ch 3, skip next 3 sts, dc in next 13 sts, ch 3, skip next 3 sts, dc in next 3 sts, dc in 3rd ch of beginning ch-3; turn – 28 sts.
- Row 3: Ch 3, dc in each dc and in each ch across; turn.
- Rows 4-11: Ch 3, dc in each st across; turn.
- Row 12: Ch 3, skip next st, sc in next st, * ch 3, skip next st, sc in next st; repeat from * across. Fasten off.
- Trim: Join F at the top post on left side of robe. Slip st in same post and in next st, [2 sc around next post] 3 times; [2 hdc around next post] 2 times; [2 dc around next post] 2 times; [2 tr in next post] 3 times; ch 4 and sc in first ch-3 space at bottom of robe, ch 4, sc in each ch space across bottom, ch 4, [2 tr around next post] 3 times; [2 dc in next post] 2 times; [2 hdc in next post] 2 times; [2 sc in next post] 3 times; slip st in next post, 2 slip st in last post. Fasten off.
- Tie: With E, ch 55. Fasten off. Weave through first dc row at the top of robe for neck gathering.
- Finishing: Join E at a ch in armhole, ch 1, sc in same ch, ch 3, skip next st, sc in next st, ch 3, sc around next post, ch 3, sc in next st, ch 3, skip next st, sc in next st, ch 3, sc around next post, ch 3; join to 1st sc. Fasten off. Repeat for other armhole.
Headpiece
- With smaller hook and F, ch 30.
- Row 1: Hdc in 3rd ch from hook (counts as first hdc), hdc in each ch across; turn – 28 sts.
- Rows 2-3: Ch 2, hdc in each st across; turn.
- Row 4: Ch 1, sc in next 5 sts, dec in next 2 sts, * sc in next 5 sts, dec in next 2 sts; repeat from * across. DO NOT FASTEN OFF.
- Finishing: Fold over and sc ends together evenly to form circle. Fasten off.
Baby Jesus
Body
- With B, ch 4; join to form ring.
- Rnd 1: Ch 2 (counts as 1st hdc), 9 hdc in circle, join at top of beginning ch-2 – 10 sts.
- Rnd 2: Ch 2, 2 hdc in next st; * hdc in next st, 2 hdc in next st; repeat from * around; join – 15 sts.
- Rnd 3: Ch 2, hdc in the next st, 2 hdc in next st, * hdc in next 2 sts, 2 hdc in next st; repeat from * around; join – 20 sts.
- Rnd 4: Ch 2, hdc in next st and in each st around; join.
- Rnd 5: Repeat Rnd 4.
- Rnd 6: Ch 1, sc in first 3 sts, dec in next 2 sts, * sc in next 3 sts, dec in next 2 sts; repeat from * around; join – 16 sts.
- Rnd 7: Ch 1, sc in first 2 sts, dec in next 2 sts, * sc in next 2 sts, dec in next 2 st; repeat from * around; join – 12 sts. Fill lightly with fiberfill material.
- Rnd 8: Ch 1, sc in 1st st, dec in next 2 sts, * sc in next st, dec in next 2 sts; repeat from * around; join. Fasten off.
Head
- With A, work as for Body through Rnd 2.
- Rnd 3: Ch 2, hdc in each st around; join – 15 sts.
- Rnd 4: Ch 2, hdc in next 2 sts, hdcdec in next 2 sts, * hdc in next 3 sts, hdcdec in next 2 sts; repeat from * around; join – 12 sts.
- Rnd 5: Ch 1, sc in 1st 2 sts, dec in next 2 sts, * sc in next 2 sts, dec in next 2 sts; repeat from * around; join – 9 sts. Fill lightly.
- Rnd 6: Ch 1, sc in 1st st, dec in next 2 sts, * sc in next st, dec in next 2 sts; repeat from * around; join. Fasten off.
- Finishing: Sew head and body together. Use three strands of black embroidery floss to form closed eyes and to stitch on curl.
Swaddling Clothes
- With C, ch 6; join.
- Rnd 1: Ch 2 (counts as 1st hdc), 11 hdc in circle; join –12 sts.
- Rnd 2: Ch 2, 2 hdc in next st, * hdc in next st, 2 hdc in next st; repeat from * around; join –18 sts.
- Rnds 3-6: Ch 3 (counts as 1st dc), dc in each st around; join.
- Rnd 7: Ch 2, hdc in each st around; join.
- Rnd 8: * Ch 3, skip next st, sc in next st; repeat from * around; join. Fasten off.
Large Lamb
- With A, ch 6; join.
- Rnd 1: Ch 2 (counts as 1st hdc), 9 hdc in ring; join – 10 sts.
- Rnd 2: Ch 2, 2 hdc in next st, * hdc in next st, 2 hdc in next st; repeat from * around; join – 15 sts.
- Rnd 3: Ch 2, hdc in next st, 2 hdc in next st, * hdc in next 2 sts, 2 hdc in next st; repeat from * around; join – 20 sts.
- Rnds 4-8: Ch 2, hdc in each st around; join.
- Rnd 9: Ch 2, hdc in next 2 sts, hdcdec in next 2 sts, * hdc in next 3 sts, hdcdec in next 2 sts; repeat from * around; join – 16 sts.
- Rnd 10: Ch 2, hdc in next st, hdcdec in next 2 sts, * hdc in next 2 sts, hdcdec in next 2 sts; repeat from * around; join – 12 sts. Fill lightly with fiberfill.
- Rnds 11-13: Ch 2, hdc in each st around; join.
- Rnd 14: Ch 2, 2 hdc in next st, * hdc in next st, 2 hdc in next st; repeat from * around; join – 18 sts.
- Rnds 15-16: Ch 2, hdc in each st around; join.
- Rnds 17: Ch 1, sc in 1st 3 sts, dec in next 2 sts, * sc in next st, dec in next 2 sts; repeat from * around; join – 12 sts. Fill head lightly.
- Rnd 18: Ch 1, sc in 1st 2 sts, dec in next 2 sts, * sc in next 2 sts, dec in next 2 sts; repeat from * around; join – 9 sts. Fasten off.
- Rnd 19: Join B in any st, ch 1, sc in 1st st, dec in next 2 sts, * sc in next st, dec in next 2 sts; repeat from * around; join – 6 sts.
- Rnd 20: Slip st in each st.
- Rnd 21: Repeat Rnd 20. Fasten off, leaving 8" tail for forming eyes. Using tapestry needle, form a black eye on each side of head and fasten off.
Ears (Make 2)
- With A, ch 6.
- Row 1: Sc in 2nd ch from hook, hdc in next ch, dc in next 2 ch, tr in last ch. Fasten off.
- TAIL: With A, ch 8.
- Row 1: Hdc in 3rd ch from hook and in each ch across. Fasten off.
Legs (Make 4)
- With A, leave beginning 10" tail, ch 11.
- Row 1: Hdc in 3rd ch from hook and in each ch across; turn–9 sts.
- Row 2: Ch 2, hdc in each st across; turn.
- Row 3: Repeat Row 2. Fasten off, leaving another 10" tail for sewing.
- Hooves: Join B to end which has no tails, leaving a small tail for tying.
- Row 1: Ch 1, 3 sc evenly across. Fasten off and tie onto beginning black tail (this begins to form a cylinder for leg).
Finishing
- Fold two chenille stems in half. Insert one through body at top of Rnd 3 and one through body at top of Rnd 10, centering equally. Dab a small amount of glue where legs meet body. Note: Use wooden skewer or awl to help guide stems through lamb’s body. With tapestry needle, sew tail and ears onto bodies. Stitch legs together, fit onto wires and sew onto bodies.
Small Lamb
- With A, ch 4; join.
- Rnd 1: Ch 2 (counts as 1st hdc), 7 hdc in ring; join – 8 sts.
- Rnd 2: Ch 2, 2 hdc in next st, * hdc in next st, 2 hdc in next st; repeat from * around; join – 12 sts.
- Rnd 3: Ch 2, hdc in next st, 2 hdc in next st, * hdc in next 2 sts, 2 hdc in next st; repeat from * around; join – 16 sts.
- Rnds 4-5: Ch 2, hdc in each st around; join.
- Rnd 6: Ch 2, hdc in next st, hdcdec in next 2 sts (hdc in next 2 sts, hdcdec in next 2 sts) around; join – 12 sts.
- Rnd 7: Ch 2, hdcdec in next 2 sts; * hdc in next st, hdcdec in next 2 sts; repeat from * around; join – 8 sts. Fill body lightly.
- Rnds 8-9: Ch 2, hdc in each st around; join. Fill neck lightly.
- Rnds 10-11: Ch 2, 2 hdc in next st, * hdc in next st, 2 hdc in next st; repeat from * around; join – 12 sts.
- Rnd 12: Ch 1, sc in 1st st, dec in next 2 sts; * sc in next st, dec in next 2 sts; repeat from * around; join – 8 sts.
- Rnd 13: Ch 1, sc in 1st 3 sts, dec in next 2 sts, sc in next st, dec in next 2 sts; join – 6 sts. Faste off. Fill head lightly.
- Rnd 14: With B, join in any st, ch 1, sc in 1st st, dec in next 2 sts, sc in next st, dec in next 2 sts; join – 4 sts.
- Rnd 15: Slip st in each st.
- Rnd 16: Repeat Rnd 15. Fasten off, leaving 8" tail of yarn for forming eyes. Finish as described for Large Lamb.
Ears (Make 2)
- With A, ch 5.
- Row 1: Sc in 2nd ch from hook, hdc in next ch, dc in next ch, tr in last ch. Fasten off, leaving 6" tail for sewing.
Tail
- With A, ch 6.
- Row 1: Hdc in 3rd ch from hook and in each ch across. Fasten off, leaving 6" tail for sewing.
Legs (Make 4)
- With A, leave beginning 8" tail, ch 8.
- Row 1: Hdc in 3rd ch from hook, hdc in each ch across; turn – 6 sts.
- Row 2: Ch 2, hdc in each st across; turn.
- Row 3: Repeat Row 2. Fasten off, leaving another 8" tail for sewing.
- Hooves: Work as for Large Lamb.
Finishing
- Cut two chenille stems to 8", fold in half. Insert one through body at top of Rnd 2 and one through body at top of Rnd 7. Finish as for Large Lamb.
Read NextAlaskan Winter Crochet Afghan
Your Recently Viewed Projects
Thanks for your comment. Don't forget to share!
ramclaren 9250989
Oct 30, 2015
this is my nativity scene. I made it with part of your pattern.MERRY XMAS from New Zealand.
ConniM1
Jan 06, 2014
There is a Macram Book from 1979 to make a Nativity which includes the Manger and it just stunning! You might be able to find it in Ebay. Maybe that is what you were thinking of? Thank you for this Pattern I love it and will be working on it all year and hopefully will get it done in time for Christmas 2014 :}
ConniM1
Jan 06, 2014
I did Macram in the '70s and still do. There is a book that has the whole Nativity which included the Manger. It was just beautiful. Maybe that's what you're thinking of?
nellyvaudin 964403 2
Nov 28, 2013
comme c'est magnifique!!!! avez vous les explications en francais? mon niveau d anglais ne me permet pas de traduire correctement les explications par avance MERCI!!!
nellyvaudin 964403 2
Nov 28, 2013
comme c'est magnifique!!!! avez vous les explications en francais? mon niveau d anglais ne me permet pas de traduire correctement les explications par avance MERCI!!!
azcong 7520170
Aug 20, 2012
I love it! Thank you. We live in anRV I love it ! We live in an RV full time and travel. I just finished a quilt for the bed. My husband and I agreed I would not do large projects like that, only small miniatures or wall quilts. I have seven grandchildren who I have been knitting and crocheting for. This looks like a small project easy to do traveling and something special to leave for the grands. How would I get the patterns from the Crochet World. I think I kept the counted cross stitch magazines but they are in storage. If you send me your em address I can send them to you when I come across them.
BigHeartsOfAZOrg
Aug 22, 2011
There is a nativity pattern in the December 1981 Crochet World issue and a Camel pattern in the Crochet World 1985 Christmas in July.
opera23 6644356
Jul 31, 2011
The whole nativity set was a series in either Needlework and Crafts magazine or another like that from around 1976. I wish I would have kept them, I would love to make them now. Anyone out there have the patterns?
hellen5
Oct 17, 2013
I don't remember the magazine either, but I made them, too bad they're in the attic and I can't climb stairs. I was hoping to find another pattern too, so that I can make them for my granddaughters.
AnKsMemere
Dec 25, 2010
Are there other patterns for the WHOLE Nativity set? Would love to do Mary, Joseph, Jesus, Angel, Sheperds, Wise Men, animals, everthing.
eclecticindiv
Oct 01, 2010
What an AWESOME pattern! Thank you so much. This would make a great gift for family and friends. It makes me happy because I collect Nativity sets, and now I can add a handmade set to my collection. To help the baby Jesus stand out a bit more, try using yarn with metallic threads woven in. Thank you so much for this pattern.
Member 3750563
Sep 06, 2010
Maravillosos!!!! Lindos los muequitos de Navidad. Muchas gracias. Un abrazo.
Report Inappropriate Comment
Are you sure you would like to report this comment? It will be flagged for our moderators to take action.
Thank you for taking the time to improve the content on our site.