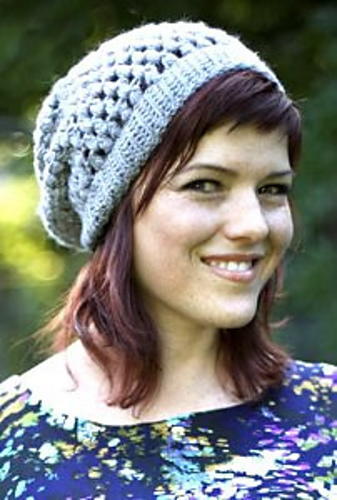
Blooming Purple Beanie
This Blooming Purple Beanie is a great crochet beanie hat. The beautiful flower on the side makes this fun and unique hat perfect for winter and spring! With this easy to follow pattern, you'll be making these colorful hats in tons of colors! Learn how to crochet a hat and make sure your head stays warm all winter long. This is a great gift idea for the holiday season, so make one for yourself and a few more for your favorite people. This homemade hat will help you update your look and add some spice to a cold winter wardrobe.

Materials:
- “Washable Ewe™” yarn: 1 ball 3540 Currant
- Crochet Hook: 5.5mm [US I-9]
- Yarn needle
GAUGE: Round 1 of Hat = 1½” across; Rounds 1 and 2 of Hat = 2½” across. CHECK YOUR GAUGE. Use any size hook to obtain the gauge.
SPECIAL STITCHES
Beg-Cl = Beginning Cluster – (first leg) Yo, insert hook in indicated st and draw up a loop, yo, and draw through 2 loops on hook; (2nd leg) yo, insert hook in next st and draw up a loop, yo and draw through 2 loops on hook, yo and draw through 3 remaining loops on hook.
Cl = Cluster – Yo, insert hook in indicated st and draw up a loop, yo and draw through 2 loops on hook, yo, insert hook in same st and draw up a loop, [yo and draw through 2 loops on hook] twice (2 loops remain on hook).
2Cltog = 2 Cluster Together – (first leg) Cl in indicated st (2 loops remain on hook; (2nd leg) Cl in next indicated st (3 loops remain on hook), yo and draw through all 3 loops on hook.
3Cltog = 3 Cluster Together – (first leg) Cl in indicated st (2 loops remain on hook; (2nd leg) Cl in next indicated st (3 loops remain on hook); (3rd leg) Cl in next indicated st (4 loops remain on hook), yo and draw through all 4 loops on hook.
NOTE: Hat and flower are worked with right side facing at all times. Do not turn at the end of rounds.
Instructions:
HAT:
Ch 3; slip st in first ch from hook to form a ring.
Round 1 (Right Side): Ch 3 (counts as dc here and throughout), 10 dc in ring; join with slip st in top of beginning ch—11 dc.
Round 2: Ch 3, dc in same st as join, 2 dc in each remaining dc around; join with slip st in top of beginning ch—22 dc.
Round 3: Ch 2, Beg-Cl working first leg in same st as join, ch 3, Cl in back bar of 3rd ch from hook (horizontal Cl made – 2 loops remain on hook), Cl in same st as 2nd leg of previous Beg-Cl (3 loops remain on hook), Cl in next dc, yo and draw through all 4 loops on hook, *ch 3; 3Cltog working first leg in back bar of 3rd ch from hook, 2nd leg in same dc as last leg of previous Cl, and 3rd leg in next dc; repeat from * 18 more times, ch 3; 3Cltog working first leg in back bar of 3rd ch from hook, 2nd leg in same dc as last leg of previous Cl, and 3rd leg in slip st join of previous round; ch 3, Beg-Cl in back bar of 3rd ch from hook; join with slip st in base of first horizontal Cl—22 horizontal Cl.
Rounds 4–12: Ch 2, 2Cltog working first leg in same st as join and 2nd leg at base of next horizontal Cl, *ch 3; 3Cltog working first leg in back bar of 3rd ch from hook, 2nd leg in same st as last leg of previous Cl, and 3rd leg in base of next horizontal Cl; repeat from * 18 more times, ch 3; 3Cltog working first leg in back bar of 3rd ch from hook, 2nd leg in same st as last leg of previous Cl, and 3rd leg in slip st join of previous round, ch 3, Beg-Cl in back bar of 3rd ch from hook; join with slip st in base of first horizontal Cl—22 horizontal Cl.
Fasten off.
FLOWER:
Ch 3; slip st in first ch to form a ring.
Round 1: [Sc in ring, ch 3] 6 times; join with slip st in first ch-3 space—6 sc and 6 ch-3 spaces.
Round 2: Ch 1, 5 sc in each ch-3 space around; join with slip st in first sc—6 petals.
Round 3: Working behind the petals of Round 2, [slip st around post of next sc of Round 1, ch 3] 6 times; join with slip st in first ch-3 space.
Round 4: Ch 1, (sc, hdc, 3 dc, hdc, sc) in each ch-3 space around; join with slip st in first sc—6 petals.
Round 5: Working behind petals of Round 4, ch 5, [skip next sc of Round 4, slip st around post of next sc of Round 4, ch 5] 5 times; join with slip st in first ch-5 space.
Round 6: Ch 1, (sc, hdc, 5 dc, hdc, sc) in each ch-5 space around; join with slip st in first sc—6 petals.
Fasten off.
FINISHING:
Fold back brim. Using photograph as a guide, sew flower to hat.
Weave in ends.
ABBREVIATIONS:
ch = chain; dc = double crochet; hdc = half double crochet; sc = single crochet; sl st = slip stitch; st(s) = stitch (es); [] = work directions in brackets the number of times specified; * = repeat whatever follows the * as indicated; () = work directions in parentheses into same st.
Read NextUnbelievably Easy Crochet Baby Hat
Your Recently Viewed Projects

Thanks for your comment. Don't forget to share!
lpalmer59 7490208
Mar 23, 2016
I love this hat I think the flower did it for me. I can see me in this in several different colors, and it looks very modern and trendy, and I like that. I really like hats, but am very picky about what hats I wear, as I do not want to look doughty. I think I am going to look really good in this one!
maryyounger0820 56 53160
Oct 16, 2014
Would like to see video on this pattern, not sure what they mean by ( Leg ).
FaveCrafts Editor JL
Oct 16, 2014
Hi there, There is a video tutorial on Kim Guzman's YouTube channel. Simply search Charleston Cloche on YouTube and you'll find it. Thanks! - Julia from FaveCrafts
faeriequeen2002 56 43277
Oct 27, 2014
Re: leg of the cluster. A cluster is made of long stitches such as hdc or dc or tr, right? So each one of these long stitches are one of the "legs", of the "columns", of the "poles" or whatever long object you want to use as an analogy. One could say "first part" and "second part", but saying 'leg' is more descriptive. The words in parentheses (first leg, second leg) are there to clarify, but if they confuse you you can just skip/ignore them, it won't make any difference to the pattern.
mindy 7420581
Feb 26, 2014
I used the video and figured out the stitches no problem. I'm about half way done but this is not looking like a hat!!! It looks more like a frilly doily. Did I do something wrong or will it take shape as I continue???
FaveCrafts Editor JL
Aug 18, 2014
Hi there, I have updated the pattern instructions so that should help you. Leave another comment if you're still confused - thanks!
denverdeb
Sep 10, 2014
Where did you find a video for this pattern, Mindy? I really want to make this beanie, but I am completely confused with this pattern. I can't tell you how frustrated I am also because I can't find the video that you refer to here. Can you give me a better idea of how to search for this. I'd REALLY appreciate it. Thanks Deb
carmelitavluna 311 5155
Jan 05, 2014
I found this pattern a year ago, I think it is one of the prettiest hats , I had a litlle trouble at first but after looking at the video it was very easy to fallow, I don't even remember how many I made and gave them away as presents, know I have started again and I am on my third one. Thank you very much for posting the video. Carmen
Member 7720931
Nov 01, 2013
There's a video on youtube for this specific pattern. It is easy but my problem is it always comes out big. I went a size down on the hook and still too big. I'll go another hook size down and if it still too big I give up!
anita 2082604
Nov 05, 2013
Same here, I'm down to a G hook and trying to keep 3rd row very tight, otherwise I'm getting too much fullness.
kandm55 4680958
Oct 24, 2013
I hesitate to start this pattern as I have never seen "leg" in a crochet list of terms or stitches. Any one know what this means? I love the hat & would love to make it if possible. I'd appreciate a video!
Camtogo
Aug 17, 2014
You can find this pattern through the red heart site, instructions are clearer. http://www.redheart.com/free-patterns/cha == rleston-cloche
heathermatheney 07 31277
Oct 15, 2013
I also had a hard time with this pattern, I revisited it though and found it easier and workable this time. As confusing as it is, it does work and I can't think of a better way to describe the stitch.
2carebear 7297497
Sep 17, 2013
This pattern is one of the worst to try to work. I'm not a novice with crochet and I even asked for help from a fellow-crocheter and we together couldn't figure it out. I'll look for another pattern until this one is fixed. Too bad!
Kim Guzman
Feb 27, 2013
The instructions are correct and very clear. The stitch pattern is just challenging. http://kimguzman.wordpress.com/2011/09/18/tutorial-charleston-cloche/
thelaydnred 809634 8
Feb 20, 2013
would be nice to see viedo, very hard to understand instructions, I wanted to make this hat very badly
creedelady 9656073
Jan 15, 2013
Need better instructions starting at Row 4. Nice hat, video would be helpful
jujuofvanhoof 6667 931
Jan 14, 2013
Round 4 of this pattern is very confusing cannot get pattern to work as written very disappointed that I can't make this hat.
dorotheaschmalfeld t 4120021
Jan 12, 2013
do you have a video on the special stiches for this hat?
stephenw 4320359
Jan 11, 2013
I need to see video on how to crochet blooming purple hat
CNTRYGAL89
Jan 02, 2013
I love this pattern, but I am having trouble understanding row 3 of the flower. Is there a video tutorial or can someone help me?
loissoll 5432364
Nov 08, 2012
I've finally completed to the end of row 5. The hat lies flat. If I continue as the pattern says, will it end up curving to the head? It seems now that it will be loose and shapeless and not sure I want to put in the time to find out.
Kim Guzman
Apr 01, 2012
Please see my blog for a video on how to do the stitches. I was, unfortunately, in a rush to get the video finished so that people could understand the instructions. After several "takes", I had to turn on the fan because, wow, it gets hot in Arkansas! The fan makes excessive noise. The pattern is rated Easy because it fits into YarnStandards.com that way. But, the instructions are very involved, requiring concentration until you know what to do. Once you have it, the hat goes very quickly. http://kimguzman.wordpress.com/2011/09/18/tutorial-charleston-cloche/
dey1960
Apr 03, 2012
Thank you so much for this great video! It helped a lot and it was nice to see that my "wavy doily" wasn't so far off after all. Can't wait to finish this. I make hats for chemo patients and this is so pretty I'm happy to be able to finally make it correctly. P.S. Love your nail polish :-)
Kim Guzman
Apr 04, 2012
You're most welcome. I'm glad it helped. I just wish I had known about so many of my patterns being on FaveCrafts a lot earlier. I would have been able to help sooner. :-)
dmos1107 3967188
Mar 31, 2012
I agree with girlienumday, instructions need to be clairfied. Definately not an easy pattern.
girliemunday
Mar 30, 2012
The instructions are to vague. I'm thinking a tutorial would help remedy everyone's confusion on the clusters. I love the look of the hat but these instructions have got me baffled!
Sharon Mann
Feb 11, 2012
This is a beautiful hat but I am stuck on row 4
Jenn L
Feb 12, 2012
It sounds more complicated than it actually is. I have to say, though, this hat is taking forever to make. Each row of these clusters is taking way too long. Plus, the clusters seem to take up more space than the first 3 rows, so there's some buckling. I'm hoping that when it's done, and on my head, it will lay more flat.
dey1960
Mar 27, 2012
same here - my beanie begins to look like a wavy coaster - have no idea why. aaargh!
Report Inappropriate Comment
Are you sure you would like to report this comment? It will be flagged for our moderators to take action.
Thank you for taking the time to improve the content on our site.