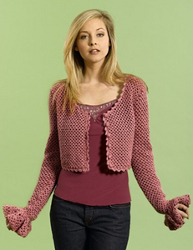
Cropped Lacy Cardigan
Using a free crochet pattern from Caron International Yarns like this one you can make a cute cropped cardigan. The ruffle sleeves add a little extra design that you will have fun in. The buttons match the cardigan because you crochet those too.

Materials:
- Caron International's Simply Soft (100% acrylic; 6 oz/170 g, 315 yds/288 m skein):
- # 9721 Victorian Rose, 3 (3, 4) skeins
- One size US I/9 (5.5 mm) crochet hook, or size to obtain gauge
- Split-ring stitch markers
- Yarn needle
- One size US G/7 (4.5 mm) for crochet buttons (optional)
- Or Six - 5/8" buttons (optional)
- Row counter
GAUGE
In Mesh stitch pattern, 7 spaces and 14 1/2 rows = 4"/10cm using larger hook
SPECIAL TECHNIQUES
Inc 1 (at beg of row): After turning, ch 4, sc in first st (last sc of previous row) – 1 new space made. Then repeat from * of Mesh st.
Dec (at end of row): Work across until number of spaces indicated in instructions remain; ch 1, insert hook in next space, yo and pull up a loop, yo and draw through first loop on hook, insert hook in space under the two loops on hook, yo and pull up a loop, yo and draw through 3 loops on hook; turn. Continue in Mesh st.
STITCHES USED
Chain (ch)
Double crochet (dc)
Half double crochet (hdc)
Single crochet (sc)
Treble (tr)
Mesh Stitch (multiple of 2 sts).
- Row 1 (RS): Sc in sixth ch from hook (counts as first space); *ch 3, skip 1 ch, sc into next ch; repeat from * to end; turn.
- Row 2: Ch 4, sc in first space, *ch 3, sc into next space; repeat from *across; turn.
- Repeat Row 2 for Mesh st.
Shell: Work [hdc, dc, hdc] in st indicated.
RIGHT FRONT
- Foundation Row: Using larger hook, loosely ch 32 (36, 40).
- Begin Mesh st—14 (16, 18) ch-spaces after Row 1.
- Work even for 8 more rows; end with a RS row—9 rows total.
- Shape Side
- Row 10: (WS) At armhole edge, inc 1, work to end—15 (17, 19) spaces.
- Rows 11 – 19: Work even.
- Row 20: Repeat Row 10—16 (18, 20) spaces.
- Rows 21 –32: Work even.
- Shape Armhole
- Next Row: (RS) Work across until 3 spaces remain, work dec—13 (15, 17) spaces remain.
- Continuing in Mesh st, work 2 (4, 6) rows even.
- Shape Front Neck
- Next Row: (WS) Work across until 3 spaces remain, work dec at neck edge; turn—10 (12, 14) spaces remain.
- Next Row: (RS) At armhole edge, dec 1 space—9 (11, 13) spaces remain.
- Next Row: At neck edge, dec 2 spaces—7 (9, 11) spaces remain.
- Working armhole edge even, dec 1 space at neck edge every other row 3 times—4 (6, 8) spaces remain; 44 (46, 48) rows completed.
- Work even until armhole measures 7 (7 1/2, 8)" from beginning of shaping, end with a RS row.
- Shape Shoulder
- Work 2 (3, 4) spaces, slip st into next space.
- Fasten off.
LEFT FRONT
Work as for right Front, reversing shaping.
BACK
- Foundation Row: Using larger hook, loosely chain 62 (70, 78).
- Begin Mesh st– 29 (33, 37) ch-spaces after Row 1.
- Work even for 8 more rows; end with a RS row—9 rows total.
Shape Sides
- Rows 10 and 11: Inc 1 space at beg of next 2 rows—31 (35, 39) spaces. Work even for 8 rows.
- Rows 20 and 21: Repeat Rows 10 and 11—33 (37, 41) spaces. Work even until piece measures same as right Front to underarm—32 rows completed.
Shape Armholes
- Dec 3 spaces at end of next 2 Rows—27 (31, 35) spaces remain. Work even for 2 rows.Dec 1 space at end of next 2 rows—25 (29, 33) spaces remain. Work even until piece measures 4 rows less than right Front to shoulder shaping.
Shape Neck and Shoulder
- Next Row: (RS) Work 5 (7, 9) spaces, dec at neck edge; leave remaining spaces unworked; turn—5 (7, 9) spaces for shoulder. Work 1 row even.
- Next Row: Work 4 (6, 8) spaces; dec at neck edge, turn—4 (6, 8) spaces remain. Work 1 row even.
Shape Shoulder
- Work 2 (3, 4) spaces, slip stitch into next space.Fasten off.Join yarn at opposite armhole edge; work as for first side.
SLEEVE – 2 lengths given (Longer length shown). Longer <shorter>sleeve, including 4" ruffle, measures 25<23>" long, including cap. Instructions for shorter length are shown in < >.
- Foundation Row: Using larger hook, loosely chain 34.
- Begin Mesh st—15 ch-spaces after Row 1.
- Work even for 4 (4, 2) rows.Inc 1 space each side at beg of next 2 rows—15 (15, 17) spaces; 5 rows total.
Shape Sleeve
- Inc 1 space at beginning of this row, then every 9 (7, 7) <7 (5, 5)> rows 6 (8, 8) times—21 (23, 25) spaces.
- Work even until piece measures 16 1/2 <14 1/2)" from Foundation row.
Shape Cap
- Dec 2 spaces at end of next 2 rows—17 (19, 21) spaces remain.Dec 1 space at end of next 4 rows—13 (15, 17) spaces remain.
- Work even for 2 rows.Dec 1 space at end of next 8 rows—5 (7, 9) spaces remain
- Fasten off.
SLEEVE RUFFLE
- Note: Ruffle is worked in-the-round; place a marker (pm) in the dc or tr that ends each rnd.
- With RS held together, partially seam lower edge of sleeves.
- Rnd 1: With right side facing, join yarn in firstspace on lower edge next to seam; * ch 4, sc in next space; repeat from * to last space, ch 2, dc into same space as beg ch 4 (counts as last ch-4 space); pm in top of dc—15 spaces.
- Rnd 2: * Ch 4, sc in next space; ch 5, sc in same space; repeat from * to last space (formed by ch-2 and dc), end ch 4, sc in last space, ch 2, tr in marked st of previous row (counts as last ch-5 space); pm.
- Rnds 3 and 6: Ch 4, sc in each ch-4 and ch-5 space around to last space, end ch 2, dc in top of marked st; pm—30 ch-4 spaces after Rnd 3; 45 ch-4 spaces after Rnd 6.
- Rnd 4: Work shell in marked dc of Rnd 2, sc in next space; * ch 4, sc into next space, shell in sc between spaces, sc into next space; repeat from * around, end ch 2, dc in marked st; pm—15 ch-4 spaces, 15 shells.
- Rnd 5: *Ch 4, sc in dc of shell, ch 4, sc into next space, ch 5, sc in same space; repeat from * around, end ch 4, sc in top of dc of last shell, ch 4, sc in last space (ch-2 and dc of previous row), ch 2, tr in top of marked st; pm—30 ch-4 spaces, 15 ch-5 spaces.
- Rnd 7: Work shell in dc of Rnd 5, sc in next space; * ch 4, sc into next space, ch 5, sc into same space, ch 4, sc into next space; work shell in sc between spaces, sc into next space; repeat from * around, end ch 2, dc in top of marked dc; pm—30 ch-4 spaces, 15 ch-5 spaces, 15-shells.
- Rnd 8: [Ch 4, sc] in dc of each shell and in each ch-4 and ch-5 space around; end ch 2, dc in top of marked stitch; pm—60 ch-4 spaces.
- Rnd 9: * [Ch 4, sc] in next 3 spaces, work shell in next sc, sc in next space; repeat from * around, end work shell in sc between last two spaces, slip st in top of marked dc and in next two ch of ch-4 space of previous row—45 ch-4 spaces, 15 shells.
- Rnd 10: [Ch 5, sc] in each space and in dc of each shell around, end ch 2, tr in slip st at beg of rnd—60 ch-5 spaces. Fasten off. Repeat for second sleeve.
FINISHING
- Seam shoulders seams. Set in sleeves; sew side and sleeve seams.
- Note: You may find it helpful to place markers at center Back, and center Back neck to help in working the same number of sts in each section of Edging.
Edging
- With right side facing, join yarn at right side seam.
- Rnd 1: Ch 1, * sc evenly around lower edge, along center fronts and neck shaping, working 3 sc in each corner at lower edge and Front neck edge, join with a slip stitch to beg sc; pm.
- Rnd 2: Slip st in next sc, work shell in next sc, * slip st in each of next 2 sc, shell in next sc; repeat from * around, working ch-5 button loops evenly spaced on center right Front edge between 2 slip sts in pattern, end with a slip st in last sc at side seam. Fasten off. Weave in ends. Sew crocheted or purchased buttons opposite button loops.
Crochet Buttons (optional – make 6 if desired)
Place working yarn across 8" of yarn tail, making a loop. Insert smaller hook through crossing and pull up a loop. Ch 2, work 10 hdc into loop. Cut yarn, leaving an 8" tail. Pull yarn out of last hdc; with tail threaded on yarn needle, pass tail through top of first hdc and back through top 'v' of last hdc; weave yarn through outer edge of all 10 sts. Turn button over to WS; thread up beginning yarn tail and weave through all hdc around; pull up tightly to close center opening. Pull up and tighten yarn woven through outer stitch edges and tie in knot with yarn tail at center.

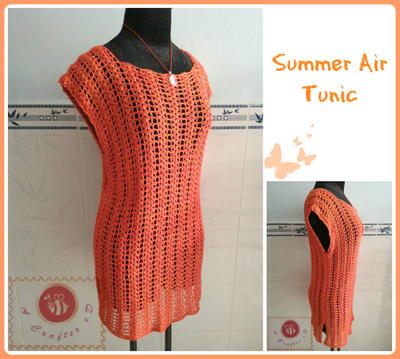
Read NextSummer Air Crochet Tunic
Your Recently Viewed Projects
Thanks for your comment. Don't forget to share!
lcarr
Apr 26, 2017
This would make a wonderful little jacket to wear with a summer dress, or even with jeans and a tank top. You could also add a peplum and maybe a ruffled collar to it and make it really dressy. I am getting so many ideas for this pattern. I am definitely going to have to add it to my to do list.
GrandmaT
Apr 20, 2017
It would be much cuter with short sleeves trimmed same way as neck edge.
dainty
Apr 03, 2012
Has anyone made this pattern? Is it easy Int? Advanced? I want to try it.. but.. I need a little encouragement lol* TY* for all the free patterns*
Teariana Designs
Mar 22, 2012
Beautiful but would definitely use the shorter sleeve length, possibly make it even shorter because my arms aren't all that long. :)
Report Inappropriate Comment
Are you sure you would like to report this comment? It will be flagged for our moderators to take action.
Thank you for taking the time to improve the content on our site.