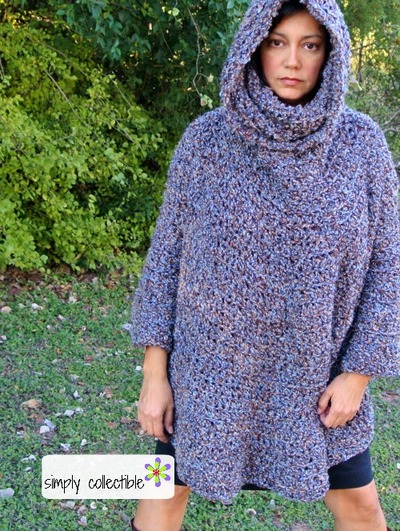
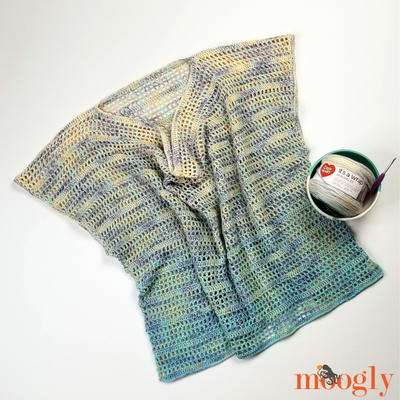
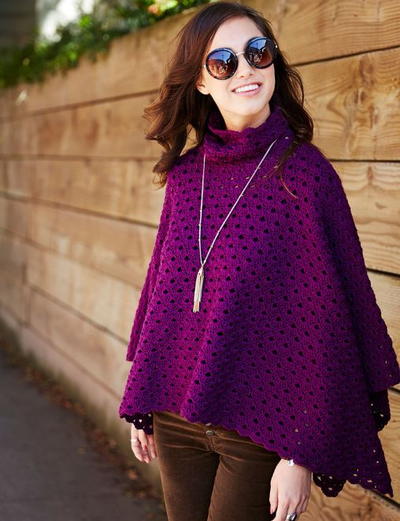
Perfectly Panache Chic Poncho

The Perfectly Panache Chic Poncho is a one-size-fits-all design that features a turtleneck for warmth and maximum coziness. This intermediate pattern features gorgeous shell motifs and is worked up using basic single and double crochet stitches and is slightly oversized so it covers your arms. Make this in the featured rich purple shade, or choose your own color - this would look so great in a standard neutral that can go with anything in your closet!

Crochet HookH/8 or 5 mm hook
Yarn Weight(4) Medium Weight/Worsted Weight and Aran (16-20 stitches to 4 inches)
Crochet Gauge3 shells = 4" (10 cm); 8 rows = 3.25” (8cm)
Finished SizeProject measures 48” [122cm] in width, 22” [56 cm] in length
Materials List
- RED HEART® Chic Sheep by Marly Bird™: 10 balls of 5619 Regal
- Susan Bates® Crochet Hook: 5mm [US H-8]
- Yarn needle
- Stitch Markers
Poncho Front
-
Chain 218
-
Row 1 (RS): Sc in 2nd ch from hook, *skip 2 ch, 5 dc in next ch (shell made), skip 2 ch, sc in next ch; repeat from * across. Turn- 36 shells.
-
Row 2: Ch 4 (counts as dc, ch 1 throughout), dc in first sc, *skip 2 dc, sc in next dc, skip 2 dc**, (dc, ch 3, dc) in next sc; repeat from * across ending at **, (dc, ch 1, dc) in last sc. Turn.
-
Row 3: Ch 3 (counts as dc throughout), 2 dc in first dc, *sc in next sc**, 5 dc in next ch-3 space; repeat from * across ending at **, 3 dc in 3rd ch of tch. Turn.
-
Row 4: Ch 1, sc in first dc, *skip 2 sc, (dc, ch3, dc) in next sc, skip 2 sc, sc in next dc; repeat from * across to tch, sc in top of tch. Turn.
-
Row 5: Ch 1, sc in first sc, *5 dc in next ch-3 space, sc in next sc; repeat from * across. Turn.
-
Repeat Rows 2-5 twelve more times. Fasten off.
Poncho Back
Note: Back panel starts by working in the opposite side of the foundation chain on the front panel.
-
Row 1: Join yarn with slip st to opposite side of foundation chain on RS of Front (in the same ch as the first sc of Row 1 on Front), ch 1, sc in same ch. *skip 2 ch, 5 dc in next ch, skip 2 ch, sc in next ch; repeat from * 14 more times. Ch 35 (creates neck opening), skip 35 ch; sc in next ch. Repeat from * across to end. Turn- 30 shells.
-
Row 2: Ch 4, dc in first sc, *skip 2 dc, sc in next dc, skip 2 dc, (dc,ch 3, dc) in next sc; repeat from * across to neck opening. [Skip 2 ch, sc in next ch, skip 2 ch, (dc, ch 3, dc) in next ch] 5 times, skip 2 ch, sc in next ch, skip 2 ch, (dc, ch 3, dc) in next sc on back. Repeat from * across to end. Turn.
-
Rows 3 - 5: Repeat Rows 3-5 of Front Repeat Rows 2-5 of Front twelve more times. Fasten off.
Cowl Pattern
Note: Cowl is worked in opposite side of foundation chain of Front and Back Panel for seamless stitch pattern.
Note: The stitch pattern was worked in rows for Front and Back and is now worked in rounds for Cowl.
-
Round 1: Join yarn with slip st on RS Back on opposite side of foundation chain in any chain which a sc was worked on Row 1. Ch 1, sc in same ch, *skip 2 ch, 5 dc in next ch, skip 2 ch**, sc in next ch; repeat from * around ending at **, slip st to first sc. Do not turn- 12 shells.
-
Round 2: Ch 6 (counts as dc, ch 3 throughout), dc in first sc, *skip 2 dc, sc in next dc, skip 2 dc**, (dc, ch3, dc) in next sc; repeat from * around ending at **, slip st to 3rd ch of beginning ch. Do not turn.
-
Round 3: Slip st into first ch-space (formed by beginning ch), ch 3, 4 dc in same ch-space, *sc in next sc**, 5 dc in next ch-3 space; repeat from * around ending at **, slip st to top of beginning ch 3. Do not turn.
-
Round 4: Slip st in next 2 dc, ch 1, sc in same dc, *skip 2 dc, (dc, ch 3, dc) in next sc, skip 2 dc**, sc in next dc; repeat from * around ending at **, slip st to first sc. Do not turn.
-
Round 5: Ch 1, sc in first sc, *5 dc in next ch-3 space**, sc in next sc; repeat from * around ending at **, slip st to first sc. Do not Turn.
-
Repeat Rounds 2 - 5 three more times. Fasten off.
Finishing
Weave in all loose ends. Soak project in cool bath, wrap in towels and gently roll out water. Lay project out to schematic size and pin in place to dry.
-
Pattern diagram

Do you prefer ponchos, ruanas, shawls, or all of the above?
Read NextEasy Collar Crochet Dress
Your Recently Viewed Projects
Thanks for your comment. Don't forget to share!
Delphine Bryant
Sep 25, 2018
This is just fab-u-lous! From a distance, it looks like material instead of a crochet item. I do not know if it is because of the color yarn or the type but this is really pretty. Not a fan of cowls but I think I would rock it in this design.
Morehouse17
Aug 24, 2018
Visit this link if you are wanting to see the finished project in different pictures. http://www.redheart.com/free-patterns/perfectly-panache-chic-poncho#prettyPhoto
princess6860504
Jul 15, 2018
So elegant and refined! I see a lot of poncho patterns featured that look like a cozy blanket by the fire. But this one is suitable for the working woman at the office, or a night on the town with hubby or the girls. Simple to construct with just double and single crochets. And the COWL neck is just what I would want!
Cheryl Y
Mar 23, 2018
This Perfectly Panache Chic Poncho is well named! I love the look of this poncho, the color is right up my ally and there is nothing better then a poncho with a cowl. The written pattern right here on this page is well written and easy to understand and follow. I'm looking forward to wearing this one! Thank you so much for sharing this free crochet poncho pattern.
Zeemer
Mar 21, 2018
I looove this Perfectly Panache Chic Poncho. It is so elegant and regal! There's sonething about ponchos that make you look chic and fashionable. I want to make this in a different color thought other than purple.
Report Inappropriate Comment
Are you sure you would like to report this comment? It will be flagged for our moderators to take action.
Thank you for taking the time to improve the content on our site.