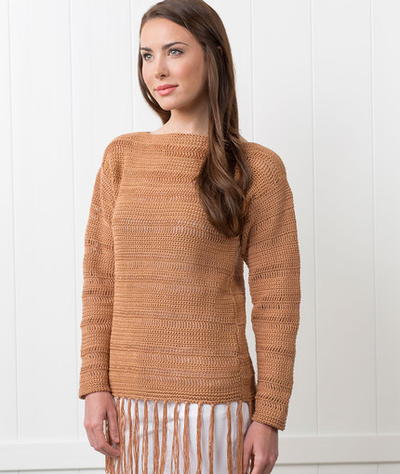
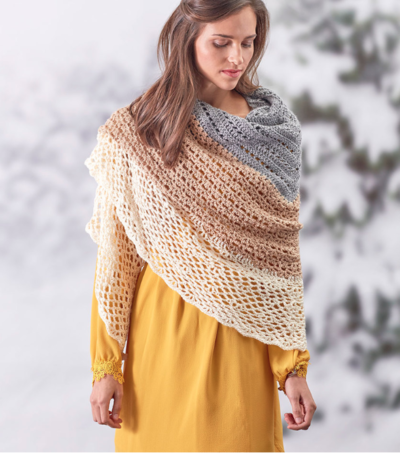
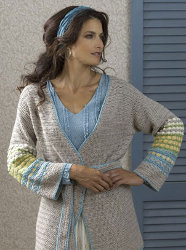
Comfortable Napa Belted Jacket
This Comfortable Napa Belted Jacket is a pattern you have to get your hands on. The colors compliment each other so well and the design is just perfect. It's an intermediate pattern from Caron International Yarns but a free crochet pattern at that.
Materials:
- Naturally Caron.com Spa
- (75% Microdenier acrylic, 25% Bamboo; 3 oz/85g, 251 yds/230m ball):
- 21 (24, 27, 30, 33) oz MC, 3 oz A, 3 oz B, 3 oz C, 3 oz D. Shown in: #0008 Misty Taupe (MC); #0005 Ocean Spray (A); #0003 Soft Sunshine (B); #0004 Green Sheen (C); #0007 Naturally (D).
- One size US G-6 (4 mm) crochet hook, or size to obtain gauge
- Stitch Markers
- Yarn needle
Sizes:
S (M, L, 1X, 2X)
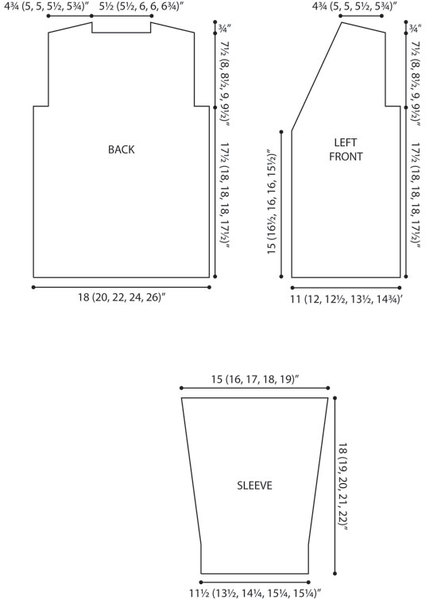
FINISHED MEASUREMENTS:
Chest 36 (40, 44, 48, 52)"/91.5 (101.5, 112, 122, 132) cm, closed with about 4"/10 cm overlap
Length25 (26, 26 1/2, 27, 27)"/63.5 (66, 67.5, 68.5, 68.5) cm
GAUGE
In double crochet, 17 sts and 11 rows = 4"/10 cm.
STITCHES USED
Chain (ch), double crochet (dc), half double crochet (hdc), single crochet (sc), slip stitch (slip st)
SPECIAL TERMS
dc2tog: Double crochet 2 together –[Yarn over, insert hook in next st and pull up a loop, yarn over and draw through 2 loops] twice, yarn over and draw through 3 loops on hook.
lhdc: Long half double crochet – Work as for hdc, except insert hook in ch-1 space 2 rows below and draw the loop up even with current row.
bobble: [Yarn over, insert hook in indicated stitch or space and draw up a loop; yarn over, draw through 2 loops on hook] 4 times; yarn over draw through all 5 loops on hook.
NOTE
To change color, work last stitch of old color to last yarn over; yarn over with new color and draw through all loops on hook to complete stitch. Carry colors not in use loosely up side of piece. When seaming, take care to hide unused strands of color.
BACK
With A, chain 79 (87, 96, 104, 113).
Row 1: Hdc in 3rd ch from hook and in each ch across, turn—77 (85, 94, 102, 111) hdc. Fasten off.
Join MC with slip st in first st.
Row 2 (WS): Ch 3 (counts as first dc here and throughout), dc in each st across, turn.
Repeat last row until piece measures 17 1/2 (18, 18, 18, 17 1/2)"/44.5 (45.5, 45.5, 45.5, 44.5) cm from beginning; end with a WS row.
Shape Armholes
Next Row (RS): Slip st over first 7 (10, 13, 15, 17) sts, ch 3 (counts as dc with base at next st), dc in each st across to last 7 (10, 13, 15, 17) sts; leave last 7 (10, 13, 15, 17) sts unworked, turn—63 (65, 68, 72, 77) sts.
Next Row: Ch 3, dc in each st across.
Repeat last row until armhole measures 7 1/2 (8, 8 1/2, 9, 9 1/2)"/()cm from beginning of shaping; end with a WS row.
Shape First Shoulder and Neck
Next Row (RS): Slip st over first 6 (7, 7, 7, 8) sts, sc in next st, hdc in next st, dc in next 12 (12, 12, 14, 14) sts; leave remaining sts unworked, turn.
Next Row: Ch 3, dc in next 5 (5, 5, 6, 6) sts, hdc in next st, sc in next st. Fasten off.
Shape Second Shoulder and Neck
With RS facing, skip next 23 (23, 26, 26, 29) sts following first shoulder, join yarn in next st.
Next Row: Ch 3, dc in next 11 (11, 11, 13, 13) sts, hdc in next st, sc in next st; leave remaining sts unworked, turn.
Next Row: Slip st over first 6 (7, 7, 7, 8) sts, sc in next st, hdc in next st, dc in each remaining st across. Fasten off.
LEFT FRONT
With A, chain 49 (53, 55, 59, 65).
Row 1: Hdc in 3rd ch from hook and in each ch across, turn—47 (51, 53, 57, 63) sts. Fasten off.
Join MC with slip st in first st.
Row 2 (WS): Ch 3 (counts as first dc here and throughout), dc in each st across, turn.
Repeat last row until piece measures 15 (16 1/2, 16, 16, 15 1/2)"/38 (42, 40.5, 40.5, 39.5) cm from beginning; end with a RS row.
Shape Neck
Next Row (WS – neck edge decrease): Ch 3, dc2tog, dc in each st across, turn—46 (50, 52, 56, 62) sts.
Next Row (RS – neck edge decrease): Ch 3, dc in each st across to last 3 sts, dc2tog, dc in last st, turn—45 (49, 51, 55, 61) sts.
Next 5 (3, 3, 3, 3) Rows: Ch 3, dc in each st across, decreasing 1 st at neck edge as established, turn—40 (46, 48, 52, 58) sts.
Piece should measure about 17 1/2 (18, 18, 18, 17 1/2)"/44.5 (45.5, 45.5, 45.5, 44.5) cm from beginning.
Shape Armhole
Next Row (RS):Slip st over first 7 (10, 13, 15, 17) sts, ch 3 (counts as dc with base at next st), dc in each st across to last 3 sts, dc2tog, dc in last st, turn—32 (35, 34, 36, 40) sts.
Next 9 (10, 9, 8, 11) Rows: Ch 3, dc in each st across, decreasing 1 st at neck edge as established, turn—23 (25, 25, 28, 29) sts.
Next Row: Ch 3, dc in each st across, turn.
Next Row: Ch 3, dc in each st across, decreasing 1 st at neck edge as established, turn—22 (24, 24, 27, 28) sts.
Next 4 (6, 6, 8, 8) Rows: Repeat last 2 rows 2 (3, 3, 4, 4) more times—20 (21, 21, 23, 24) sts.
Next Row: Ch 3, dc in each st across, turn.
Repeat last row until armhole measures 7 1/2 (8, 8 1/2, 9, 9 1/2)"/()cm from beginning of shaping; end with a WS row.
Shape Shoulder and Neck
Next Row (RS): Slip st over first 6 (7, 7, 7, 8) sts, sc in next st, hdc in next st, dc in next 12 (12, 12, 14, 14) sts; leave any remaining sts unworked, turn.
Next Row: Ch 3, dc in next 5 (5, 5, 6, 6) sts, hdc in next st, sc in next st. Fasten off.
RIGHT FRONT
Work as for left front reversing all shaping.
SLEEVE (make 2)
With A, chain 51 (59, 63, 67, 67).
Row 1: Hdc in 3rd ch from hook and in each ch across, turn—49 (57, 61, 65, 65) sts. Fasten off.
Join MC with slip st in first st.
Row 2 (WS): Ch 3 (counts as first dc here and throughout), dc in each st across, turn.
Repeat last row until piece measures 3 (3, 3, 3 1/2, 3 1/2)"/7.5 (7.5, 7.5, 9, 9) cm from beginning; end with a WS row.
Shape Sleeve
Work the next 44 rows changing colors as specified in the following color sequence.
Color Sequence: Work [2 rows with MC, 2 rows with A] twice, 2 rows with B, 2 rows with A, [2 rows with C, 2 rows with B] 3 times, [2 rows with C, 2 rows with D, 2 rows with MC, 2 rows with D] twice, 2 rows with MC.
Row 1 (increase – RS): Ch 3, dc in first st (increase made), dc in next st, ch 1, skip next st, *dc in next 3 sts, ch 1, skip next st; repeat from * across to last 2 sts, dc in next st, 2 dc in last st, turn—51 (59, 63, 67, 67) sts.
Row 2: Ch 1, sc in each st to next ch-1 space, *ch 1, skip next ch-1 space, sc in next 3 sts; repeat from * across, sc in any remaining sts to end, turn.
Row 3: Ch 1, sc in each st to 1 st before next ch-1 space, *skip next st, 3 lhdc in next ch-1 space 2 rows below, skip next sc, sc in next sc; repeat from * across, sc in any remaining sts to end, turn. Place a marker in each sc between 3-lhdc groups. If there are 5 stitches or more before the first marker and after the last marker, place additional markers 3 sts before first and 3 sts after last marker. Move markers up as work progresses.
Row 4 (increase): Ch 3, dc in first st, dc in each st across to last st, 2 dc in last st, turn—53 (61, 65, 69, 69) sts.
Row 5: Ch 3, dc in each st to next marker, ch 1, skip marked st, *dc in next 3 sts, ch 1, skip marked st; repeat from * across, dc in any remaining sts to end, turn. Remove markers.
Row 6: Repeat Row 2.
Row 7 (increase): Ch 1, 2 sc in first st, sc in each st to 1 st before next ch-1 space, *3 lhdc in next ch-1 space 2 rows below, skip next sc, sc in next sc; repeat from * across, sc in any remaining sts to last st, 2 sc in last st, turn—55 (63, 67, 71, 71) sts. Place a marker in each sc between 3-lhdc groups. If there are 5 stitches or more before the first marker and after the last marker, place additional markers 3 sts before first and 3 sts after last marker. Move markers up as work progresses.
Rows 8–15: Repeat Rows 4–7 twice, increasing at beginning and end of every third row only (Rows 10 and 13). Note: Increase by working 2 sts in the first and last st.
Row 16 (increase): Ch 1, 2 sc in first st, sc in each st across to last st, 2 sc in last st, turn—61 (69, 73, 77, 77) sts.
Row 17: Ch 1, sc in each st to next marker, ch 1, skip marked st, *sc in next 3 sts, ch 1, skip marked st; repeat from * across, sc in any remaining sts to end, turn. Remove Markers.
Row 18: Ch 2, hdc in each st to next ch-1 space, ch 1, skip ch-1 space, *hdc in next 3 sts, ch 1, skip next ch-1 space; repeat from * across, hdc in each remaining st across, turn.
Sizes S (2X) only: Continue increasing at beginning and end of every third row 2 more times (Rows 19 and 22); then work even as instructed. Sizes M (L, 1X) only: Work even as instructed.
Row 19: Ch 1, sc in each st to next ch-1 space, lhdc in next ch-1 space 2 rows below, *sc in next 3 sts, lhdc in next ch-1 space 2 rows below; repeat from * across, sc in any remaining sts to end, turn—63 (69, 73, 77, 79) sts. Place a marker in each center sc of the 3-sc between lhdc. If there are 5 stitches or more before the first marker and after the last marker, place additional markers 3 sts before first and 3 sts after last marker. Move markers up as work progresses.
Row 20: Ch 1, sc in each st across, turn.
Rows 21–24: Repeat Rows 17–20—65 (69, 73, 77, 81) sts.
Rows 25 and 26: Repeat Rows 17 and 18.
Row 27: Ch 1, sc in each st to next ch-1 space, lhdc in next ch-1 space 2 rows below, *sc in next st, ch 1, skip next st, sc in next st, lhdc in next ch-1 space 2 rows below; repeat from * across, sc in any remaining sts to end, turn
Row 28: Ch 1, *sc in each st to next ch-1 space, bobble in ch-1 space; repeat from * across, sc in any remaining sts to end, turn. Place a marker in each center sc of the 3-sc between bobbles. If there are 5 stitches or more before the first marker and after the last marker, place additional markers 3 sts before first and 3 sts after last marker. Move markers up as work progresses.
Row 29: Repeat Row 17.
Row 30: Repeat Row 28.
Rows 31–40: Repeat Rows 29 and 30 five times.
Row 41: Ch 2, hdc in each st to next marker, ch 1, skip marked st, *hdc in next 3 sts, ch 1, skip marked st; repeat from * across, hdc in any remaining sts to end, turn. Remove Markers.
Rows 42 and 43: Repeat Rows 2 and 3.
Row 44: Ch 3, dc in each st across, turn.
With MC, repeat last row until piece measures 18 (19, 20, 21, 22)"/45.5 (48.5, 51, 53.5, 56) cm from beginning. Fasten off.
FINISHING
Block pieces to measurements. Sew shoulder seams. Set in sleeves. Sew sleeve and side seams.
Edging
Row 1: With RS facing, join A with slip st in lower front corner, ch 2, hdc evenly spaced around all edges; join with slip st in first hdc. Fasten off.
Belt
With A, chain 227 (247, 247, 267, 277).
Row 1: Hdc in 3rd ch from hook and in each ch across, turn—225 (245, 245, 265, 275) sts. Fasten off.
Join MC with slip st in first st.
Rows 2–4 (WS): Ch 3, dc in each st across, turn. Fasten off.
Join A with slip st in first st.
Row 5: Ch 2, hdc in each st across. Fasten off.
Belt Loops
Place stitch marker on side seam about 5 (6, 6, 6 1/2, 7)"/12.5 (15, 15, 16.5, 18) cm beneath underarm seam. Place another stitch marker 2"/5cm below first marker.
Row 1: Join MC with slip st at first marker, ch 12, slip st twice in side seam near second marker, turn.
Row 2: Hdc in each ch across; slip st near first marker. Fasten off.
Repeat on other side seam for second belt loop.
Using yarn needle, weave in all ends.
Slip belt through belt loops and tie in front to close jacket.

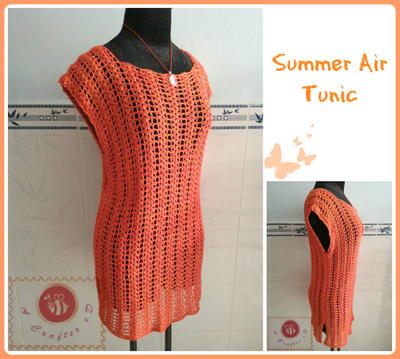
Read NextSummer Air Crochet Tunic
Your Recently Viewed Projects
Thanks for your comment. Don't forget to share!
Cheryl Y
May 01, 2016
I love this belted Jacket pattern. I think any Caron yarn would work for this pattern. I agree with a few of the comments below that I would add a collar to the Jacket, maybe a hooded collar. The pattern is well written and I can't wait to get started on this one. Thank you for this free Comfortable Napa Belted Jacket pattern.
brizkymom
Mar 02, 2014
Caron SPA has been discontinued. Can you recommend a substitute with similar softness and sheen?
bubbzmom58
Sep 15, 2011
If I were to change this pattern I would add a collar that begins from one bottom side around the neck and down the other side. (I wish I could remember what that type collar is called but I fear my senior moments are coming all to frequently!!) Otherwise I agree there would have to be a color change for me too.
rosece428 5487222
Sep 15, 2011
I wish that these photos could be zoomed in on or enlarged so that the details could be better seen and understood.
bessybubbles 44260 92
Sep 15, 2011
The only thing I think I would change would be the colors. I like bolder fall colors the best. And maybe If it could be made bigger still say, up to a 5x would make us fuller figured girls happier!!!! But it still is overall a beautiful jacket/sweater.
Izzteryl
Jan 09, 2012
i agree with you wholeheartedly! there are tons of patterns out there now for fluffy people like us but just not fluffy enough. i am also a 5x and find it hard to find really cute patterns in my size.
Report Inappropriate Comment
Are you sure you would like to report this comment? It will be flagged for our moderators to take action.
Thank you for taking the time to improve the content on our site.