Candy Stripe Vest for Baby
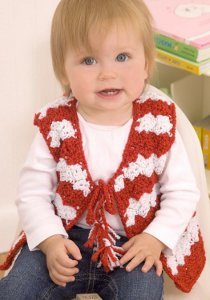
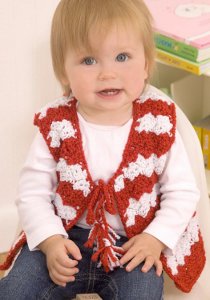
Your baby will be ready for holiday cheer with this adorable Candy Stripe Vest for Baby. Made to look like a candy cane, this adorable crocheted vest is the perfect way to get your little one ready for the holidays. Adorable to match with a holiday dress or a tee shirt and jeans, this crocheted vest is easy to make and looks great on kids of all ages. Available in sizes ranging from ages 6 months to 24 months, you can easily make a crocheted vest for kids of all shapes and sizes!
Materials:
- 1 ball Red Heart Holiday Yarn in Red/Red (A)
- 1 ball Red Heart Holiday Yarn in White/Silver (B)
- 6mm [US J-10], and 5mm [US H-8] crochet hooks
- Stitch marker
- Yarn needle
Gauge and Measurements: 4 pattern repeats = 4”; 8 rows = 4”, in pattern.
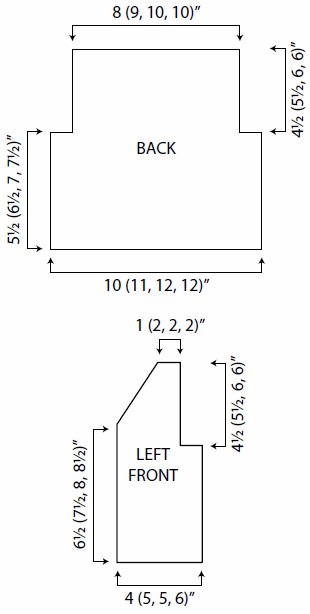
- To Fit Chest: 17 (18, 19, 20)”
- Finished Chest: 18 (21, 22, 24)”
- Finished Length: 10 (12, 13, 13½)”
Notes:
- One pattern repeat consists of one (sc, ch 2, 2 dc) group.
- To change color, work last st of row until 2 loops remain on hook, drop old color, yarn over with new color and complete st. Carry color not in use up side of piece. Hide carried strands in seams or under edging.
Instructions:
Instructions are for size 6 months. Changes for sizes 12 months, 18 months, and 24 months are in parentheses.
Back
- Row 1 (Right Side): With larger hook and A, ch 42 (46, 50, 50); sc in 2nd ch from hook, sc in next ch, *ch 1, skip next ch, sc in next ch; repeat from * across to last ch, sc in last ch, turn—19 (21, 23, 23) ch-1 spaces. Place a marker on this row to indicate Right Side.
- Row 2: Ch 1, (sc, ch 2, 2 dc) in first sc, skip first ch-1 space, *(sc, ch 2, 2 dc) in next ch-1 space, skip next ch-1 space; repeat from * across to last sc, sc in last sc, turn—10 (11, 12, 12 ch-2 spaces.
- Row 3: Ch 1, (sc, ch 2, 2 dc) in first sc, (sc, ch 2, 2 dc) in each ch-2 space across to last ch-2 space, sc in last ch-2 space, turn. Change to B.
- Rows 4 and 5: With B, repeat Row 3 twice. Change to A.
- Continue to alternate 2 rows with A and 2 rows with B throughout piece.
- Repeat Rows 2–5 until piece measures 5½ (6½, 7, 7½)” from beginning; end with a Wrong Side row.
Shape Armholes
- Row 1 (Right Side): Ch 1, skip first sc, slip st in next 2 dc, (sc, ch 2, 2 dc) in next 8 (9, 10, 10) ch-2 spaces, sc in next ch-2 space, turn; leave remaining sts unworked—8 (9, 10, 10) ch-2 spaces.
- Row 2: Ch 1, (sc, ch 2, 2 dc) in first sc, (sc, ch 2, 2 dc) in each ch-2 space across to last ch-2 space, sc in last ch-2 space, turn.
- Repeat Row 2 until armhole measures 4 (5, 5½, 5½)”; end with a Wrong Side row.
- Last Row (Right Side): Ch 2, (hdc, dc) in first sc, (sc, hdc, dc) in each ch-2 space across, dc in last sc. Fasten off.
Right Front
- Row 1 (Right Side): With larger hook and A, ch 18 (22, 22, 26); sc in 2nd ch from hook, sc in next ch, *ch 1, skip next ch, sc in next ch; repeat from * across to last ch, sc in last ch, turn—7 (9, 9, 11) ch-1 spaces. Place a marker on this row to indicate Right Side.
- Row 2: Ch 1, (sc, ch 2, 2 dc) in first sc, skip first ch-1 space, *(sc, ch 2, 2 dc) in next ch-1 space, skip next ch-1 space; repeat from * across to last sc, sc in last sc, turn—4 (5, 5, 6) ch-2 spaces.
- Continue same as back, working over the 4 (5, 5, 6) ch-2 spaces, until piece measures same as back to armhole; end with a Wrong Side row.
Shape Armhole and Neck
- Row 1 (Right Side): Ch 1, (sc, ch 2, 2 dc) in first sc, (sc, ch 2, 2 dc) in each ch-2 space across to last 2 ch-2 spaces, sc in next ch-2 space, turn; leave remaining sts unworked—3 (4, 4, 5) ch-2 spaces.
- Row 2: Ch 1, (sc, ch 2, 2 dc) in first sc, (sc, ch 2, 2 dc) in each ch-2 space across to last ch-2 space, sc in last ch-2 space, turn.
- Row 3: Ch 1, skip first sc, slip st in next 2 dc, (sc, ch 2, 2 dc) in each ch-2 space across to last ch-2 space, sc in last ch-2 space, turn—2 (3, 3, 4) ch-2 spaces.
- Repeat last 2 rows 1 (1, 1, 2) more times—1 (2, 2, 2) ch-2 spaces.
- Repeat Row 2 until piece measures same as back to last row; end with a Wrong Side row.
- Last Row: Work Last Row of back. Fasten off.
Left Front
- Work same as Right Front to armhole; end with a Wrong Side row.
Shape Armhole and Neck
- Row 1 (Right Side): Ch 1, skip first sc, slip st in next 2 dc, (sc, ch 2, 2 dc) in each ch-2 space across to last ch-2 space, sc in last ch-2 space, turn—3 (4, 4, 5) ch-2 spaces.
- Rows 2 and 3: Ch 1, (sc, ch 2, 2 dc) in first sc, (sc, ch 2, 2 dc) in each ch-2 space across to last ch-2 space, sc in last ch-2 space, turn.
- Row 4: Repeat Row 1—2 (3, 3, 4) ch-2 spaces.
- Repeat last 2 rows 1 (1, 1, 2) more times—1 (2, 2, 2) ch-2 spaces.
- Repeat Row 2 until piece measures same as back to last row; end with a Wrong Side row.
- Last Row: Work Last Row of back. Fasten off.
Tie (Make 2)
- With smaller hook and A, ch 40. Fasten off, leaving a long tail for sewing tie to vest.
- Tassel: Cut 3 strands each of A and B, 5” long. Hold all 6 strands together and fold in half. Insert crochet hook in beginning end of tie and draw folded end of strands through to form a loop. Thread ends of strands through loop, and pull to tighten. Trim tassel.
Finishing
- Sew shoulder and side seams. Weave in ends.
- Body Edging Round: With Right Side facing and larger hook, join A with sc in any lower, side seam; work *ch 1, sc in edge; repeat from * evenly spacing sts around all edges of vest, and working (sc, ch 2, sc) in each corner; join with slip st in first sc. Fasten off.
- Armhole Edging: With Right Side facing and larger hook, join A with sc in underarm seam, work *ch 1, sc in edge; repeat from * evenly spacing sts around armhole edge; join with slip st in first sc. Fasten off.
- Sew one tie to each front, neck corner.
Read NextColorful Crochet Poncho

