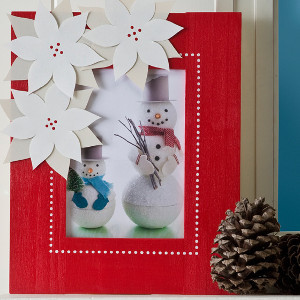
Cute DIY Poinsettia Frame
When the winter weather has you stuck indoors, learn how to make a frame with this Cute DIY Poinsettia Frame. It's the perfect way to display your holiday memories. This simple frame's bright red color really makes pictures pop. Decorating with picture frames can be a fun way to reminisce with the family. Photos don't have to be recent, so make a few Cute DIY Poinsettia Frames for Christmases past and present. Spreading Christmas cheer is as easy as D-I-Y.

Materials:
- Martha Stewart Crafts ® 2oz Multi-Surface Satin Acrylic Craft Paint - Summer Linen
- Martha Stewart Crafts ® 2oz Multi-Surface Satin Acrylic Craft Paint - Wedding Cake
- Martha Stewart Crafts ® 2oz Multi-Surface High Gloss Acrylic Craft Paint - Habanero
- Martha Stewart Crafts ® Foam Pouncers Set - 6pc
- Martha Stewart Crafts ® Basic Brush Set - 5pc
- Martha Stewart Crafts ® Pretty Borders Adhesive Stencils
- Unfinished wood frame
- Scissors
- Glue
- Brush basin
- Paper towels
- Foam plates
- Gallery Glass® Cuttable Plastic Set
Instructions:
- Base coat frame with Habanero.
- Cut three small poinsettia shapes and three large from cuttable plastic.
- Apply Wedding Cake to the small shapes with pouncer. Apply Summer Linen to three large shapes. Let dry.
- Using dot border pattern from adhesive stencil, apply Wedding Cake dots around opening of frame.
- Glue smaller poinsettia shapes to larger ones, then glue to frame.
- Use opposite end of brush dipped in Habanero to create centers of poinsettias.