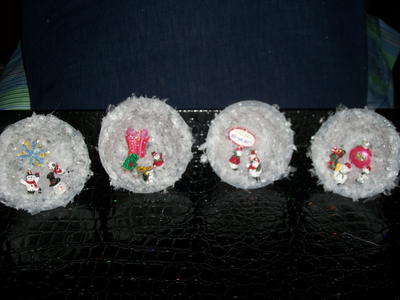
Cute Clay Snowman Decor

Winter means hot chocolate, sitting by the fire and building snowmen galore. Rather than freezing your tail off outside, create your own Cute Clay Snowman Decor piece that will never melt! This kid's craft is so fun to make and easier to create than you may think. Making this Christmas decor piece is just like making a real snowman like you would outside. After you roll up some white "snowballs" for the body, accessorize it by adding a clay carrot, buttons and hat to keep warm. Once finished making your snowman come to life, set this little guy on your mantel or bedside table to show off your masterpiece.
Estimated Cost$11-$20
Time to CompleteIn an evening
MaterialsClay
Primary TechniqueHome Decor

SeasonWinter
HolidayChristmas
Materials List
- premo! Sculpey® Individual Bars in the following colors: White, Pomegranate, Bright Green Pearl, Silver, Burnt Umber, Gold, Copper and Bronze.
- Sculpey Clay Conditioning Machine
- premo! Graduated Cutter Set: Circle
- Sculpey Super Slicer Set, w/comfort handles
- Sculpey Clay Tool Starter Set, set of 3
- Sculpey Style & Detail Tools, set of 3
- Sculpey Technique Design Blocks
- Sculpey Bake & Bond
- Jewelry wire cutters and pliers
- Paints: black, silver, red and dark green
- Paintbrush
- Ceramic tile
- Toothpicks
- Greem 20 gauge wire
- Wood grain rubber stamp
Instructions:
Learn how to make this clay snowman, then add him to your mantel!
-
Getting started:
Polymer clay may stain. CLAY MAY DAMAGE UNPROTECTED FURNITURE OR FINISHED SURFACES. DO NOT USE polymer clay on unprotected surfaces. We recommend working on the Sculpey clay mat, wax paper, metal baking sheet, or disposable foil. Start with clean hands and work surface area. Knead clay until soft and smooth. For best results, clean your hands in between colors. Shape clay, pressing pieces together firmly. Bake on oven-proof glass or metal surface at 275°F (130 °C) for 30 minutes per ¼" (6 mm) thickness.
For best baking results, use an oven thermometer. DO NOT USE MICROWAVE OVEN. DO NOT EXCEED THE ABOVE TEMPERATURE OR RECOMMENDED BAKING TIME. Wash hands after use. Baking should be completed by an adult. Begin by preheating oven to 275 °F (130 °C). Test temperature with oven thermometer for perfectly cured clay. For best results, condition all clay by running it through the Clay Conditioning Machine for several passes on the widest setting. Fold the clay in half after each pass and insert the fold side into the rollers first. -
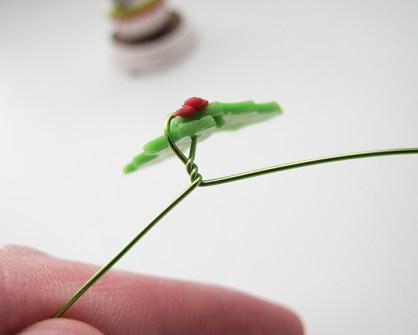
Making the holly leaves
Take a piece of Bright Green Pearl clay and run it through the clay-conditioning machine on the #4 setting. Lay the piece of clay on your ceramic tile and take a ¼ circle cutter. Start punching out circles forming the holly leave in the negative space. Make two holly leaves. Then with your clay knife create veins on your leaves and attach them together. Use your needle end tool to make a hole. Then roll out 2-3 tiny pomegranate balls for the holly berries and place them on the leaves. -
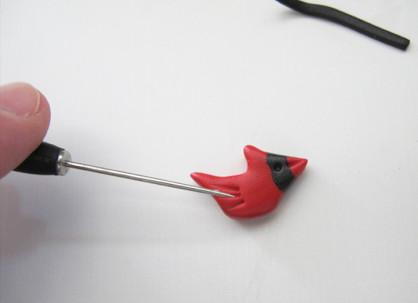
Making the cardinal
Sculpt a 3/8-size pomegranate ball of clay into a bird like shape with your fingers. Pinching your fingers together to sculpt the beak and the cardinal’s pointy head and tail feather. Roll out a thin black clay stripe approx. 1/16 H x ½ L. Take it and wrap it around the upper beak area. Leaving the end of the beak the pomegranate color of the clay. (Tip: looking at a few photos of cardinals will help). Blend the black strip to the clay bird. Use your 2mm ball end stylus to make eyes and your needle end point to make lines for feathers and a mouth. -
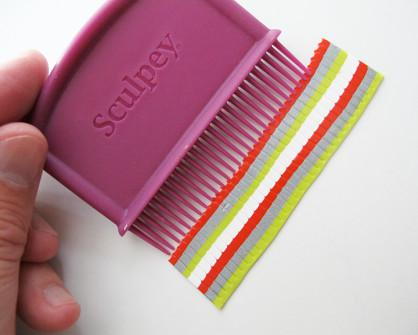
Making the snowman sweater:
Take your Wasabi, Silver, White and Cadmium clay and run them each separately through the clay-conditioning machine on the #5 setting. Use your super slicer to cut 1/8 wide by approx. 5” long strips. Now start taking a strip of which ever color and start and lay it down on your tile. Choose another color and lay it lengthwise right next to your first color until you have 5-6 colors. (Tip: Don’t make your white strip be the first or last color of your group of 6 stripes, it will not show up against the white of the snowman.)
To make sure your stripes have all adhered to each other you can either run roll your acrylic roller over them lightly or carefully run it through the clay conditioning machine on the #6 setting. Take your Sculpey dragging design block comb and create lines going from the top to the bottom. Decide which color is going to be at the bottom of your sweater and take your zigzag slicer and trim the bottom. Set aside. -
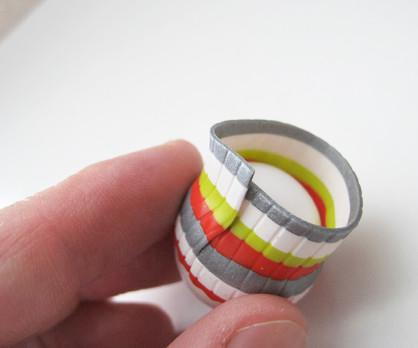
Making the snowman:
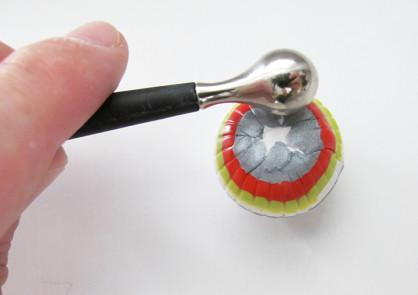
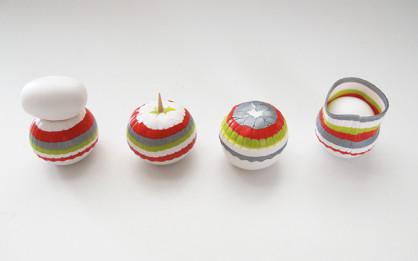
Create a ¾ -1” ball of white premo clay for the snowman body and a1/2 oval ball for the head. Take the ball of the snowman body and approx. 3” piece of your striped sweater and wrap the top have of the ball so the line perfectly together in the back. Use your super slicer to remove any extra. Start smoothing the clay sweater to the top of the snowman using your 12mm ball end stylus tool.
Cut a piece of toothpick, apply some bake and bond and attached it the top of the snowman’s body and attach his head. Add two more toothpicks for his arms and a small piece for his nose. Use your 2mm ball end stylus to make eyes and buttonholes in your snowman. -
Making the yule log:
Using a piece of burnt umber, 18k, gold, copper, bronze clay and run it through the clay conditioning machine on the #5 setting. Don’t blend it so much you lose all the clay colors. Take a small amount of burnt umber clay and roll it into a log and place it at the end of your mixed clay piece and start to roll the piece to you have a approx 1 ¼ wide of cane. Turn the cane on its side so you see the spiral (like the rings of a tree stump) and slice approx. ½” thick piece. Take a piece of burnt umber and run it through the clay-conditioning machine on the #5 setting. Wrap it around the sides and do it again with a piece of white clay. Take your super slicer and slice a thin layer off the top to expose more rings of the stump. The stumps final size should be around 3/8 H x 1 ½ W Stamp a wood grain stamp around the stump and carve out some of the white to expose the brown (like a birch tree).
Cut a piece of toothpick, apply some bake and bond and attach it the top of the Yule log and place your snowman on it. Cut a small piece of wire and insert into the side of your snowman’s head and attach the cardinal.
Place this and the holly on a ceramic tile and bake your pieces in your oven according to the manufacturer’s instructions on the packaging. Let cool. -
Painting:
Paint the eyes and button of the snowman black. Paint the snowman’s arms and nose silver. Paint red tips to the arms and stripes to the nose. Paint white eyes with black dots for the cardinal eyes. Paint the holly veins with a dark green paint. -
Finishing:
Attaching the holly Take a piece of the green 20 gauge wire and feed it threw the holly and twist with your pliers and wrap both ends around the end of the snowman arms.


Contest Rules:
- There is a maximum of one extra entry per person. The extra entry will be based upon a comment left on this project. Duplicate comments will be deleted and are not tallied.
- The winner will be selected at random from the comments on this page and the entries on the contest page.
- The winner will be contacted on the morning of July 31, 2017.
- Email Address provided in their account (please do NOT leave your email address in the comments--you already provided it when you created your account)
- You have until Sunday, July 30, 2017 at 11:59pm EST to leave your comment on this post. Comments posted after that will not be counted.
- Contest open to anyone 18+ in US and/or Canada. Excludes Quebec and Puerto Rico.
Read NextFolded Book Christmas Tree
Your Recently Viewed Projects

Thanks for your comment. Don't forget to share!
nichols310 3936128
Jul 25, 2017
What a wonderful piece to make. I found polymer clay 5 years ago and have been making Christmas ornaments for my grandchildren every year since. This will be a great ornament to add to their collection this Christmas. Wonderful tutorial. Great way to make the holly leaves! Never would have thought of it. Thanks a million! Can't wait to make him/her.
Weberme
Jul 24, 2017
I have not worked with clay yet but I love this cute clay snowman and the may be the first one I do. It seems easy enough with this great tutorial and you can have the family join in helping to make one amazing Christmas piece to display on the mantel or even on a shelf or table. I put small lighted trees on my mantel because that is all I have but this snowman will look great to make a winter theme. Anyone make one yet?
kimlennie 9336847
Jul 22, 2017
Last year my Dad was so kind to give me his Christmas village and it just looked lovely on my mantle. Before this I used to display my old Santa Clause that a lovely friend had made me over 20 years ago with fake presents surrounding . While my crocheted stockings hung from the mantle too.
karensuewaldner 91 70666
Jul 22, 2017
I love placing our beautiful ceramic Nativity scene on our mantle,
aketch
Jul 11, 2017
I like to bring in natural pine boughs and pine cones from outside and decorate the mantel. I add fancy ribbon and mini lights to finish off the look. Sometimes I just use painted white branches and mini white lights for a more modern look.
ohmgurl51 2182518
Jul 10, 2017
This is perfect! I have a friend who collects snowmen. These would be perfect for her.
Kim K 12345
Jul 10, 2017
Thank you for this great tutorial! My favorite Christmas decor item to put on the mantel is my dancing/singing Bumble the Abominable Snowmonster because it always makes me smile.
Report Inappropriate Comment
Are you sure you would like to report this comment? It will be flagged for our moderators to take action.
Thank you for taking the time to improve the content on our site.