Decorative Sledding Snowbuddies
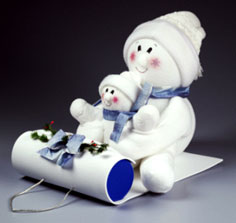
This Christmas craft includes a lot of materials, but it's so worth it. Sledding snowbuddies are a great decorative craft for the holidays. Show off your talents this season with this adorable snowman craft! You can have these cute sledding snowmen on display on your mantel or place them under your tree for a fun winter scene. This cute project is easy to customize however you'd like, and you're sure to love the adorable results!
Materials:
Big Snowman
- 1 6" ball STYROFOAM* Brand Foam
- 1 5" ball STYROFOAM* Brand Foam
- (2) 3 1/16" STYROFOAM* Brand Foam Eggs
Little Snowman
- 1 4" ball STYROFOAM* Brand Foam
- 1 3" ball STYROFOAM* Brand Foam
- (2) 2 1/2" STYROFOAM* Brand Foam Eggs
- Acrylic paints: black; dark pink
- White craft foam, 2mm, 12" x 18"
- 2 Screw-top jar lids, about 2-1/4"
- 2 pairs white cotton socks (L)
- 2 pairs white cotton socks (newborn)
- 1 pair white cotton socks (crew)
- Opaque, white cotton tights, child 4-6
- White stocking cap, child small
- White plush felt, 1" x 12"
- White sewing thread
- White pom-poms: 1/2"; 1"
- Fiberfil stuffing
- Wired-edge ribbon, color of choice, 2" x 1-1/2 yds.
- Thin silver braided cord, 15" length
- Iridescent snowflake sequins, two each: 3/8"; 5/8"
- Artificial greenery, small amount
- Serrated kitchen knife
- Candle stub or paraffin
- Fine-line black permanent marker
- Pencil
- Ruler
- Paintbrushes: small round; liner
- Disposable palette
- Water basin
- Paper towels
- Scissors
- Sewing needle
- Quilting pins with white heads
- Low-temp glue gun and glue sticks
- Thick, white craft glue
- Pattern
Instructions:
-
Wax serrated knife with candle stub or paraffin. Cut thin slice from top and bottom of larger foam ball, and thin slice from bottom of smaller foam ball. Twist and glue smaller ball to top of larger ball to make body.
-
Cut thin slice from tummy of large snowman and back of small snowman so snowmen can sit close together on sled.
-
Cut legs from tights at crotch. With thumbs inside leg, gather one leg up in fingers (like putting on pantyhose). Place toe of tights over snowman's head, then gently pull leg down over body. Tightly pull fabric together at center bottom of body; trim fabric, leaving 1" excess.
-
Use pencil point to make hole in center bottom of body. Place generous amount white glue in hole, then use scissors point to work excess fabric into hole. Push fabric into hole until fabric at base of snowman is tight and smooth.
-
For feet, refer to Diagram 1. Use serrated knife to cut bottom from larger end of each egg. Position remaining portion of eggs at an angle in front of body, pointing away from body, as shown in Diagram 2.
-
To make legs, place each foot into toe of one ped (large snowman) or infant sock (small snowman). Firmly stuff remainder of sock with fiberfil. Fold open end of sock to inside. With toes pointing outward away from hips, use glue gun to glue folded ends of legs to bottom of body, slightly in front of center side. Snowmen should appear to sit. Pin sock to body to secure.
-
To make small snowman's arms, firmly stuff remaining infant socks with fiberfil. Fold open end of sock to inside. With arms pointing upward, glue and pin folded ends of arms to shoulder area of body.
-
To make large snowman's arms, firmly stuff remaining peds with fiberfil, up past heel. Heels become "elbows." Stretch ped while stuffing to ensure enough length to wrap around small snowman. Fold open end of ped to inside. Glue and pin folded ends of arms to shoulder area of body.
-
Place small snowman in front of large snowman. Glue and pin large snowman's arms around to front of small snowman's tummy. Spot glue snowmen together as needed.
-
To make small snowman's hat, refer to Diagram 3. Cut crew sock as shown. Turn inside out and sew closed along cutting line, using 1/4" seam. Turn right side out and place on small snowman's head. Glue plush felt around head for hatband. Place child's hat on large snowman; spot glue to secure.
-
Use white glue to glue 1/2" pom-pom nose to small snowman; glue 1" pom-pom to large snowman.
-
Using photo as guide and liner brush, paint black eyes and eyebrows, and dark pink smile. Use dry, round brush and very small amount dark pink to blush cheeks. Use white glue to glue sequins to cheeks, 3/8" for small snowman and 5/8" for large snowman.
-
Cut ribbon into three equal lengths. Tie one length around each neck for scarf. Tie bow from remaining length for sled; set aside.
- To make sled, use glue gun to glue one end of 18" sides of craft foam sheet around jar lids. Poke two holes into foam at front of sled. Thread cord ends into holes from front to back; knot ends to secure. Glue greenery and ribbon bow to front of sled. Place snowmen on sled.
Read NextUpcycled Christmas Tin
Your Recently Viewed Projects
Kefra
Jul 29, 2012
This is so Fantastic!! I can't wait to gather the supplies or improvise! I save stryo from packed items, then cut it to the styles needed. Makes it fun to create awesome projects like this! Thanks for another great decoration :) I love this place!
risa987 3421134
Dec 09, 2010
that is so cute and it would be perfect but sadly i still dont have the right materials!!!!!!!!!!!!!!!
Report Inappropriate Comment
Are you sure you would like to report this comment? It will be flagged for our moderators to take action.
Thank you for taking the time to improve the content on our site.

