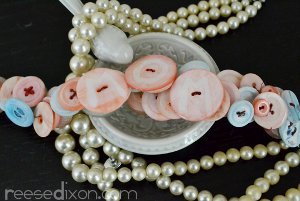
Mango Button Bracelet
Make mom something she's sure to love with this Mango Button Bracelet. With a soft monogram right on the buttons, this bracelet is a great way to personalize your project. This button bracelet would also make a fun friendship bracelet and is something fun to make with all those leftover buttons in your craft stash. No matter what color bracelet you make, this is sure to be one accessory you'll love wearing and showing off to family and friends!

Materials:
- Buttons of various sizes and colors
- Elmer's Blue Glue Gel
- Rit Dye in color of your choice
- Needle and thread
- Bracelet closure
Video:
Instructions:
- Pick out a few buttons that are large enough to write a letter on. Large buttons with only a couple holes work great, and so do buttons with the shank on the back. Use Elmer’s Blue Glue Gel to write your letter on and let it dry overnight.

- Dye a bunch of buttons in a mix of dye and hot water. How long this takes depends on the materials the buttons are made of and the color you’re going for. Keep an eye on them until you’re satisfied with the color, anywhere from 2 minutes to 30. When you’re done, wash them with soap and dry them thoroughly.

- Line up your largest buttons until you have a line long enough to fit around your wrist. Bring your threaded needle up from the back and through each hole, making an X, then move on to the next button with the thread in the back and repeat until your buttons are all sewed together.

- When you get to the end, use the thread to tie on one end of a bracelet closure, then go back across the line to where you started, sewing so that you now have two lines of thread running across the back of the buttons. When you get back to where you started, tie on the other end of the closure.

- Now it’s time to layer on the pretty smaller buttons. Line up one of the button’s holes with a hole on the bracelet and use your thread to come up from the back and attach the new button. Stitch through the other holes of the new button, attaching it to the bottom layer wherever it lines up.

- Keep adding buttons, layering as you go, sewing them altogether as the holes line up. Continue adding across the bracelet until you’re satisfied with how it looks.

- When you’ve added all the other buttons you want to, bring your thread to the middle of the bracelet and stitch on the special buttons you’ve monogrammed.

- When all your buttons are stitched in place, bring the thread to the back of the bracelet and tie it in a knot. Cut off the remaining thread and dab a little glue on the knot to make it secure.

Your Recently Viewed Projects
Thanks for your comment. Don't forget to share!
Iceni
Feb 19, 2019
Very nice project and easy too. You can get lots of fantasic buttons and different colurs at the Dollar stores so you don't have to dye them yourself.
flowergirl
Jul 06, 2018
This is something that I had so much fun doing. I learnt how to dye buttons, stitch them together and layer. It's the best combination of crafting techniques out there so I thoroughly enjoyed making this. I'm going to need larger buttons and more people to gift these to.
Report Inappropriate Comment
Are you sure you would like to report this comment? It will be flagged for our moderators to take action.
Thank you for taking the time to improve the content on our site.