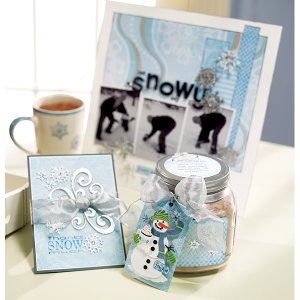
Hot Cocoa Jar
This adorable Hot Cocoa Jar from Jolee's makes a great hostess gift for the upcoming holiday season. Fill it with a homemade hot cocoa mix or a brownie mix and attach a small whisk or some measuring cups. This project also comes with instructions on how to make a Thank You "Snow Much" card, perfect for sending a special smile to anyone you'd like to thank before or after the holidays.
Materials:
- Glitter Snowflake Stickers
- Snowflake Value Pack Stickers
- Bling - Silver Puffy Flourish Dimensional Stickers
- Citronella 12x12 Specialty Paper Pad
- Snowflake Value Pack Stickers
- Snow Day Stickers
- Citronella 12x12 Specialty Paper Pad
- HERMA Dotto Permanent Dry Adhesive Blue Dispenser
- 3D-Dots - White Adhesive Foam 1/8 inch Circles
- Cutter Bee Scissors
- Cutterpede Straight Edge Trimmer
- Cutterpede Score Blade Shuttle
- Coloriser Heat Tool
- Retractable Knife Value Pack
- Embossing Powder-Clear
- 5/8 inch Circle - Medium Nesting Punch
- Photo Labels Large Punch
- Circle Scissor Pro
- Ribbon: silver organza
- Vellum
- Hole punch
- Corner rounder
- Sewing machine and thread
- White elastic cording
- Gray chalk ink
- Glitter Snowflakes Stickers: 50-20484
- Snowflake Repeats Stickers: 50-20428
- All That Bling Silver Puffy Flourish Stickers: 52-30005
- Snowflakes Stickers: SPJ6044
- All That Bling Snowflakes Stickers: 50-28116
- Snowflake Repeats Stickers: 50-20428
- Snow Day Stickers: SPJBLG290
Instructions:
Thank You Snow Much Card
-
Cut dark gray cardstock to desired size. Score and fold to form card base.
-
Cut blue swirl pattern paper to fit on card front. Mat with white cardstock and glue to card base.
-
Format sentiment using word processing program. Print on vellum and immediately emboss with clear embossing powder to set ink.
-
Cut vellum block to be just smaller than blue swirl pattern paper and machine stitch to secure.
-
Lay card flat and mark on fold ribbon placement. Using craft knife, cut a slit long enough to accommodate ribbon.
-
Wrap card with ribbon, running through slit on fold, and tie in a square knot on card front.
- Embellish card with stickers as shown.
Hot Cocoa Jar
-
Cut blue polka dot pattern paper blocks to fit jar sides. Round corners.
-
Cut vellum blocks to fit inside and machine stitch to secure. Adhere to sides of jar and embellish with snowflake stickers.
-
Format cocoa instructions in word processing program. Print on vellum and immediately emboss with clear embossing powder to set ink.
-
Use circle cutter to cut vellum and blue swirl pattern paper mat to fit jar lid. Layer and machine stitch to secure. Adhere to jar lid and embellish with snowflake stickers.
-
Cut tag from blue swirl pattern paper. Round bottom corners. Cut vellum piece to fit inside and machine stitch to secure.
-
Punch circle from blue polka dot paper. Glue to tag top and punch with hole punch to create tag reinforcer.
-
Add snowman sticker and replace book with cocoa mug.
-
Punch small label from blue polka dot pattern paper. Add sentiment and ink edges. Adhere to tag.
- Tie jar with ribbon and secure tag to bow using elastic cording.
Read NextSnowman Mug Hug