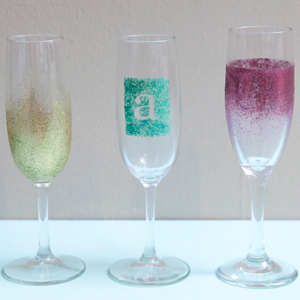
Champagne Shimmer Toasting Glasses
I propose a toast to these Champagne Shimmer Toasting Glasses from Jen Carreiro! DIY wedding favors and party crafts like these embellished champagne glasses make wonderful DIY wedding gifts and homemade hostess gifts for classy parties.

Materials:
- Champagne glasses
-
Martha Stewart Mulit-surface Craft Paints in Glitter
- florentine gold
- peridot + turquoise, mixed together
- tourmaline - Martha Stewart Craft foam pouncers
- Martha Stewart Craft Paint Stencil Tape
Gold Glitter Glass:
-
Use your pouncer to create a gradient of color up the glass. Carefully twist and paint your glass. To get the look of the glitter fading up the glass, paint less towards the rim and paint it more towards the base. Turn the glass upside down to make it easier to paint the base.

Personalized Monogram Glass:
-
In this example you will need letter stickers for your monogram. Start by choosing your letter of the alphabet and placing it on your glass, nice and firm.

-
To create a box around the monogram, tape it off using Martha Stewart Craft Paint Stencil Tape. Be careful with the curve of the glass. Measure it out if you need to and don’t get discouraged if it takes you a few times to tape it off evenly.
-
Using a smaller size pouncer, start pouncing with the mixed paint.
-
Apply three coats of paint, with an hour of drying time in between each coat. A good way to check the glitter coverage in this design is by taking a peek from behind.
-
Once the paint is fully dry, carefully pull the tape and the sticker monogram off. You might even want to softly slide an Exacto knife along the edge of your design and the tape to make a clean break. If any edges pull up – push them right back down. If any paint bled under your monogram sticker, using your nail gently scratch it away. The paint will be permanent once cured.
- If you are using a swirly, thin edged type sticker – you might need to very carefully pull the sticker off before the paint dries, to ensure that the design shows completely and doesn’t peel the rest of the paint with it.
Pink Glitter Glass:
-
Start this design about 3/4″ below the rim to leave room to sip the drink. I taped my line using Martha Stewart Craft Paint Stencil Tape… be careful with the curve of the glass, it might take you a few times to get the tape line straight.

-
Again, using a pouncer start dabbing the glitter onto the champagne glass. I did two coats of paint, with an hour of drying time in between each coat.
- Just like the gold glass, dab much more glitter paint onto the top of the glass and much much less towards the bottom of the glass. So that it looks as if the glitter is falling down the sides of the glass. When the paint is completely dry, remove the tape – you can even softly run an Exacto knife along your design and the tape for perfect tape removal.
Oven curing the glasses:
-
Put your project into a cool oven on a baking sheet, making sure that no part of your project that has been painted is touching anything – the pan, the oven or each other.
-
Turn your oven on to 350* and set a timer for 30 minutes. Your glass will not crack because it is cold and so is your oven, the two will heat up together – this is very important.
- Once the 30 minutes is up, turn off your oven and let your project cool down completely inside the oven. Then it needs to sit for 72 hours before you can use or wash it. This is the best method for this project.
Air curing the glasses:
- After painting, let your project air dry for at least 21 days – no using or washing. After the 21 days is up, it should be ready to use and wash. This method is not recommended for this specific craft. The glitter paint does better with the oven cure method.
Note:
-
Start by cleaning your glasses with alcohol and making sure they are completely dry before you start painting.
- With Martha Stewart Craft Paint, after these glasses cured, they are dishwasher safe.
Your Recently Viewed Projects
Thanks for your comment. Don't forget to share!
Hannah
May 10, 2017
Oh my!!!! This is o cool!! I can totally make these, like several of these. My parties will definitely look fancy and exclusive! I can make a business out of this. Like a souvenir boutique or something. Can even give as giveaways during weddings. I totally love this!
Report Inappropriate Comment
Are you sure you would like to report this comment? It will be flagged for our moderators to take action.
Thank you for taking the time to improve the content on our site.