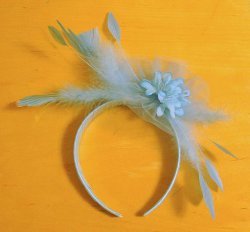
Princess Headband
Did you notice the hats at the royal wedding? This Princess Headband pays tribute to the wedding accessories that had everyone talking. This simple process will add some spunk to your special day.

Materials:
- Plain Plastic Headband
- 2 yards Satin Nylon Ribbon, 1” wide
- 12-15 Craft Feather Plumes, assorted sizes
- Nylon Tulle, 5” x 24”
- 5 Silk flowers, small size
- Craft Glue
- Scissors
- Cloth Adhesive Tape or Florist Tape
- 12” Length Craft Wire
- Needle & Thread
- Hair Dryer
- Rit Liquid Aquamarine Dye
- Large plastic container for dyeing
- Measuring cup & measuring spoons
- Spoon for stirring dye
- Latex gloves
- Plastic table cover
- Paper towels
Instructions:
- Cover work surface with a plastic table cover.
- In a large plastic container, measure and mix 3 Tablespoons Aquamarine liquid dye with 3 cups very hot water (at least 140º). Stir well.
- Wearing latex gloves, carefully immerse the ribbon, feather plumes, tulle, and silk flowers into the dye bath. Allow these items to soak in the dye bath for 7-10 minutes.
- Remove each item and rinse in cool water. Place on paper towels to air-dry.
- When the feather plumes are dry, fluff each one with a hair dryer.
- Select seven of the longest plumes. Using scissors, carefully cut a cock feather (Cock feathers are the long quills that have a small feather on the end) at the end of each quill. Then, trim away all of the downy feathers from the quill, cutting as close as possible to the quill.
- Wrap the plastic headband with the satin ribbon: Place a drop of craft glue at one end of headband to secure ribbon. Then begin wrapping ribbon around band working toward the middle. Cut the ribbon and secure the end of the ribbon with craft glue. Now wrap the other half of the headband in the same manner. This will result in a smooth wrap.
- Fold the piece of tulle in half lengthwise. With needle and thread, sew a running stitch along the raw edges. Pull the thread to gather the raw edge.
- Form the gathered tulle into a tight circle. Secure the circle with a knot.
- Bunch the silk flowers into a cluster and secure them together with adhesive fabric tape or craft wire. Put the flower cluster in the center of the tulle. Hand stitch the
flowers to the tulle.
- Tightly secure the tulle and flower cluster to the headband with craft wire. (Note: As you are wearing the fascinator, the flower and feathers should be on the right side of your head. As you are assembling it, facing you, they will be to the left.) Wrap the wire around the headband several times. Also, apply craft glue to secure the flower cluster to the headband.
- Using the craft wire as an anchor, arrange 4 cock feathers to the right of the flower cluster, pointing up, and 3 cock feathers to the left of the flower cluster, pointing down. In a way that’s pleasing to the eye, add several more plumes around the flower cluster using the craft wire to secure them.
- Check to see that everything is secured to the headband. Use more craft glue if necessary.