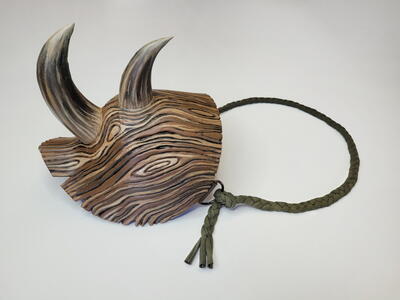
Deadly Horned Pauldrons
With Wood Grain Texture

With this shoulder armor piece, we’re going to create some awesome wood grain texture in the foam—very fitting for a wood elf character. This technique may be a bit tricky at first, but before you know it, you’ll want to burn a wood texture into every foam project! This technique also works on other armor pieces or even props like “wooden” shields or tankards. For the horns, we’ll use a thinner foam, which will make it easier to glue the tips as neatly as possible. You can make one pauldron for your costume and wear it over one shoulder, or make one for each shoulder. The materials listed are for two pauldrons.
MaterialsCraft Foam
Materials List
-
Main Materials
- Deadly Horned Pauldrons templates (digital pattern)
- 1 (2 x 2–ft [60 x 60–cm]) sheet of 6mm EVA foam
- 1 (14 x 12–inch [35 x30–cm]) piece of 4mm EVA foam
- 1 (4 x 2–inch [10 x 5–cm]) piece of 2mm EVA foam
- 6 thin strips of stretchy jersey fabric (moss green)
- Contact cement
- 4 metal D-rings (I used 1-inch [2.5-cm]-wide D-rings)
- Flexible primer (black)
- Acrylic paint (dark brown, light brown and beige)
- Matte (spray) varnish (optional)
-
Tools:
- Paint marker
- Craft knife
- Cutting mat
- Measuring tape
- Heat gun
- Soldering iron or wood-burning tool
- Safety tools, including a respirator, dust mask and safety glasses
- Brushes for painting
- Needle and thread (for the braided straps)
Instructions
Printing the Pattern: If you want to print a pattern, be sure to set your printer to ‘not scaling’. It should print at 100%. Also make sure you pick the right paper size to print. So in the USA, you would need ‘letter’ and in Europe you would need ‘A4’. If in doubt, check what paper is in your printer It’s also important that you open the file in Acrobat reader and print from there instead from opening it in your browser and printing from there. In rare occasions, printing from a browser can warp the pattern pieces. So use Acrobat reader just to be sure! It’s a free to download program.
Preparation:
-
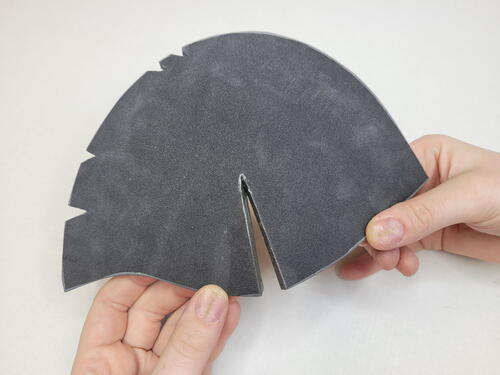
To make both pauldrons, use your template to trace and cut the pauldron base out of the 6mm EVA foam four times (twice mirrored). Cut out both horn shapes four times (twice mirrored for each horn) from the thinner 4mm EVA foam. For the horns, it’s important to cut the foam at an inward angle at the tips. This will make it easier to glue the tips together nice and tight. On the template, it’s marked where to make the angled cut.
-
Cut four (2 x 1–inch [5 x 2.5–cm]) strips of 2mm EVA foam. These will be used to attach some D-rings to the pauldrons.
-
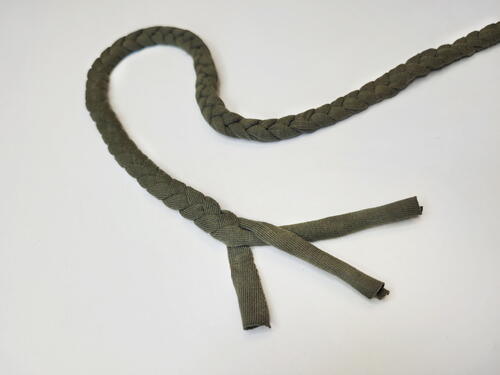
Now take some measurements for the jersey fabric straps that will be used to attach the armor to your body. Measure from the front of your shoulder, going under the opposite armpit, over the back and to the back of the shoulder. For me, this was about 28 inches (70 cm). The straps will need to be tied on the D-rings, so the straps will need to be up to 1 foot (30 cm) longer than the measurement you took. So, I needed straps that were 3 feet (90 cm) long. If you want to make the straps from elastic material and braid it to look nice, like I did, then cut six (1-inch [2.5-cm]-wide) strips that are each 3 feet (90 cm) long. You will need three for each pauldron, so six in total for both pauldrons. If you want to use rope or yarn, simply use that instead. Just keep in mind that those won’t be elastic so it could be a bit less comfortable to wear.
Building the Pauldron Base:
-
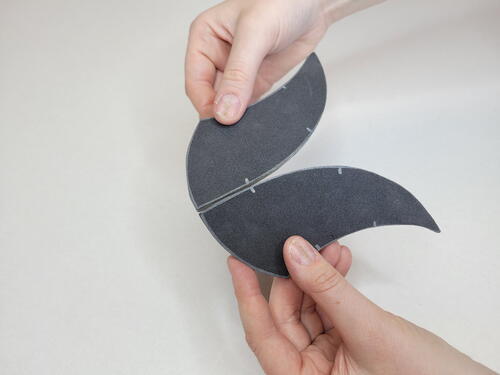
Close the darts on both of the pauldron base pieces using the contact cement. This dart will help to give the pauldron a rounded shape on the top so it fits nicely on the shoulders.
-
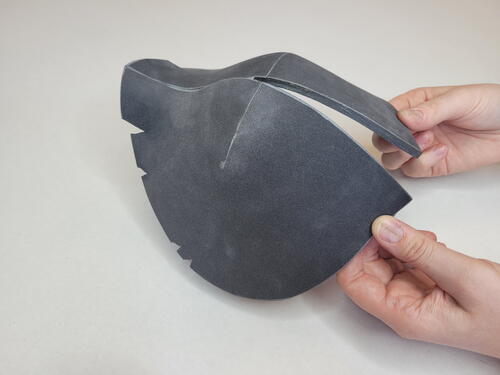
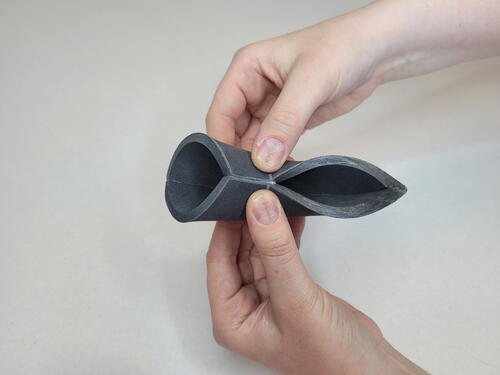
Glue both halves of the pauldron together along the top edge. You can use the closed dart as a registration mark for gluing to make the armor piece as symmetrical as possible.
-
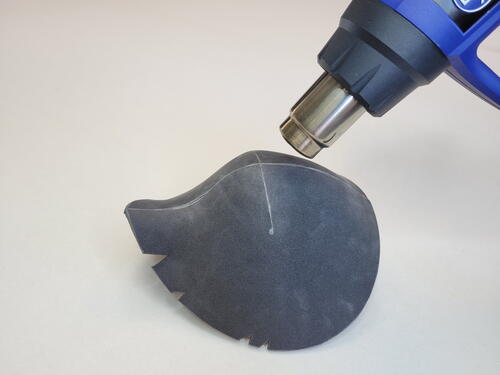
After the glue has fully set, heat the armor piece with the heat gun. When the foam is hot, you can shape it to be more rounded and to curl up at the edges. Hold the armor piece for a few minutes in the desired shape until it’s cooled down, so the foam will stay in this shape. Repeat steps 1 through 3 for the second pauldron.
Note: To make this project even more beginner friendly, feel free to skip the horns and texturing. Just create the base shape and paint the armor pieces. They will still look awesome! And when you feel more advanced, you can follow all the steps to create the wood grain texture and horns.
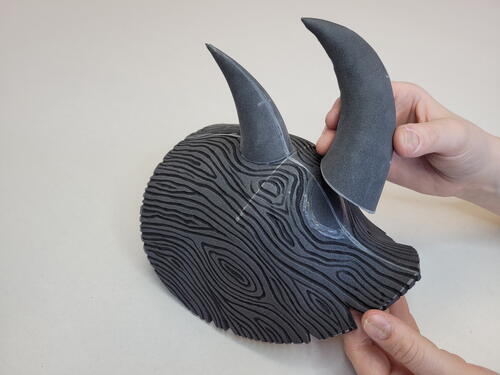
Assembling the Horns:
-
Apply contact cement to the back edges of the mirrored horn pieces. When the glue is tacky, connect the two foam pieces.
-
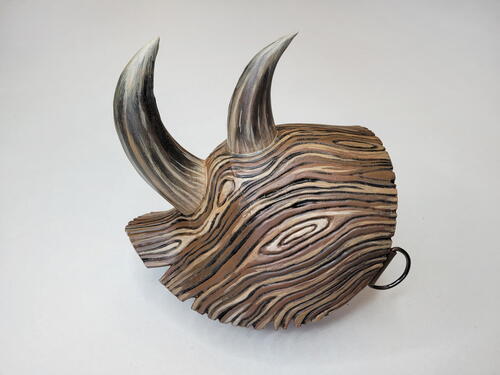
Once that side is attached, apply contact cement to the two remaining edges and attach them so the horn is completely closed (except the bottom). Repeat these steps for the other horns. Once all four horns are finished (two small and two larger), you can mark the spots on the pauldrons where you want to place the horns by tracing them with a paint marker.
Creating Wood Grain Texture:
-
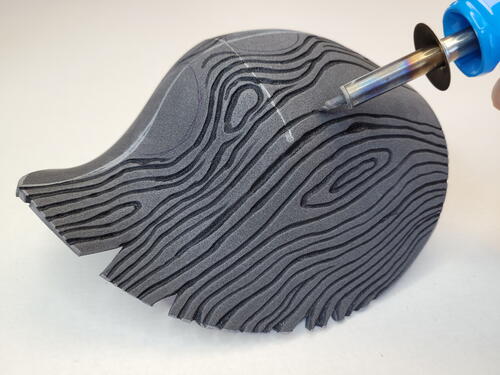
Sketch some wood grain on the pauldrons as a guide for making the texture. Don’t just make straight lines, but also add some circles and gnarly lines, since this will give more character to the final piece.Turn on your soldering iron or wood burning tool, and when it's heated up, start burning lines into the foam to create the wood grain texture. Press harder to create deeper, thicker lines or gentler for narrower, thinner lines.
-
Glue the horns on the pauldrons. Heat the pauldrons with the heat gun to seal them and close the pores of the foam to prepare it for painting.
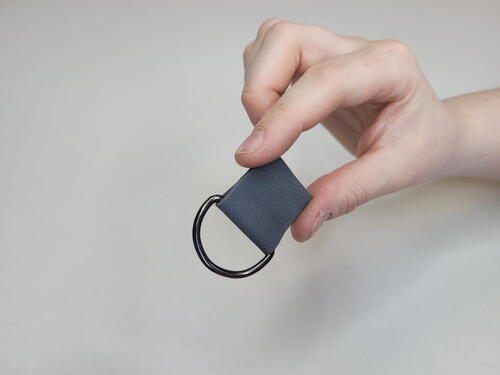
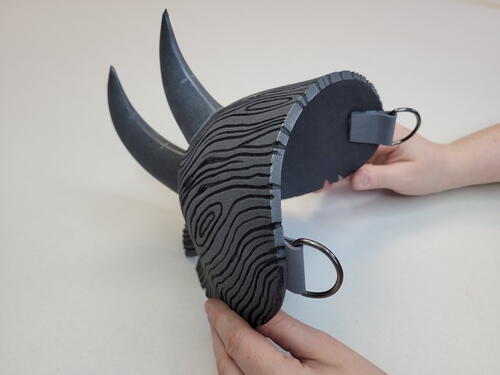
Adding D-Rings to the Pauldrons:
-
Apply contact cement on both ends of one of the 2mm EVA strips. When the glue is almost dry, fold the foam strip through the D-ring and press it closed so the metal ring is attached. Repeat this step for the rest of the D-rings.
-
Glue the piece of foam with the D-ring to the inside of the pauldrons. Do this on the front and on the back, so you can add a string or straps for wearing the armor pieces.
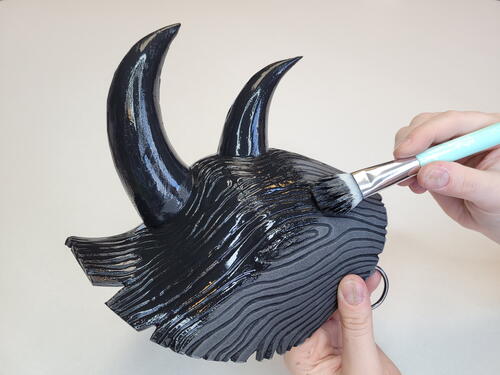
Priming and Painting:
-
Apply a black flexible primer onto the armor pieces. Also apply some primer on the underside at the edges, where the raw foam color could still show while wearing the armor. Use as many coats of primer as needed until you like how the surface looks. I used two layers of HexFlex black. If your primer isn’t black, you can either mix some black acrylic paint into the primer before applying it or paint the pauldrons black with some acrylic paint after the primer is dry, which usually takes 2 to 4 hours.
-
When the black base layer is dry, apply a layer of brown acrylic paint to the armor pieces. Make sure to leave the texture lines black by only painting on the raised parts. This already gives some depth because the black will look like a shadow. To do this, don’t take too much paint on your brush, and paint in the opposite direction of the lines. Also apply some brown lines on the horns to give them more dimension. After the dry brushing, take a smaller brush and refine some of the parts that didn’t get enough paint coverage. Now leave the paint to dry for 2 to 4 hours before moving on to the next step.
-
Mix a lighter color of brown (with dark brown and either beige or white) and with a thin brush, paint some lines to create highlights. Just randomly select lines that you want to highlight. Also highlight the circles in the wood grain so that they stand out more. You can build up the highlights by going over them again with the pure beige color to make some of the lines pop even more.
-
Leave the paint job to fully dry overnight, and then optionally add a layer of matte varnish to protect it.

Make Them Wearable:
-
For each pauldron, take three long strips of jersey fabric and braid them. Close the two ends of the braid with some hand stitches using the needle and thread so they won’t come undone.
-
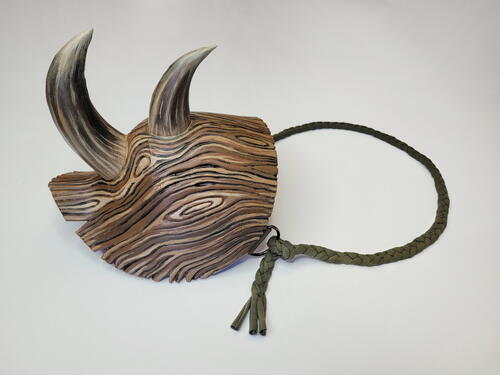
Tie the strap to the D-rings. Then you can wear your finished armor piece by simply putting it on your shoulder, and then placing the stretchy strap under your arm on the other side. Repeat this for the other pauldron and wear the straps crossed over your chest.
Get Creative! Ideas for Variations
If you don’t like the look of the horns on the pauldrons, you can use different shaped horns or simply leave them off. Decorate your pauldrons even more by sculpting mushrooms and autumn leaves out of foam clay. Add them on the pauldrons with a little bit of water while the clay shapes are still soft, or glue them on the pauldrons after the clay shapes have fully air-dried.
In this example, I used stretchy fabric, which I braided for the armor attachment. But it’s also possible to sew a belt with a buckle and use that for wearing the armor piece. Or to make it even easier, you could simply tie some rope or yarn to the armor piece and use that.
For these pauldrons, I used a matte acrylic varnish to protect the paint job. A glossy varnish wouldn't look good on the wood texture. But if you want the horns to be extra shiny, you can apply a glossy varnish on just the horns. This will add even more texture to the final product.
Credit:
Reprinted with permission from The Beginner’s Guide to Cosplay Armor & Props by Joyce Van Den Goor. Page Street Publishing Co. 2023. Photo credit: Pascal Deguelle + Joyce Van Den Goor.
Read NextGreek Goddess Crochet Shawl Pattern