Kinona Wall Hanging
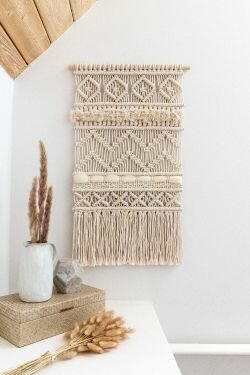
This wall hanging shows how geometric patterns can play a big role in creating striking, unique designs. Instead of relying on color to create contrast, this design relies solely on texture and shapes to produce an attention-grabbing piece of art.
Materials and Tools
- 423 feet (129 m) of 5mm three-strand cotton rope in off-white/natural color
- 136 feet (41.5 m) of 4mm single-strand cotton string in off-white/natural color
- 50 feet (15.2 m) of 5mm braided cotton cord in off-white/natural color
- One 20-inch (50.8-cm) wooden dowel
- 30 inches (76.2 cm) of wool roving
- Brush/comb
- Measuring tape
- Scissors
- Large tapestry needle
- Optional: Tape, S-hooks and working rack
Knots and Techniques
- Lark’s Head Knot
- Horizontal Double Half Hitch Knot
- Diamond Pattern
- Vertical Double Half Hitch Knot
- Square Knot
- Open Increasing Alternating Square Knot
- Alternating Square Knot
- Diagonal Double Half Hitch Knot
- Rya Knot
- Reverse Lark’s Head Knot
- Tabby Weave
- Tucking in Ends
Finished Size (Including Dowel)
- 20 inches (50.8 cm) wide by about
- 35 inches (89 cm) long
Preparation
- Vertical Setup
Cut List
- 24 pieces, 17' (5.2-m) long, of 5mm three-strand cotton rope in off-white/natural color
- 6 pieces, 30" (76.2-cm) long, of 5mm three-strand cotton rope in off-white/ natural color (used as filler cords)
- 2 pieces, 20' (6.1-m) long, of 5mm braided cotton cord in off-white/natural color
- 48 pieces, 2' (61-cm) long, of 4mm single-strand cotton string in off-white/natural color
- 48 pieces, 10" (25.4-cm) long, of 4mm single-strand cotton string in off-white/natural color
- 1 piece, 10' (3-m) long, of 5mm braided cotton cord in off-white/natural color
- 1 piece, 30" (76.2-m) long, of wool roving
Instructions
-
Place the 20-inch (50.8-cm) wooden dowel on two S-hooks or a comfortable vertical setup. Fold each 17-foot (5.2-m) length of rope in half, and mount each to the dowel using Lark’s Head Knots. Make sure they are spaced out evenly across the dowel.
-
Using one of the 30-inch (76.2-cm) pieces of rope as the filler cord, leave a tail of approximately 6 inches (15.2 cm) and tie a full row of Horizontal Double Half Hitch Knots with each of the cords. Leave no space between this row of knots and the wooden dowel.
-
Separate all 48 hanging cords into four sections of 12 cords. Use each section to tie a Diamond Pattern until there is a row of four diamonds directly below the Horizontal Double Half Hitch Knots above.
-
Using another 30-inch (76.2-cm) piece of rope, tie another row of Horizontal Double Half Hitch Knots below the row of diamonds. Again, leave a tail of approximately 6 inches (15.2 cm) before knotting.
-
Grab a 20-foot (6.1-m) length of braided cord. Leaving a tail of approximately 6 inches (15.2 cm), tie a row of Vertical Double Half Hitch Knots across the entire piece. Use two hanging cords of rope at a time as filler cords for this row of knots.
-
Using the same working cord, work another row of Vertical Double Half Hitch Knots in the opposite direction, directly under the row from step 5.
-
Repeat steps 5 and 6 with the other 20-foot (6.1-m) length of braided cord, leaving a 1-inch (2.5-cm) gap down from the last two rows of Vertical Double Half Hitch Knots.
-
Using another 30-inch (76.2-cm) piece of rope, tie a row of Horizontal Double Half Hitch Knots below the last row of Vertical Double Half Hitch Knots.
-
Skip six cords from the left, and use the next four cords to create a Square Knot. Do the same on the right side. Then tie a center Square Knot using the four center cords of the piece. You will have three Square Knots tight to the row above.
-
Work three Open Increasing Alternating Square Knot patterns (the variation of the Increasing Alternating Square Knot technique) using the three knots from step 9 as the center of each inverted “V” shape. You will work three Alternating Square Knots on the left and three Alternating Square Knots on the right of each inverted “V.”
-
Skip 14 cords from the left, and use the next four cords to tie a Square Knot below the knots above. Then do the same on the right side. This will create a zigzag pattern with all the Alternating Square Knots.
-
Measure 2 inches (5 cm) down, and re- peat steps 9 through 11 so that two zigzag patterns form.
-
Grab a 30-inch (76.2-cm) filler cord and work a row of Horizontal Double Half Hitch Knots. Start this row about ½ inch (13 mm) down from the farthest left Square Knot.
-
Using another 30-inch (76.2-cm) filler cord, tie another row of Horizontal Double Half Hitch Knots approximately 2 inches (5 cm) below the last row.
-
We will now work a row of six “X” patterns using Diagonal Double Half Hitch Knots. To create the first “X,” tie three Diagonal Double Half Hitch Knots. Use the farthest left cord as the filler cord for this step.
-
Take the eighth cord from the left and angle it downward toward the outer edge of the piece. Using this cord as the filler cord, tie seven Diagonal Double Half Hitch Knots.
-
Using the fifth cord from the left (the same filler cord from Step 15), tie three Diagonal Double Half Hitch Knots to form the “X.”
-
Move on to the next eight cords, and repeat steps 15 through 17. Do this until all cords have been used and six “X” shapes form. Then grab the last 30-inch (76.2-cm) filler cord and work a final row of Horizontal Double Half Hitch Knots below.
-
We will now create the fringe at the bottom of the piece using the Rya Knot weaving technique. Gather four 2-foot (61-cm) lengths of string and separate them into two groups. Make sure all the ends of each group are even, and then use these groups of cords to add two Rya Knots. The farthest left four cords will be the filler cords for these knots.
-
Slide both Rya Knots up until they are flush to the row of Horizontal Double Half Hitch Knots above. To secure these strings in place, take all four filler cords and tie a Square Knot tight to the center of the Rya Knots.
-
Repeat steps 19 and 20 all the way across the piece until all the 2-foot (61-cm) lengths of string have been used.
-
Now, it is time to add texture. Starting with the open section between the rows of Vertical Double Half Hitch Knots, grab a 10-inch (25.4-cm) length of string, and mount it to the farthest left two vertical cords by using a Reverse Lark’s Head Knot. Then grab another 10-inch (25.4-cm) piece of string and do the same, using the same two filler cords. Tighten both knots securely.
-
Repeat step 22 across the entire piece until all 48 10-inch (25.4-cm) pieces of string have been used.
-
Secure all the Reverse Lark’s Head Knots tight to the filler cords. Once these knots are taut, trim the string to approximately 1 inch (2.5 cm) in length and brush out the ends of string to create a row of fluffy fringe.
-
Concentrating on the 2-inch (5-cm) open section below, grab the 10-foot (3-m) length of braided cord, and weave in through all the vertical cords, using the Tabby Weave technique. Leave a tail of approximately 6 inches (15.2 cm), and weave over one cord and under one cord across the entire piece. Starting from the bottom and working your way up, weave a total of five rows with this cord.
-
Using the Tabby Weave technique once more, take the 30-inch (76.2-cm) piece of wool roving and weave it into the remaining open cords. Leave a tail of about 6 inches (15.2 cm), and weave this material over six vertical cords and under one cord. Continue this pattern across the entire piece.
-
To secure the ends of the wool roving, tuck them into cords in the back of the piece.
-
Using a large tapestry needle, tuck the ends of the filler cords and braided rope into cords in the back of the piece. If you don’t have a large tapestry needle, you can also glue or sew these ends down instead of tucking them in. Trim off the excess ends of these cords if needed.
-
Measure approximately 9 inches (23 cm) down from the last row of Horizontal Double Half Hitch Knots, and cut all the cords in a straight line. If it’s helpful for you, secure a length of tape across all the cords horizontally and use this tape as a guide to cut an even, straight line.
Credit:
Reprinted with permission from The Complete Beginner’s Guide to Macramé by Alisha Ing. Page Street Publishing Co. 2024. Photo credit: Alisha Ing and Alyssa Vela.
Read NextColorful Cross Wall


