Beautiful Moments Chalkboard Tray DIY Wall Decor
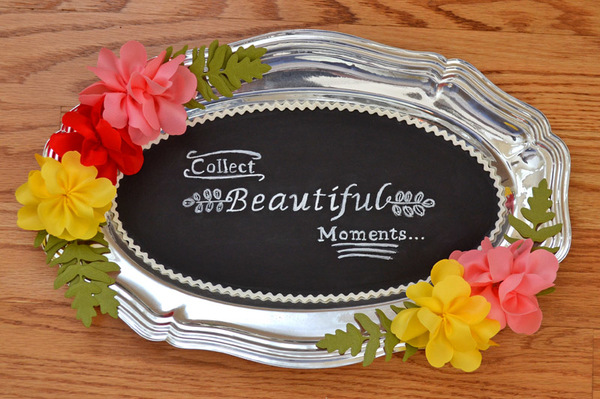
Cheap decorating ideas can help you transform any space. This Beautiful Moments Chalkboard Tray DIY Wall Decor will bring a positive vibe to any room. The best part of this DIY wall art is that you can use throw-away silver tray from the trash. Paint the center with Plaid FolkArt Home Dcor Chalk Rich Black Paint to give your wall decor some life and be sure to use accents such as rickrack and flowers. Be sure to add on some chalkboard lettering and create a personal message. This project is the true definition of a trash to treasure craft. You can hang it in any room of your house and look at it whenever you need a little inspiration.
Primary TechniqueGeneral Crafts

SeasonSpring
Materials List
- Plaid®: FolkArt® Home Décor Chalk Rich Black Paint
- Little B™ LLC: Pull Flower – Roses
- iLoveToCreate: Aleene’s® Always Ready Tacky Glue Turbo
- Simplicity Creative Group: ¼” Baby Rick Rack
- Sizzix®: Core'dinations® Kraft-Core Nostalgic Collection by Tim Holtz™ For Sizzix®
- Disposable Silver Tray
- Foam Brush
- Scrapbook Adhesives by 3L®: Dodz™ XL (extra large adhesive circles) and 3D Foam Squares, White Small
- Hazel & Ruby™: Chalkboard Kit (White Chalk, White Pencil and Practice Slate)
- Spellbinders® Creative Arts: S4-328 Foilage (Die #6)
Instructions
-
Apply FolkArt Home Dcor Chalk Rich Black Paint in the center of tray. Paint three coats with dry time in between coats.
-
While waiting for paint to dry, create Little Bs Pull Flower Roses as directed on package. Make two of each color. Set aside.
-
Once the last coat of chalk paint is dried, edge the painted area with Baby Rick Rack and Aleenes Always Ready Tacky Glue Turbo. Let dry.
-
On the computer create a sentiment to fit the center of tray and print out. I also drew some accents around the words. Chalk over the back of the copy paper of sentiment with white chalk. Place chalked side down on to the tray and beginning tracing the words. The white chalk will transfer to the painted area. Use white marker to finish the sentiment.
-
Cut and emboss Foliage set Die #6 (the smallest size die is #1) with No. 11 Green cardstock for a total of six die cuts. These will be placed behind the Pull Flower Roses for accent.
-
Place a cluster of three Pull Flowers Roses (pink, red and yellow) and adhere with Dodz XL on the upper left edge of tray. Repeat another cluster of roses to the lower right edge. Add in leaf die cuts - the upper left corner, double up the die cuts and for dimension, use 3D Foam Squares, Small White.
Read NextBeachy Pom Pom Wall Hanging