This project was submitted by one of our readers, just like you.
DIY Vintage Irish Pub Sign

DIY Vintage Irish Pub Sign
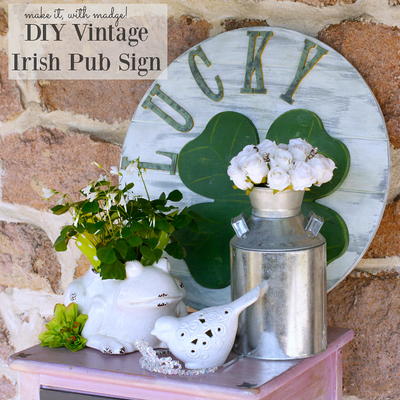
In the Desiger's Words: "Being Irish, we’re all about the wearing o’ the green, so this sign will be a year round addition to our decor even after St.Patrick's Day. We’re using a variety of faux finish techniques here, the fun thing about faux finishing is that it’s always a little bit different so every sign will be one of a kind."
Add the luck of the Irish to your DIY home décor for St. Patrick’s Day or leave it up all year-round to keep the good tidings coming. This gorgeous and green piece of DIY wall art is a lovely way to celebrate your Irish heritage. With a faux rustic finish and green accents, the DIY Vintage Irish Pub Sign would make a lovely addition to your entryway or living room. Wood crafts like this are an easy way to add a rustic touch to your modern home, lending a homey touch instantly.
Primary TechniquePainting
Materials List
- 18.5" Wooden Grooved Circle Unfinished Wood Company
- 12" Wooden Shamrock Unfinished Wood Company
- 3.875×1.25" Laser Cut Vintage Sign Letters
- Delta Ceramcoat Chalk Paint: Lichen, Marigold, Spanish Olive, Raven, White Lace, and Oyster Shell
- Delta Ceramcoat Wax Clear
- FolkArt Wide Brush
- FolkArt Chalk Paint and Wax Brushes
- FolkArt Wax Brush
- FolkArt Angular Brush Small
- FolkArt Sanding Foam Block
Instructions
-
Prep everything by sanding with a fine grit sandpaper, wipe clean, let dry.
-
Paint a coat of the Oyster Shell paint on circle using the wide flat brush working with the wood grain. Cover the sides too! Let this dry completely.
-
Paint the shamrock Spanish Olive green. Let this dry completely.
-
Paint the letters, the sides are marigold, the tops are lichen. Work slowly and carefully! Let these dry.
-
Use the wide flat brush and the white lace paint to dry brush white across top and sides of circle. Take your time, working with the wood grain. Build this up in layers. Once you are happy with the result, let this dry completely.
-
Use a flat brush to lightly sweep black paint across surface of letters. This is similar to dry brushing, you only want to accent this, not coat the letters. Watch the video!
-
Mix the dark green and yellow paint to make a chartreuse shade. Mark the veins lightly on the shamrock using a pencil. Then use edge of brush to paint these on. Don’t worry if they’re not perfect, we are dry brushing and sanding over this.
-
Dry brush white, grey, and black across top of shamrock, this can be side to side and up and down and also on edges. Take your time, don’t over do this! I used a smaller chalk paint brush and just tipped the tips of the bristles into the paint. Let this dry completely.
-
Sand the surfaces of all of your painted elements. Make sure you work on the edges and work with the grain of the wood. The idea here is to distress the wood as if it has aged naturally. You can do as much or as little as you choose.
-
Glue the elements to the circle using the wood glue. Let this dry overnight.
-
You can seal this using the Ceramcoat wax. Paint it on with a wax brush. Let it dry, then buff it with a soft cloth to a dull sheen.