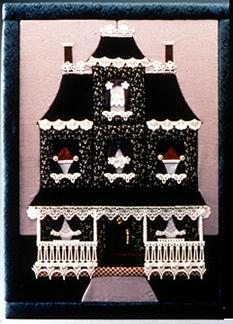
Victorian House No Sew Quilt
This Victorian House quilt is an easy no-sew project you can quilt in a day! Packed with charm and detail like lace curtains, wooden porch railings and more, you won't even be able to tell that this is a no-sew quilt that's fun to make!
Materials:
-
STYROFOAM Brand Products:
- 2 12" X 18" x 1" sheets
- Package quilt batting
- White craft paint
-
Fabric:
- 1/4 yd. dark green for frame
- 1/4 yd. light green for grass
- 1/4 yd. light violet for sky
- 1/4 yd. dark, small-flowered print for house
- 1/4 yd. dark burgundy for roofs
- 1/8 yd. dark red print for porch floor
- 1/8 yd. medium red print for porch front;
- Scraps of bright fabric for window curtains, shades, front door and chimneys
-
Lace:
- 1/4 yd. 1" pointed scalloped lace for roof tops
- 1/2 yd. 5/8" scalloped lace for roof edges
- 1/2 yd. 1" lacy scalloped lace for porch edge
- 1/4 yd. 1" flower lace (or flower motif cut from wider style) for flowers in front of porch
- 1/3 yd. lace with 1 1/2" loop motif for under windows
- 1/8 yd. tiny lace for chimney tops and window shades
- 1/8 yd. 1 1/2" sheer lace for curtains;
- Scraps of lace for tie backs, edges of shades, etc.
-
Doll House Accessories:
- 9" X 2" porch baluster (Northeastern Scale Models, Inc. #pbl-2, 1201)
- Two 1/4" turned spindles (Houseworks #7009 spindles);
- Door handle and knocker (Realife Miniatures #801)
- Glue gun and glue sticks or white craft glue
- 1" putty knife
- Toothpicks
- Pencil
- Tracing paper
- Ruler
- Cuticle scissors
- Saw-toothed picture hanger
- Pattern
Instructions:
-
Enlarge pattern to 22" X 16" on tracing paper.
-
Glue 2 sheets of STYROFOAM together along 18" sides, using toothpicks to reinforce seam. Let dry thoroughly.
-
Mark off a 1" frame around the 24" x 18" sheet. Center pattern inside frame and transfer pattern onto surface of sheet. Use a ruler and pencil to score the pattern lines onto the STYROFOAM; the lines should be felt through fabric.
-
For frame, cut (2) 22" X 3" and (2) 22 1/2" X 3" strips of fabric and (4) 20" X 2" and (4) 22" X 2" strips of batting.
-
Cut apart pattern pieces. Cut all pieces except windows from fabric, adding 1/4" to all sides.
-
Cut three layers for each window section. The first layer is from the sky color and covers the whole window area. The second layer, glued on top of sky fabric, is the window shade or lace curtain. The final layer, glued over shade, is the curtain or drape.
-
Use patterns to cut batting for all pieces except sky, grass and windows; pieces should be the same size or slightly smaller than pattern pieces. If desired, omit batting layer on first floor sections. Cut double layers of batting for porch roof, porch floor and sidewalk.
-
Layer (2) 20" batting strips along front and sides of top of frame; glue in place. Place 22" X 3" fabric strip over batting so 1/4" extends over scored lines. Position putty knife on scored lines and push 1/4" seam allowance into the foam; glue excess fabric to back. For a clean, crisp "seam," hold the putty knife straight up and down and work on a large flat surface. Tuck in stray fabric with a knife; carefully trim excess fabric. Finish tucking frame, using remaining batting and fabric strips.
-
Starting with sky and grass, continue to center and tuck batting and fabric pieces into foam.
-
Assemble windows (see step 6) and glue to quilt. Glue on lace or bead tie-backs
-
Cut wood baluster into (2) 4 1/2" pieces. Paint spindles and baluster white. When dry, glue to both sides of porch. Glue on door handle and knocker.
-
Cut (2) 1 1/2" X 1/2" fabric rectangles for chimneys; following photo, glue on wall hanging.
-
Glue lace along rooftops, roof edges, tops of chimneys, under windows and along front of porch.
- Glue hanger to the back about 1" from top edge. Hang and enjoy your new quilt!
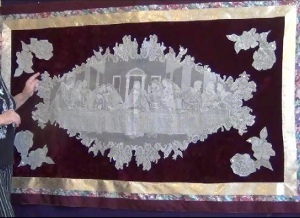
Read NextVenetian Quilt


Thanks for your comment. Don't forget to share!
rondaernst 1076862
Sep 06, 2012
I think there is a great number of books to choose from. I look forward to trying out some of these beautiful quilts.
texgal55
Mar 17, 2011
I love this pattern!! I saved it to my pattern box since I can't do it just now. I'm trying to get three little girls some Easter dresses made, so that's pretty well got my time taken up. But I will do this Victorian house. I absolutely love anything Victorian. I'll probably use lighter colors for mine than what is shown in the picture. But I'm so excited to begin picking out the pieces of material I want to use. There are so many lovely calico and Keepsake materials out right now. It's gonna be fun, fun, fun!!!! Thanks for this pattern! Myra Wade
lynnettepeatman 84 28670
Jan 06, 2011
when I tried to get the download for the pattern for no sew victorian no sew house it showed not found
Crafter 5967685
Sep 09, 2010
Hi, When I tried to download the pattern for the victorian house, I got the page unavailable message. This has happened before with other projects. Why is this?
deborahr
Feb 03, 2010
Love this Beautiful quilt pattern, I making a quilted embroidered wall hanging of the Victorian House.. Love,, does anyone know of any other Victorain House quilt patterns??
Report Inappropriate Comment
Are you sure you would like to report this comment? It will be flagged for our moderators to take action.
Thank you for taking the time to improve the content on our site.