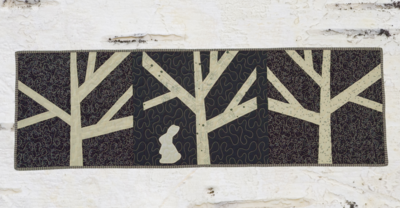
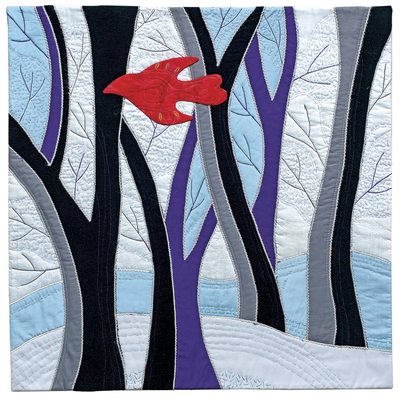
Lone Winter's Night Quilt

Bring the beauty of the outdoors inside with this Lone Winter's Night Quilt. Bursting with the wonders of winter, this quilt pattern would be great for hanging on the wall or using as the centerpiece for your next quilt project. The lovely winter landscape is a great reminder of the beauty of the season...and the striking red bird on the forefront gives this quilt pattern just the right pop of color. Complete with all the patterns you need to make this quilt, this fun winter quilt pattern makes a wonderful gift for a loved one or a nice homemade home accessory to keep for yourself!
Primary TechniqueQuilting

SeasonWinter
Sewn byMachine
Materials:
Fabrics
- Fabric requirements assume 40" usable width of fabric
- Silver-blue gray (snow & sky) – 1⁄3 yard
- Light sky blue (snow & sky) – ¼ yard
- Black (trees) – ¼ yard
- Medium gray (trees) – ¼ yard
- Dark purple (trees) – 1⁄8 yard
- Red (bird) – ¼ yard
- Binding (optional) – ¼ yard. Cut 2 strips 2¼" x 40" for 72" of continuous binding
- Backing & sleeve – 2⁄3 yard. Cut 1 panel 19" x 20" for the backing. Cut 1 piece 9" x 15” for a sleeve
Other Materials
- Tracing paper
- Pencil and eraser
- Permanent black marker
- Freezer paper
- Masking tape
- Scissors for paper and fabric
- Appliqué or curved-blade embroidery scissors
- Iron and ironing board
- Sewing machine for straight and zigzag stitching and free-motion quilting
- Cotton sewing thread
- Lightweight batting – cotton or cotton blend
- Safety pins
- Decorative yarns and threads – wool, cotton, or blends
Patterns
Instructions:
Finished quilt size: 15¼" x 157⁄8"
- Enlarge the bird and background design where the size check box measures 1" x 1". Set the bird aside. Use a pencil to trace the background design onto tracing paper. Draw over the pencil lines with a permanent marker. Copy the number for each shape onto the drawing. This is your pattern guide.
- Cut a piece of freezer paper the same size as the pattern guide. Place it shiny side down over the guide. Trace the lines and numbers onto the freezer paper. Add hatch marks (small lines drawn across the pattern lines) on each line segment. This freezer-paper drawing is the pattern that will be used for sewing. It will hold the pieces of the design in place while stitching to allow a high level of accuracy. It also holds the fabric grain in place throughout the sewing process, eliminating the need to pin or to ease a curve.
- Using my quilt as a guide, select the fabric to use for each pattern piece. As you make your choices place a piece of masking tape with the pattern piece number(s) onto the selected fabric.
- After selecting fabrics, cut the freezer-paper pattern apart on the lines. Match each numbered pattern piece to the chosen fabric. At the ironing board, press the shiny side of the freezer-paper pattern piece to the right side of the fabric. Cut around each pattern piece leaving ½" extra fabric all around.

- Lay the prepared fabric pieces on the pattern guide, freezer-paper side up. Select two adjacent pattern pieces. Place them side by side on the ironing board, aligning the pattern pieces using the hatch marks as guides. Once lined up, lift up the edge of one of the freezer-paper pattern pieces and slide the extra fabric from the adjacent piece underneath. Leave a space the width of a sewing machine needle between the edges. Iron the freezer paper down.
- Thread your sewing machine with a neutral thread in the top and bobbin. Using a straight stitch and a standard piecing length, stitch in the space between the pattern pieces.

- After stitching, lift up the edge of the freezer-paper pattern, and use appliqué or curved-blade embroidery scissors to trim the excess fabric of the top piece close to the sewing line. Trim only on the right side of the quilt. Once trimmed, iron the freezer paper back in place.

- Continue sewing the pieces together in sections, then use the same technique to sew the sections together until complete. The first layer of your landscape is now done.
- Carefully remove all the freezer paper. Layer the top, batting, and backing fabric. Baste the layers together using safety pins. Couch over the sewing lines with decorative yarns. The couching does double duty as a finish for the raw edges and quilting of the basic contours of the design. So, as you select your yarns, choose fun colors and ones that will cover the stitching lines on the quilt top. Choose top threads that give extra sparkle, and remember the thread in your bobbin will appear on the back of your quilt.

- Trace the enlarged bird pattern onto freezer paper. Cut the pattern out on the drawn line. Cut 2 pieces of red fabric 6" x 10". Place them right sides together. Press the shiny side of the freezer-paper pattern to the wrong side of one red piece. Cut out leaving at least 1" fabric margin all around. Lay the cut fabric, with pattern still attached, on top of a piece of batting. Pin securely and cut out. Straight stitch around the outside edge of the freezer paper.

- Remove the pins and freezer paper. Trim excess fabric and batting to about 1⁄16" from the stitching line. Clip the curves. Pull the fabrics apart so you can make a 1" slit in the center of one piece of fabric. Turn the bird right side out through the slit and press.

- Embellish the bird as you like, then position it slit-side down on the quilt. Hand appliqué in place. By hand or machine, embroider the bare stems of the tree. Add extra stitching to the background as you like.

- Finish your quilt with a facing, as I have done, or 72" of double-fold binding. To display your quilt, make a sleeve and sew it to the back of the quilt.
 You can find this project-and many more-in our new free eBook, 11 DIY Christmas Decorations and Ideas.
Read NextHomes For The Holidays Mini Quilt
Your Recently Viewed Projects
Thanks for your comment. Don't forget to share!
Cheryl McLaughlin
Jun 04, 2016
i LOVE this pattern -- here's my finished project - added beads and other embellishments and tatted snowflakes
Report Inappropriate Comment
Are you sure you would like to report this comment? It will be flagged for our moderators to take action.
Thank you for taking the time to improve the content on our site.