Painted Easter Egg Chick
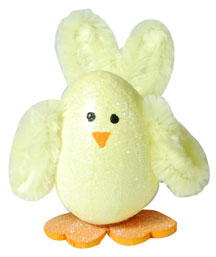
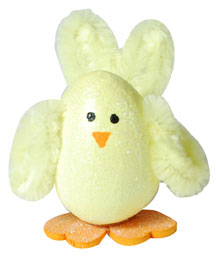
For a cute variation on traditional painted Easter eggs, paint one to look like a little baby chick with a bit of glitter.
Materials:
DecoArt Products Required
Americana Acrylics
- DAO6 - Pineapple
- DA228 - Bright Orange
Americana Writers
- DAW67 - Black
Americana Brushes
- DBR2002-B - Round 2
Multi-Purpose Sealer
- DS17 - Multi-Purpose Sealer
Glamour Dust
- DAS37 - Glamour Dust Crystal
Supplies
- Two 1" unfinished wood hearts
- Two 12" 15-mm yellow chenille stems
- Wire cutters or old scissors
- Lo-temp glue gun
- Foam plate
- 1/4" flat brush
- 2.5" papier mache egg
Instructions:
1. Basecoat egg with flat brush and Pineapple; let dry after each coat.
2. Basecoat wood hearts Bright Orange and let dry.
3. Apply coat of Multi-Purpose Sealer over Pineapple egg and Bright Orange hearts.
While wet, sprinkle all with Glamour Dust; let dry.
4. For feet, refer to photo for placement and glue hearts to bottom of egg as base.
5. Referring to photo for placement, use round brush and Bright Orange to paint inverted triangle for beak shape. Let dry.
6. Use Black Americana Writer to paint dots for eyes; let dry.
7. For wings, cut one chenille stem in half. Bend each piece in half, with fold curved to shape wing and ends twisted together. Glue ends of wing to each side of chick.
8. For tail, fold chenille stem in half, then pull fold toward loose ends to make thin, elongated heart. Twist loose ends together and glue to back of chick.
For more great Easter craft ideas, check out our free Easter craft eBook.
Read NextThanksgiving Turkey Pinata

