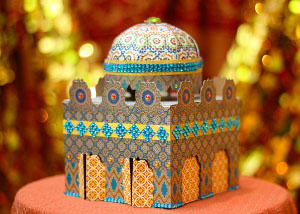
Moroccan Palace Dollhouse
 Visit Jonathan at Jonathan Fong Style.
If you think you know about DIY dollhouse plans, think again. This Moroccan Palace Dollhouse is sophisticated and unexpectedly unique. In addition to paper, use sequins, rhinestones and more to add a one-of-a-kind touch. Start by building the walls of your dollhouse and then add a roof. Before you know it, you'll have a delightful hideout for your favorite miniatures.
You can find this project, as well as many other fabulous blogger projects, in our new eBook, The Best Blogger Craft Ideas 2014: Decoupage, Sewing, Jewelry Making, and More free eBook. Download your own free copy today!
Materials:
- Sizzix Triple Fancy Frame Flip-its Card Die
- Darice Sparkle Tape - Yellow
- Darice David Tutera Self-Stick Shimmer Sheet - Rhinestone Turquoise
- Plaid Podgeable Papers - Vintage Wallpaper
- Craft Attitude printable film
- Spray adhesive
- Cardstock (I used an old Nordstrom box)
- Styrofoam half ball, 4" diameter
- Pins
- Tape
- Craft glue
- Small sequins
- Rhinestone brad
Instructions:
- Print Moroccan patterns on seven sheets of Craft Attitude printable film. (I found royalty-free Moroccan artwork and collaged them on Photoshop.) Spray each of the the printed sides of the Craft Attitude film with spray adhesive, and apply them to card stock. The first four sheets of Craft Attitude will be for the four walls of the palace.
- Using the main card die in the Sizzix Triple Fancy Frame Flip-its packet, die cut four of the pieces of card stock to create the four walls. Bend the cut shape at its fold so the ornaments flip up. These pieces that flip up will be the palace's "battlements."
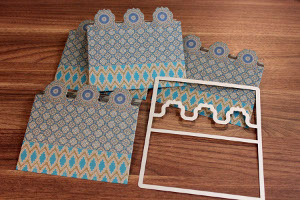
- Die cut two doorways on each wall using the largest of the ornate frame dies included in the packet. I positioned the die on the wall so that some of the bottom of the frame would be cut off. That way, you have a doorway that goes to the floor, rather than a hole you have to jump through.
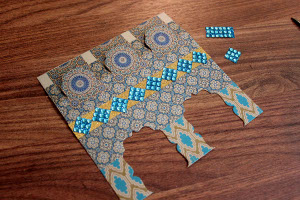
- To create some ornate doors for the doorways, simply position a piece of decorative paper behind the openings that you have just created with the frame die. I used the Moroccan-flavored paper from the Plaid Podgeable Papers - Vintage Wallpaper. I also created two doors that open by die cutting some of the same paper with the same frame die, cutting it in half top to bottom, and then gluing the doors to the doorway so they appear open.
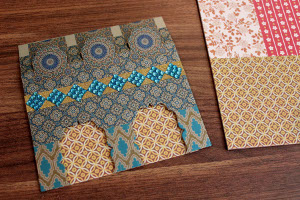
- Apply a strip of Darice Sparkle Tape horizontally to each wall. Then cut the Darice David Tutera Self-Stick Shimmer Sheet into diamond shapes (3" X 3" rhinestones in each diamond), peel off the protective liner, and apply the diamonds on top of the sparkle tape. Add sequins along the wall wherever you would like more sparkle.
- Attach the four walls to each other using tape on the inside. Let the top pieces that are folded over help support the structure, gluing the contact points.
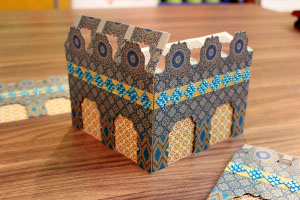
- Once the walls are up, you'll notice there is no roof. Cut the fifth piece of card stock to cover the entire roof area. Place this piece on top of the main structure, gluing it in place.
- Cut the sixth piece of card stock into a circle shape that will cover the Styrofoam half ball. Cut the circle into six wedge shapes, which will make it easier to cover the ball. Pin the wedges to the Styrofoam to cover the dome with a Moroccan design. Top it off with a rhinestone brad. Avoid the temptation to now put this on your head.
- To create the gazebo-like structure that supports the dome, die cut the seventh piece of card stock using the die in the Sizzix packet that looks like arches. You will need two of these shapes taped together. Then pin this piece to the dome at several points so it is secure.
- Hide the seam where the dome and arch structure meet with a strip of the Darice Sparkle Tape and a strip of the Darice David Tutera Self-Stick Shimmer Sheet. Bend the columns of the arches inward about a half inch; this shortens the arch structure because it's a little tall otherwise, and more importantly, this creates a surface for you to glue the dome/arch to the roof.
- Add more small strips of the Darice David Tutera Self-Stick Shimmer Sheet to the bottom of the walls surrounding the doorways. And that's what we mean by "rocking the kasbah."
Read NextPressed Flower Paper Lanterns