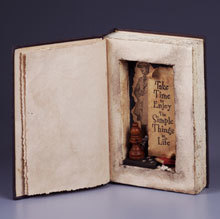
Foam Scrapbook
This clever craft allows you to create a new book of memories from an old book, with the help of some scissors, foam, and glue. This ornate-seeming project is deceptively easy, and can be accomplished in two to three hours.

Materials:
- STYROFOAM* Brand Foam:
- Sheet, 36" x 12" x 1-1/2"
- Old book, interior pages approximately 1-1/2" thick
- Antique-finish parchment paper, three sheets
- Premixed tile grout
- Acrylic paint to match parchment paper
- Gel stain medium
- Memorabilia: old photos; quote; stickers; dimensional items
- Serrated knife
- Candle stub or paraffin
- Fine-line black permanent marker
- Ruler
- Disposable mixing bowl and spoon
- Medium flat paintbrush
- Disposable palette
- Water basin
- Paper towels
- Scissors: straight-edge; deckle-edge
- Low-temp glue gun and glue sticks
- Thick, white craft glue
Instructions:
-
Carefully remove pages from book, preserving binding. Wax serrated knife with candle stub or paraffin. Trace removed pages onto foam sheet; cut out. Remove center from foam cut-out, leaving 1" border on all sides. Use scrap foam to sand all cut edges smooth.
-
Slightly thin tile grout with water. Paint all foam surfaces with thinned tile grout; let dry and sand smooth. Repeat.
-
Paint top, bottom and right edge of foam with non-thinned grout. Use knife edge to indent "page" lines in grout to resemble unopened book. Let dry completely.
-
Paint foam insert with acrylic paint. Follow manufacturer's instructions to apply gel stain to painted surfaces. Let dry.
-
Stack and wrap papers around "spine" of foam insert, creating three pages in front and three in back; do not glue. Use straight-edge scissors to trim pages to size of insert. Barely trim all paper edges with deckle-edge scissors.
-
Place right side of one paper page over front of foam insert; cut matching window opening in paper. Glue page to foam, aligning openings. Apply glue to foam spine and back; wrap rest of page around insert. Apply glue to spine to attach two remaining pages and book cover. Close book, weight down and let dry completely.
-
Thin gel stain slightly with water and apply around window opening. Apply mixture to pages and inside front cover to give vintage look.
- Glue embellishments, quote, photos or other desired memorabilia inside book.
®™ Trademark of The Dow Chemical Company ("Dow") or an affiliated company of Dow. For more project ideas, please see styrofoamstyle.com.
Read NextEasy Valentine´s Day Candy Gift
Your Recently Viewed Projects
Thanks for your comment. Don't forget to share!
Report Inappropriate Comment
Are you sure you would like to report this comment? It will be flagged for our moderators to take action.
Thank you for taking the time to improve the content on our site.