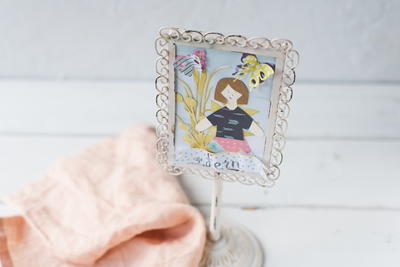
DIY Paper Doll Display
Paper doll craft ideas like this one are great for little girls' rooms.

Make a paper doll craft that will become a cherished keepsake. If your little girls are too old to play with paper dolls or you're just looking for a new decoration for their room, make the DIY Paper Doll Display. This paper craft idea is easy if you have a die cutting machine and a paper doll template to go off of. All you need to do is layer your cutouts to create a scene. Have your paper doll playing in a field of flowers or outside in general. You'll create an entire scene that will make a lovely display, and your little girl will love this.
Estimated CostUnder $10
Time to CompleteIn an evening
MaterialsPaper
Primary TechniquePaper Crafts
Type of Paper UsedCardstock

Project TypeMake a Project
Materials List
- Printable Paper Doll Template PDF
- Printer paper
- Coordinated patterned paper
- Frame
- Scissors
- Pencil
- Glue
- Stamps and ink
- Adhesive
- Cardstock
- Stickers, die cuts, etc. to create backdrop
Instructions
-
Cut a background piece of paper to fit your frame.
-
Create your paper doll by cutting out the shapes from the pdf you have printed.
-
Trace the shapes onto cardstock and patterned paper and cut out.
-
Adhere pieces together to create your doll.
-
Build your background on your paper.
-
Add your doll.
-
Remove the glass from the frame.
-
Insert image in.
-
Create flag with stamped name and fold/crumple to add dimension.
-
Adhere to the image.