30 Minute DIY Stationary
"Pinterest is full of DIY hacks and I decided try out a few of them. Following are 12 quick upgrades to basic stationery items. Hope you like my personal twist to these everyday items. I am glad I did them, my work desk looks much prettier and organized now. These are easy ways to personalize and update your stationery. Use #akioneam when you try out these ideas. Get crafty."
Primary TechniqueGeneral Crafts

SeasonSummer
Materials List
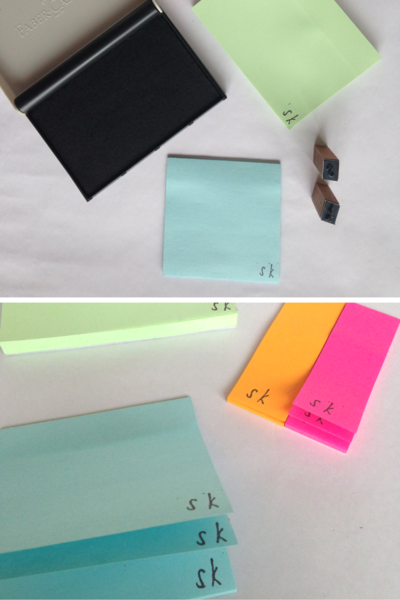
- Post-its + Alphabet stamps + Stamp pad
- 2 piece 3? Wooden pegs + Washi tape + Multi purpose glue (Fevicol all-fix)
- Binder clips + Washi tape
- Wire paper clips
- Wooden pencils + Washi tape + Nail polish (optional)
- Pens with screw on lids + Patterned paper
- Small dish (mine was an old show-piece) + Magnetic sheet + Acrylic paint (optional)
- Stapler pins + Permanent markers
- Paper (minimum 180 gsm) + Ruler + Paper glue + Folding bone/ paper knife
- Nail polish + Glass paper weights
- Water paints + Paint brush + A4 Copier paper
- Clear acylic holder + Hole protectors
Instructions
-
Select the alphabets of your choice and stamp it on. You could even get personal name stamps made. This is one of my personal favorites, quick and personalized! I even gifted a set to my friend with her initials.
-
First cover one side of each peg with washi tape. Next facing the clips in opposite directions, with the washi side out on each peg, stick them together using glue. Now placing the earphones in one mouth loop the cord around the rear ends and fix in place in the opposite mouth.
-
Cover one side of the clip with washi tape and cut. Repeat the process on all three sides. You could make different designs, like using two washi tapes or striped designs. I even used a big binder clip as a photo holder.
-
Follow this picture for the exact fold marks. It might take a few attempts to get it right, but they look so pretty!
-
Cover the maximum width of the pencil with one strip of washi tape and repeat to cover the rest of the pencil. You could either leave the tops blank or paint it up for a neater finish. Get creative and use multiple washi tapes too.
-
Use the pens refill as a guide and cut a rectangular strip of paper. You could even write a personal message or print on the strip. Wrap the paper around the refill and insert into the pens body. Try and remove any previous labels from the pens.
-
First paint the dish/plate if required. Mine was all white and I wanted to match it to the rest of the stationery so I painted it a bright peach. Using the dish as template trace out the shape onto the magnetic sheet and cut. The magnetic sheet is usually one side sticky so just stick on the dish, if not use a multi-purpose glue.
-
Just paint on the stapler pins using the markers. You could either make an entire range of a single colour or go mulit-colour like I did.
-
Using the folding bone (or fingers) and the ruler make fold lines at equal distance on all four sides. My paper was 12? x 14? and I made folds at 2.5?. Press the corners and glue the corner squares into triangles. If you fold the corners to the inside the glue wont hold the multiple layers in place,so if you want to fold it in- staple the corners.
-
Disclaimer- The glass paper weighs are actually caps of old glass containers. You could use any heavy item around the house for paper weights. Using nail polish, paint broken lines all over the paper weight. When using multiple colours let each colour dry before using the next. I made two weights matching the washi tape stationery.
-
Cut the A4 paper into four sections each. Taking 7-8 cut sheets paint the edges with diluted water paint. The paint will leave uneven edges on the various sheets giving you a set of artistic note papers.
-
Use the inside dots instead of the usual hole protector circles. Stick them onto the acrylic holder in alternating lines, the number of lines depends on the holder size. I first stuck the upper and lower line and then placed the middle line dots in alteration with them. If you get the dots stuck wrong use nail polish remover to remove sticker residue. You could use these hole protectors to personalize any product- pen stands, files, paper holders,etc.
Read NextEasy Bookmarks
Your Recently Viewed Projects
Thanks for your comment. Don't forget to share!
lpalmer59 7490208
Mar 14, 2016
I think the best gift you can give to someone is a set of handmade stationary paper, some handmade cards, a few stamps and a nice pen. People today have lost the art of sending a hand written card, just to say thank you, or I was thinking of you. I think it would make all of us very happy if it were to come back into style.
Report Inappropriate Comment
Are you sure you would like to report this comment? It will be flagged for our moderators to take action.
Thank you for taking the time to improve the content on our site.