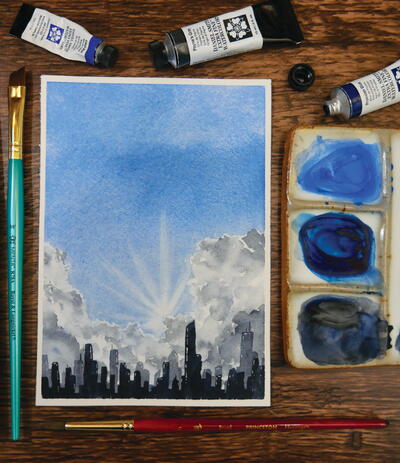
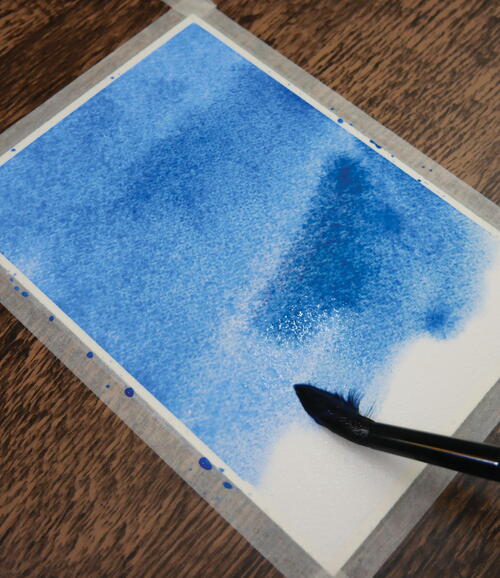
Sunbeam Skyline

Hiding behind towering, fluffy clouds, the sun brightens the city below, its sunbeams stretching high into the sky. The city, with its tall and mighty skyscrapers, is silhouetted against the bright cloudscape, while the blue sky promises a beautiful, sunny day. In this painting, we’ll use tissues to lift and stamp out our towering clouds and an angled or flat brush to paint the city skyline.
Materials List
-
Paints:
- Cobalt blue
- Prussian blue
- Payne’s gray
- Brushes: sizes 12, 10 and 6 round and size 3/8 angled (or flat)
- Paper: 5 x 7–inch (13 x 18–cm) cold-pressed watercolor paper
- Painter’s tape (or washi tape)
- Paper towels (or a rag)
- Pencil and kneaded eraser
- White gel pen or white gouache
INSTRUCTIONS:
-
STEP 1: THE BLUE SKY
No sketch is needed for this piece, so let’s dive right into painting.
A majority of the sky in this piece is completed in one layer, unlike other projects in the book. This is because we’re relying on the white of the paper below to create our clouds. If we tried to stamp out white clouds in the following layer, it would be more difficult to achieve the whiteness of the paper again. On the same degree, we’ll need to lift out pigment with our brush for the sunbeams before our blue sky dries. So, you’ll need to work a little faster than usual.
Begin by wetting the entire paper with clean water until it’s glistening. Then, using your size 12 round brush, paint the entire paper with dark value cobalt blue, adding in medium-value Prussian blue here and there for a variety of blue in your wash. Quickly, before the wash dries, move on to the next step. -
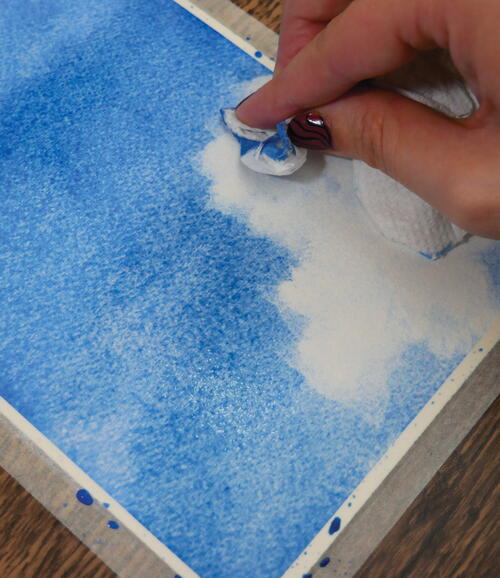
STEP 2: STAMPING OUT CLOUDS
Grab a clean paper towel or rag. Scrunch it up in your hand so the edges are uneven, and then press the paper towel into the bottom of the paper to lift the paint. You’ll need to apply decent pressure to stamp out all the pigment, so don’t be afraid to really press into the paper. You will also need to scrunch and re-scrunch your paper towel or tissue as it picks up pigment, using a clean portion to lift further, otherwise you’ll risk applying the pigment you just absorbed out of the paper.
Continue lifting out the blue pigments with your paper towel, creating the shape of towering clouds that are taller on the sides than in the middle. Another reason I like to use a scrunched-up paper towel versus a folded one is that it creates random, rounded edges rather than predictable shapes. Clouds are wild and unpredictable in shape—no two are ever the same—so we should attempt to replicate that.
Additionally, as you’re lifting up the blue pigments, you don’t have to get them all. In fact, leaving little hints of blue behind will only add to the textures of your clouds.
Once you’ve stamped out your cloud shape, move on to the next step before the blue wash above the clouds dries. -
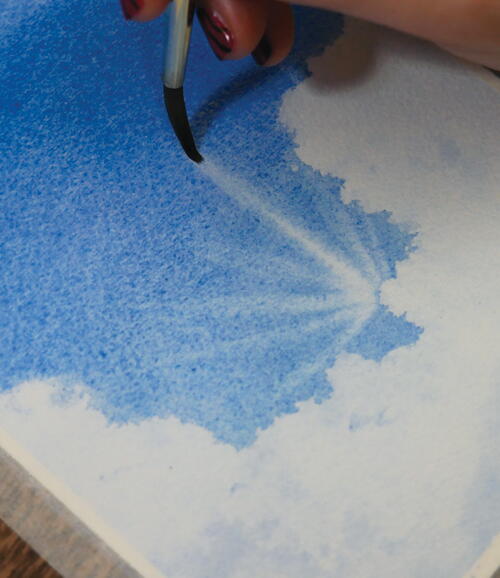
STEP 3: THE SUNBEAMS
We’ll create the sunbeams by using a thirsty round brush to absorb pigment off the paper. Grab your size 6 round brush, and make sure the brush is clean and thirsty. Press the tip of your brush into a spot just above the cloud shape you stamped out, somewhere near the middle of the painting. Drag your brush straight up, lifting the pigments as you go, to create a sunbeam. More than likely, you’ll need to make multiple passes of your brush for each sunbeam. So, make sure to clean your brush off on a paper towel or rag every single time, removing it of the pigment you just absorbed off the paper. If you don’t clean off your brush in between each pass, you won’t lift pigment but instead will apply it to the paper.
Lift out sunbeams in multiple directions using your thirsty brush, making sure to vary the lengths of them. If the sunbeams are all the same length, they won’t look real. Variety is the key to recreating natural settings!
Once you’ve lifted out enough paint to make your sunbeams nice and vibrant, let the entire layer dry before moving on. -
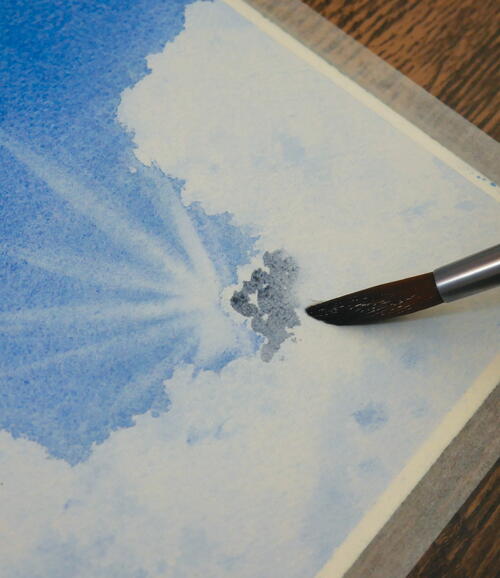
STEP 4: THE CLOUDS’ SHADOWS
Now, you can certainly leave your clouds nice and white if that’s the way you like them. If so, skip this step and move on to the next one. If, however, you want to add shadows to your clouds, keep following this step. In my opinion, painting in shadows creates more depth and dimension.
So, start by grabbing your size 10 round brush and loading it up with light- to medium-value Payne’s gray. Leaving a little white on the edges of the clouds, paint in some Payne’s gray, roughly following the edges of the clouds you stamped out. Since the sun is shining brightly behind the clouds, there is bound to be a bright white border reflecting the intense light of the sun. Right behind that bright border, however, will be a shadow.
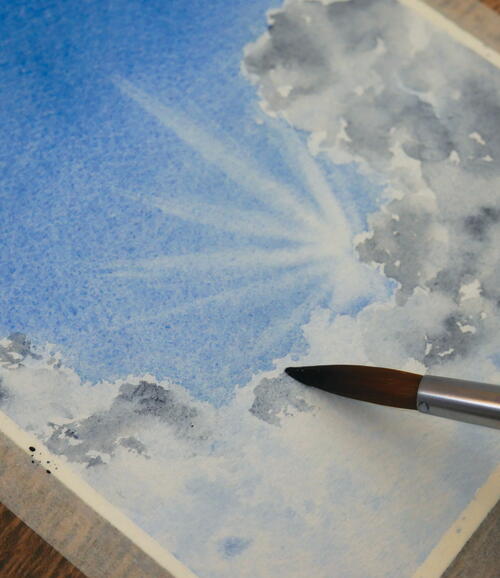
Before this small wash of Payne’s gray dries, clean off your brush and dab it on a paper towel until it’s damp. Run this clean, damp brush along the edge of the Payne’s gray, softening and blending the edges. Repeat this process throughout your clouds, using various values of Payne’s gray. Leave some edges harsh and soften others. It’s all about variety! Increase the value of your Payne’s gray paint as you approach the fluffy clouds in the bottom corners. This increase in saturation will create the illusion that those portions of the clouds are closer to the viewer, once again adding depth to your painting.
You’ll need to work in small sections. If you paint too large of a section of Payne’s gray, you risk it drying before you can return to soften some of its edges. Applying paint, cleaning your brush and then returning to soften and blend edges requires quite a bit of manual brushwork, but it’s worth it in the end.
Have fun with this part! One of my favorite things to do while watercolor painting is to watch the pigments flow into clean water, eliminating the sharp edges of the previous brushstrokes.
Let dry before continuing on to the city skyline. -
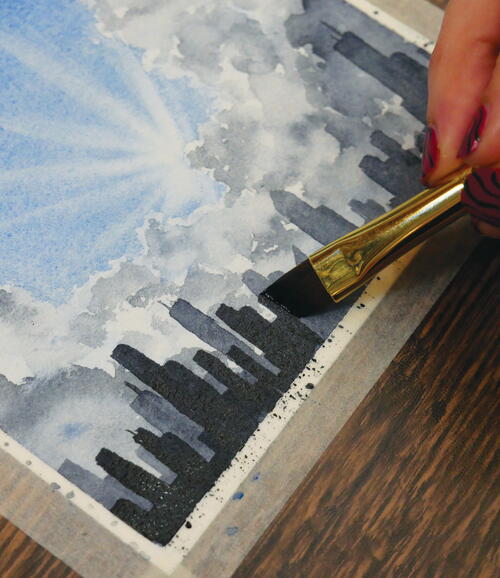
STEP 5: THE CITY SKYLINE (LAYERS 1 & 2)
Pick up your size 3/8 angled or flat brush, and load it up with medium-value Payne’s gray. Tilt the brush on its side so that you paint with the flat edge of the bristles. Similar to how we use the shape of our round brush to our advantage to paint the tips of trees, we’ll be using the flat, square-like shape of the angled (or flat) brush to paint our buildings.
Begin on one side of the paper, moving from left to right (if you’re right-handed) or right to left (if you’re left-handed). That way, as you move, your hand won’t smudge what you’ve already painted. Paint in various sizes and shapes of skyscrapers, some with flat tops, some with angled tops and some with little antennas sticking out. Again, be mindful to add variety. If you paint skyscrapers that are all the same size/ height, it won’t look realistic and will make your painting appear stiff. Let this first layer of skyline dry before moving on.
Now, load up your angled (or flat) brush again, this time with dark-value Payne’s gray. Repeat the same process of painting skyscrapers and various-size buildings all the way across the bottom of your paper. These buildings should be a bit larger than the ones you previously painted, as they are in front of and closer to the viewer than your previous layer. Once done, let dry.
Adding in silhouettes of skyscrapers can be quite fun! I find the repetitive motions of the brush to be relaxing. -
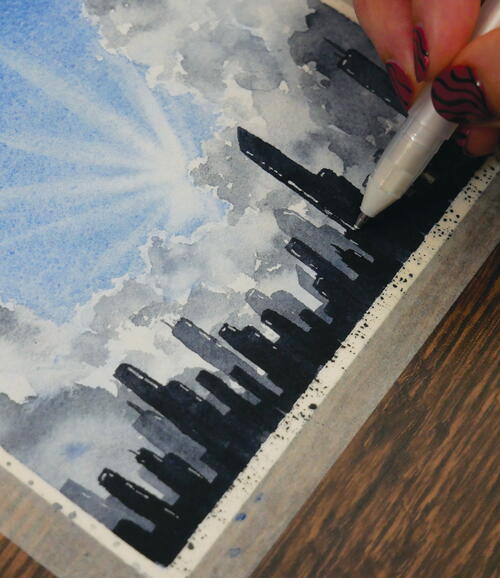
STEP 6: THE FINAL HIGHLIGHTS
For some final highlights, pick up your white gel pen or a small brush with white gouache. Draw paint in some lines of various lengths along the sides and tops of the skyscrapers, demonstrating the light of the sun reflecting off the buildings’ surfaces.
Credit:
Reprinted with permission from Stunning Watercolor Skies by Rachael Mae Moyles. Page Street Publishing Co. 2023. Photo credit: Rachael Mae Moyles.
Read NextHow To Paint On Glass